

For our second game of 2024, Dan and I would start with PB4 Killean's Red from Pegasus Bridge. Spreading out that map brought back memories of playing the Coupe de Main CG back in 2014. My playing of the Pegasus Bridge CG remains as one of the greatest ASL memories. Dan had not played any of the Pegasus Bridge scenarios, Killean's Red was an excellent introduction to this scenario.
.jpg)
Designed by Tim Van Sant, PB4 Killean's Red covers the actions of the British Ox & Bucks as they dealt with sniper fire. A German sniper in the steeple of the L' Eglise De Benouville. The sniper was severely restricting British movement and something had to be done to eliminate him.
The British moved up the walls surrounding the church, but were pinned down. Private Killean with the British troops grabbed a Piat and successfully hit and killed the sniper.
Unfortunately, this particular sniper was not alone and other snipers would continue to plague the British throughout the afternoon of June 6th.
I had played this scenario once before in 2011 and lost as the attacking British. I would play this time and lose as the defending Germans. Apparently, I should not be drinking Killian's Red!!


This scenario takes place on a very small portion of the Pegasus Bridge map. Elevation changes, slopes and barbwire fences will require some study before you begin playing. They will all factor into the game. ROAR currently has this Scenario with 63 British wins to 31 German wins. Having lost it with each side, it would be difficult for me to say that one side has the advantage. But, it clearly favors the British. The German player needs to make the most of his HIP opportunities. I didn't do a good job of that in our playing. The objective of the game is for the British to knock down the German Sniper from a SAN of 5 to a SAN of 3 by securing the steeple location and also controlling 15 building locations in the German setup area.

As the defending Germans, I would command elements of Panzerpioniere Kompanie I, Infanterie Division 716. My force would consist of 4 x 4-4-7's, a 2-3-7 and a 2-3-6 led by a 8-1 and a 7-0 with an MMG and LMG.

As the attacking British, Dan would command elements of the 7th Battalion, 5th Regiment, 6th Airborne Division. His force would consist of 5 x 6-4-8's and a 3-3-8 led by a 9-1 and 7-0 with an LMG and Piat.

And now for Dan's Pre-Game Comments:
"The British must attack and clear the church and 13 other building locations in the village. The plan will be to assault move into the woods and then into close combat. After finding out where the Germans are (there are two HIP squads) then move to capture the church and other locations. Hopefully, the CC goes well."

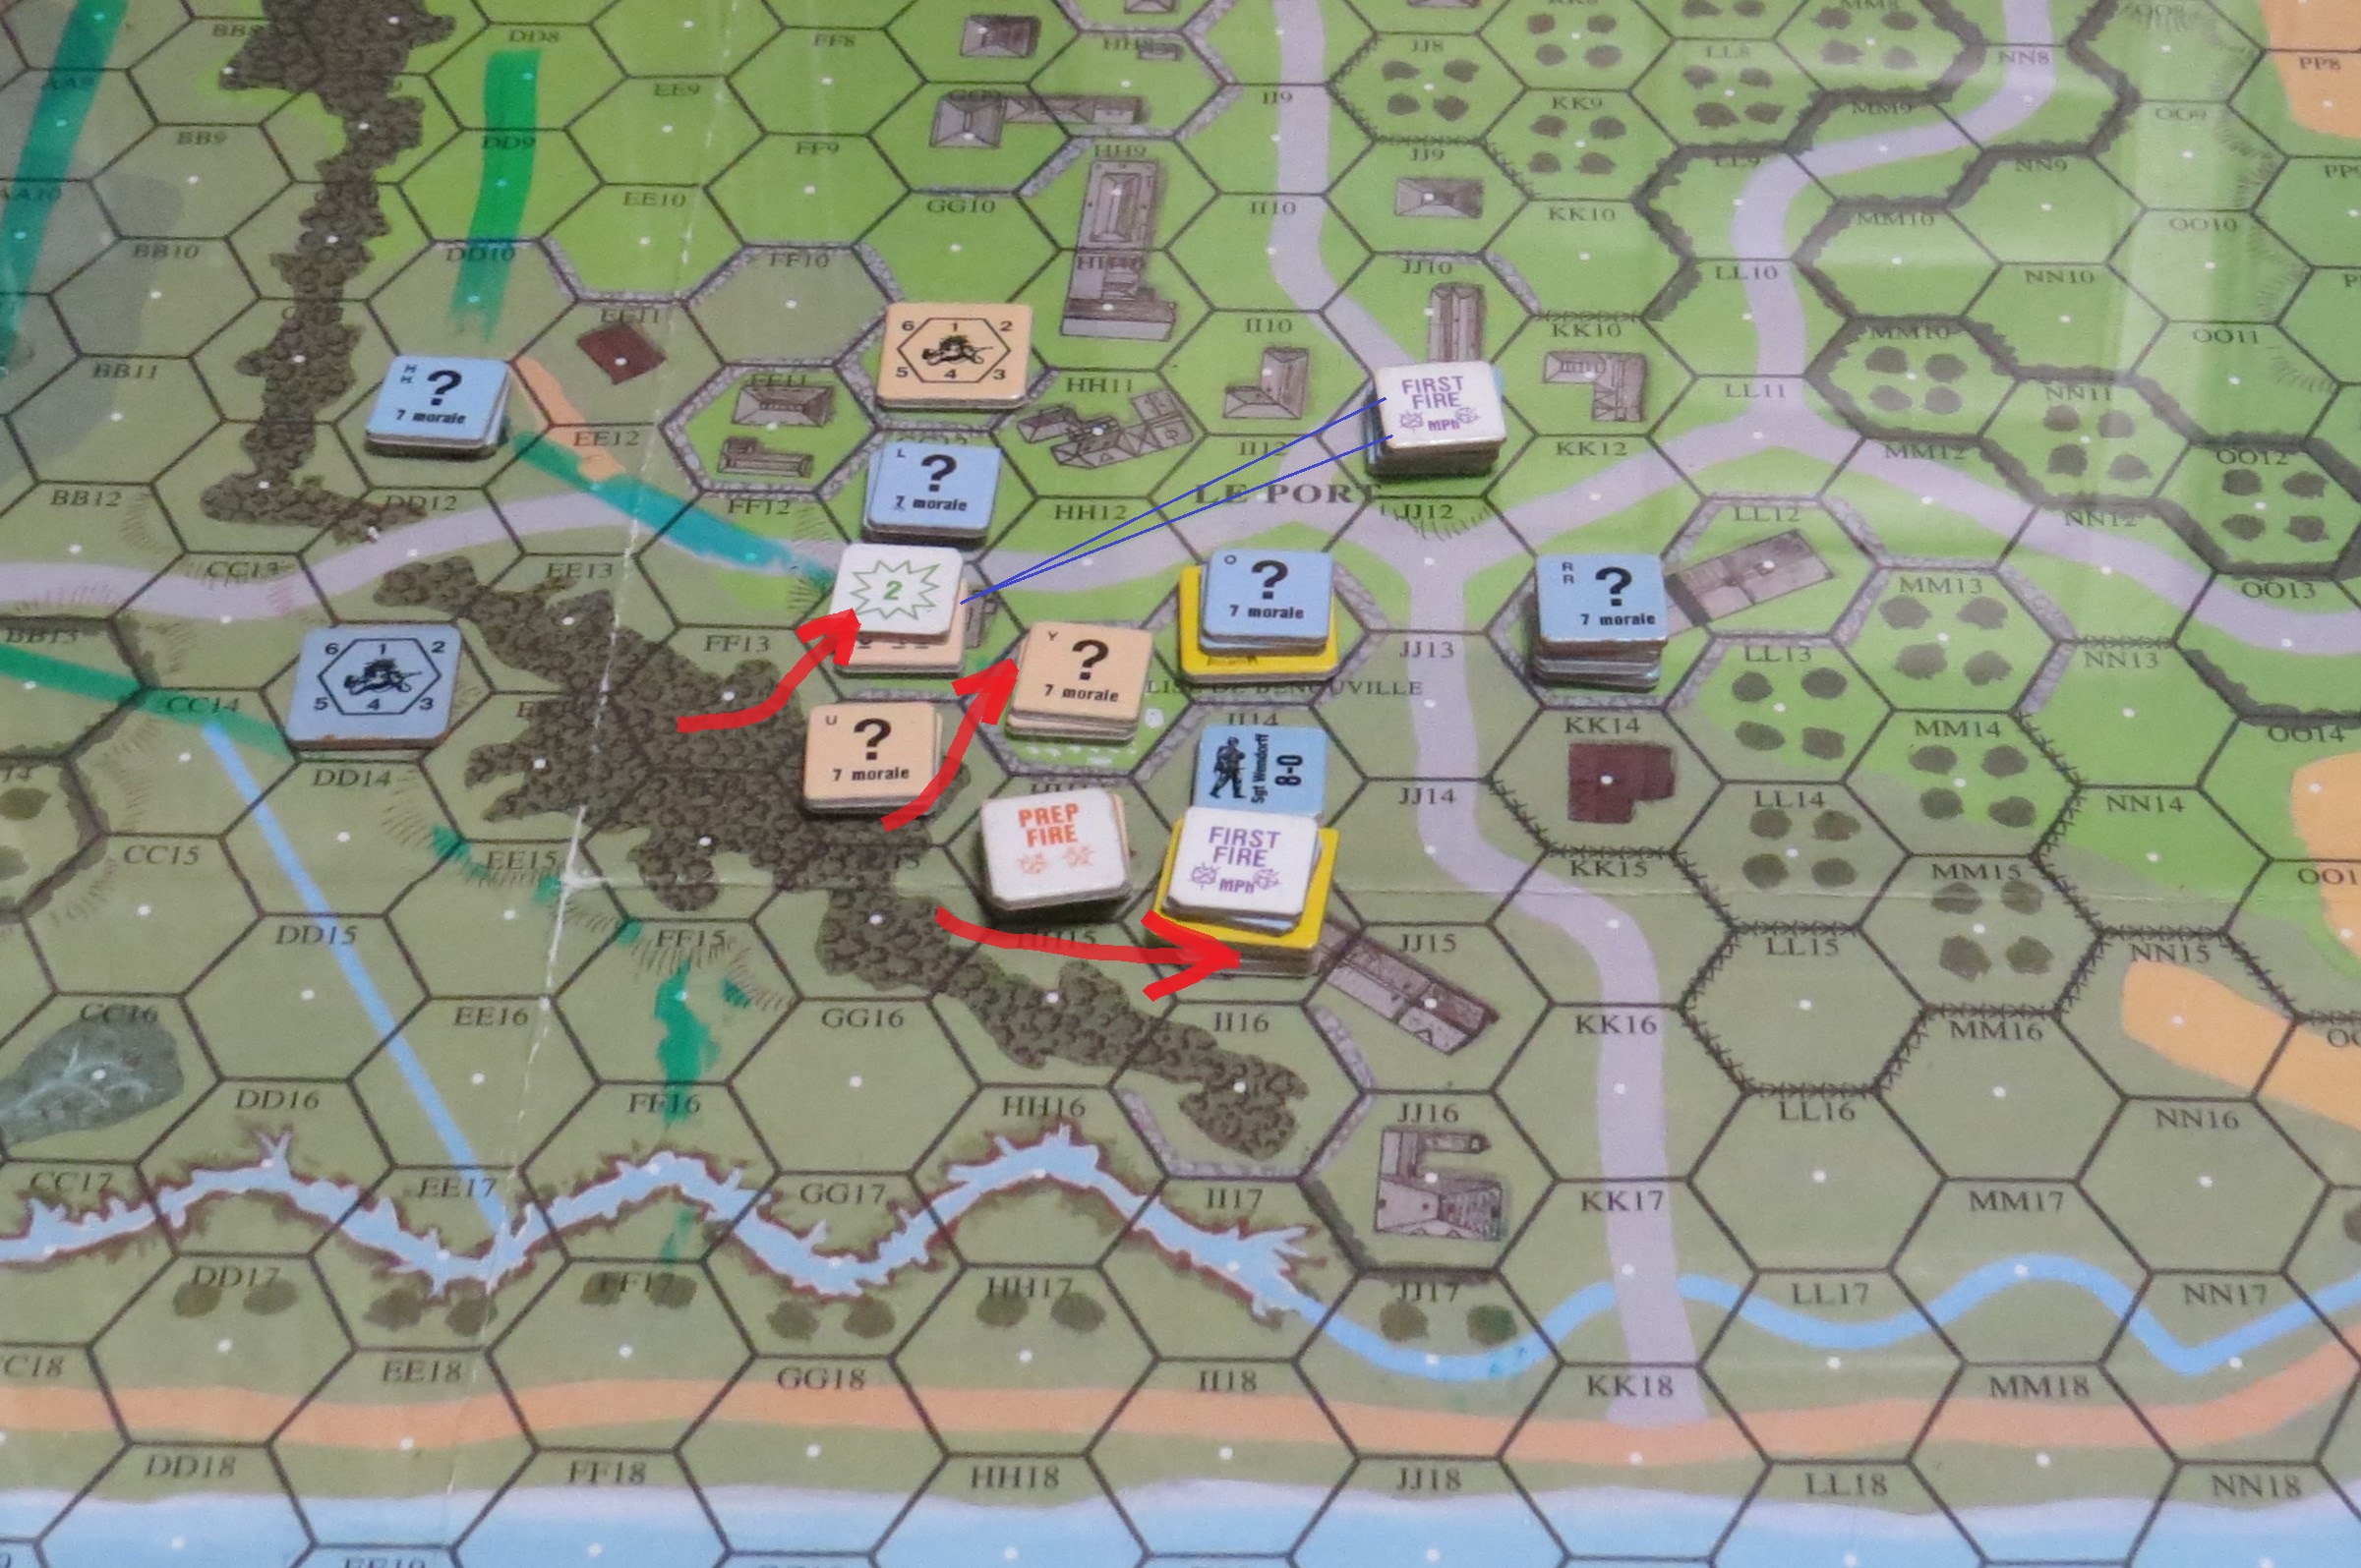
Settling on a defense wasn't easy for me. Dan's British would be concealed and able to move up on me through the woods. I expected that Dan would probably come right up the middle, but also had to defend against a flanking movement on the west edge (top of image). The German force is inadequate to the task and will need a bit of luck to hold the British off.


Turn 1 British - Dan moved in a Schwerpunkt right through the woods. I would unconceal two 4-4-7's and fire...no effect as I rolled 8's. Just great... So, I knew that Close Combat would likely finish me off.


Dan would eliminate one of the 4-4-7's by gaining the ambush and retaining concealment with his 9-1 stack. I was certain that the other 2-3-7 half-squad would be similarly dispatched. But the dice gods smiled on me with a snakes, which killed the 6-4-8 and created an 8-0 officer for my boys.

Had I lost that close combat, it would have probably have given Dan the win early as I couldn't have stopped his advance. Wining that CC would give me a chance to hold on.

At this stage of the game, the British had already lost a 6-4-8 and the Dan would boxcar the Rally for his broken 3-3-8. Just like that the British were down to only 4 squads. I was hurt as well with only 4-1/2 squads in the game.
Turn 2 British - Dan's boys moved up the GG12 building. My 8-1 had abandoned it and move back to avoid getting wiped out in CC. Giving up GG12 would spell my eventual doom.


By the end of Turn 2 Dan had eliminated my half-squad in the steeple. My sniper SAN immediately went form a 5 to a 3 and Dan has achieved the first of his objectives. He was also well on his way to controlling the necessary building locations.


Despite his success, my boys were still holding out and getting in some good licks. I would manage to DM the British 9-1 and both squads with him. Unfortunately, I couldn't take advantage of the situation and throw the British back.


My heroic 2-3-7 and the newly minted 8-0 would be KIA'd. Dan would snake a Piat Shot and kill the 2-3-7.


Dan's 9-1 would rally and then rally his two squads. The British were back in top form and ready to close out this battle.


I had 2-1/2 squads left in the game. It's very tough to stop 6-4-8's in an urban environment.


Turn 5 German - Dan makes his final movements and secure the necessary building locations for the win. A good game and some better defensive choices on my part might have given me a better chance. If I play this a third time...just maybe I'll know what I'm doing. Congratulations to Dan on a good win.

And now for Dan's Post Game Comments:
"The plan worked. After taking some casualties in CC the British then started taking buildings and eliminating German units. The VC with building location control mean you do not get them until the building is cleared. This scenario is fun to play on the historic map, but very hard on the Germans. My thanks to Grumble Jones for a great game of HASL!"

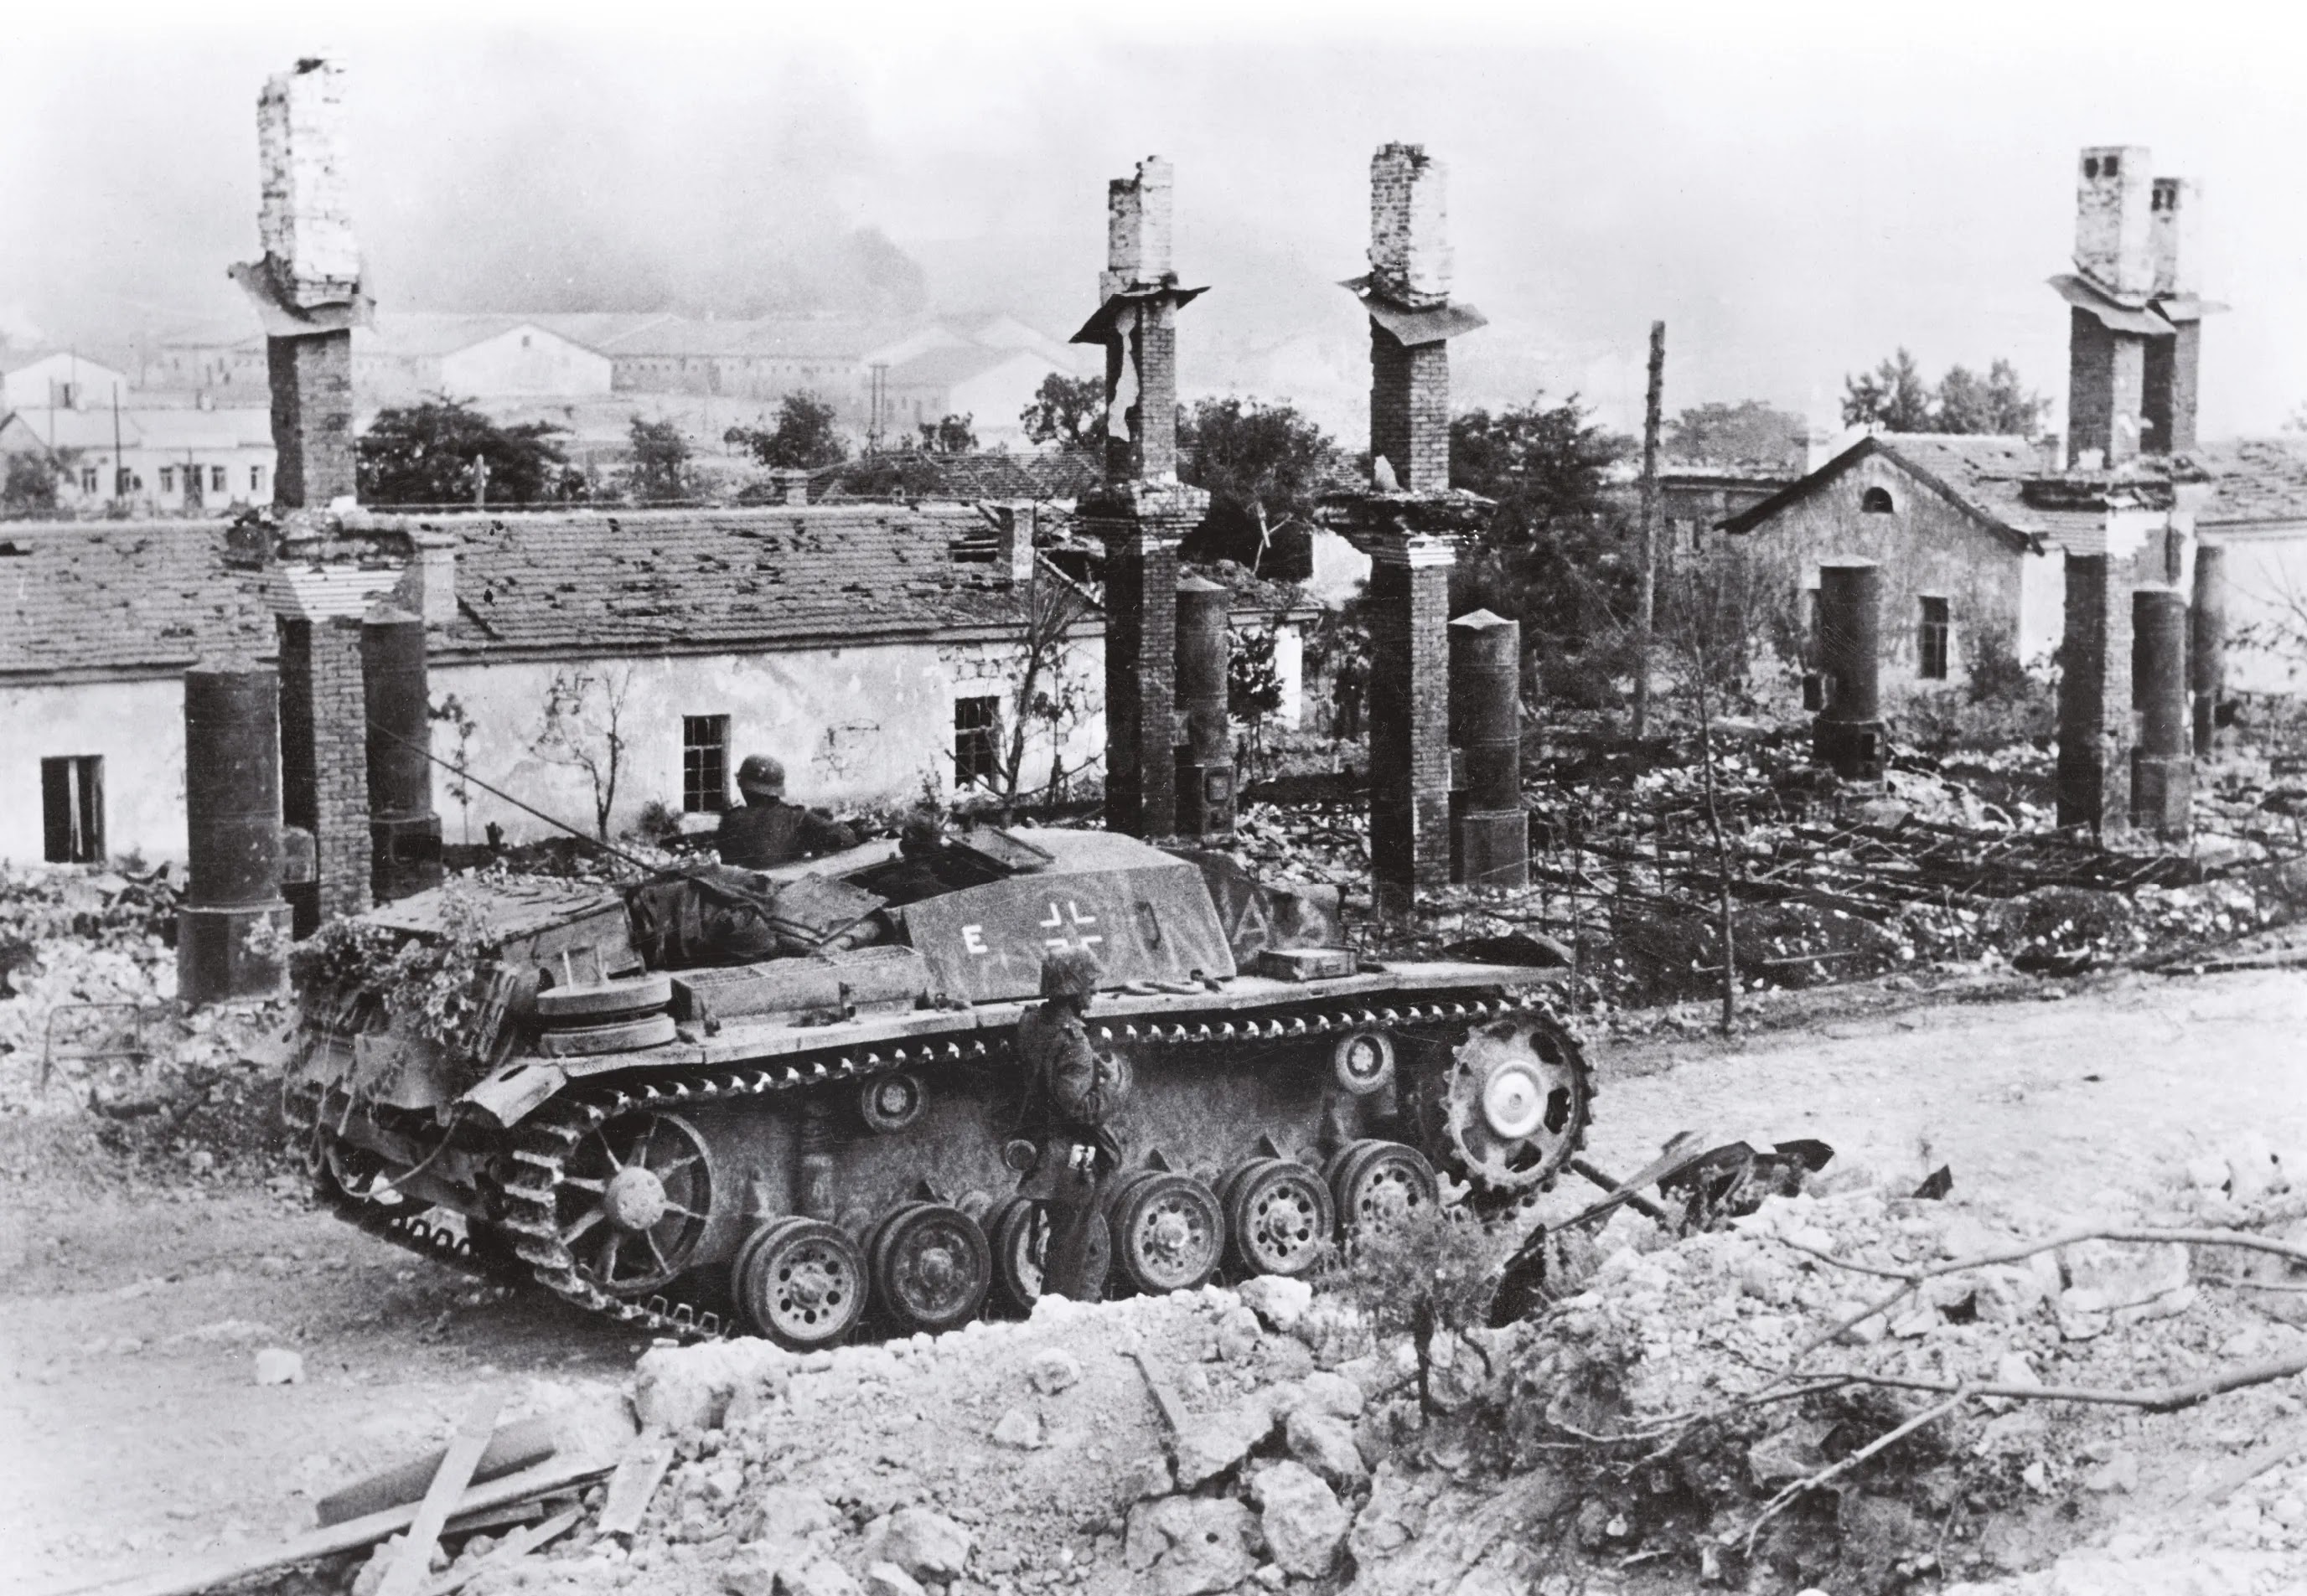
Our second game of the weekend would be RB2 Blood & Guts...one the big boys of Red Barricades. While I am not a huge fan of urban slugfests, Stalingrad based games do catch my attention. I have generally really enjoyed most of the games I have played in that setting. So, I was excited about playing Blood & Guts. The squad count is impressive on both sides and the fighting is truly up close and personal with absolutely huge firepower. It's a tour de force of flamethrowers, HMG's, and DC's.
.gif)
I have to say that no other scenarios that I have played match the intensity and ferocity of the Stalingrad scenarios. They are another level.

This also includes setting them up. Good grief, I always forget just how massive the maps really are for Red Factories.

I had to bring in one of our large folding tables, which I normally utilize for miniature games.

The Red Factories maps transport the player to the actual environment of the battle. Playing scenarios on them is a treat.
I recently added a new volume to my Stalingrad library. Along with my Jason D. Mark tomes, it has proven invaluable in navigating the city at the time of the battle.
RB2 Blood & Guts is a Charles Kibler design set in the Barrikady near the end of October. At the time, the Germans were still pressing hard to secure the factories and complete the capture of the city of Stalingrad. They were close and von Paulus knew it...but he also knew his force was degrading daily and soon would lose the power to advance. He had to continue to strike hard and dislodge the Russians before his army was exhausted.
As we all know, he would not succeed. Playing these scenarios really lays bare just how difficult was task von Paulus placed before his weary grenadiers. A factory too far...

The battlespace for RB02 Blood & Guts.

As the attacking Germans, I would command elements of Infanterie-Division 389. My force would consist of 7 x 8-3-8's, 12 x 5-4-8's and 15 x 4-6-7's led by a 10-3, 9-2, 9-1, 2 x 8-1's, and 3 x 8-0's with 2 x HMG's, 2 x MMG's, 8 x LMG's, 3 x Flamethrowers, 6 x DC's and 3 x STUG's.

As the defending Russians, Dan would command elements of the 138th and 308th Rifle Divisions. His force would consist of 10 x 6-2-8's, 9 x 4-5-8's, 4 x 5-2-7's, 9 x 4-4-7's and 2 x 2-2-8's led by a 10-2, 9-1, 8-1, 2 x 9-0 Commissars and a 7-0 with a 50 CAL HMG, 2 x HMG's, 2 x MMG's, 6 x LMG's, a Flamethrower, 2 x DC's, a MOL-P, and a 76L ARTy.

"This game is smash mouth ASL. The Russians must defend the factories and some surrounding buildings. The plan will be to build a defense in depth in case the Germans break the line. Hopefully the reinforcements can get into the fight."

Prior to play, the German player secretly selects one of the two Victory Objectives. I would select option B - win at game end by controlling Building K22 and at least two other multi-hex buildings in the Russian setup area. The circled buildings were my ultimate objectives. Dan would set up a defense in depth and elected not defend the top circled building. I certainly understand not defending it, but it would give me one of my two needed extra multi-hex buildings without a fight. Of course, Dan had no idea which of the two victory objectives I had selected.


Turn 1 German - my PREP Fire would be an embarrassment as my dice just cuckolded me into submission. I rolled boxcars on the wind change and heavy rain would start. My flamethrowers would do very little and my second 12 would eliminate one of the three. My 10-3 with both HMG's wouldn't get rate and the Russians were laughing at me as I switched to the movement phase.

My rolls were so bad that I was disheartened about even continuing the game...and I had even gotten to the movement of Turn 1. For some reason, I was just really high struck for this game and didn't calm down until the end of Turn 2. Dan was subjected to me bemoaning my wasted existence.

Yep..it's in the rule book...

Moving on to the movement phase, I went ahead with my attack. Dan's boys would smack me around a bit, but I would succeed in getting a breach with DC. But my 8-3-8's had been hit hard.


My STUG's entered the fray and fortunately only one of them bogged.

At the top of the picture, I would manage to get a German unit into a fortified location in the adjacent factory. I could afford to lose control of the Q14 building. So I planned to hold the line there and move troops forward only if the opportunity presented itself.


Turn 3 German - during his part of Turn 2 Dan would skulk troops out of harm's way and take shots at my boys moving into the K22 building. I would press my attack and get my STUG's into the game. I had been pushed out of the K22 building, but would strike hard again with my massive firepower kill stacks. I would also break Dan's 10-2 who with an HMG and the 76L ARTY had been doing a great job of defending the K22 building from M22. This would open up the avenues of approach to K22. It was the turning point of the game.


With the 10-2's demise, my Grenadiers would flood into the K22 building and the I22 building next door. The window for victory was opening.

The 10-2, 9-2 and 9-1 were keeping my boys in the fight and laying down tremendous firepower on Dan's dug in Russians.

Only a single 6-2-8 remained in K22 as my Grenadiers occupied the building. Dan's 10-2 would route upstairs. The and the other broken units would perish on the 1st level. The broken squad in I23 would head for the cellar, but also discover it was to be its tomb. That peculiar moment in ASL where the momentum shift moves hard to one side had occurred. Two turns earlier, I was convinced that this game would end as a Russian victory. Dan even suggested that I go ahead and concede as the game was a bit of a grind with the heavy rain and fortified locations everywhere. I banished the thought and suggested we play until 8:00 PM and then see which side had the best chance for victory. That was also the four-hour mark for our game.

I hadn't believed it earlier, but as we continued, I could see that victory was very possible.

Dan was not sitting idly by as I flooded into K22. His reinforcements were moving up and into the fight.


Dan counterattacked inside the K22 building and sent after me in close combat. He would casualty reduce my 5-4-8, but in the following PREP Fire, I would shoot into the melee and break the Russian squad. Dan also rushed my STUG with my 9-2 Armor Leader. He managed to break the attackers with Intensive Fire. The STUGs were providing the added punch my weakened attack needed. It had been a very tough and vicious fight to get into K22, but I was winning the war of reinforcements.


My next assault would carry the K22 building except for a single 6-2-8. The reinforcing Russians had been rebuffed and the MOL-P had fired and missed my other STUG on two occasions. I would also secure the I22 building as well as the M22 building. At the top of the map, I was once again in that factory and attempting to keep Dan's boys occupied up there and not be able to reinforce the other sector.


With the hour late and deep into the game, Dan would do the math and give the concession. The Germans had control of the K22 Building and 2 additional locations and were presently on the path to taking one or two more. The available reinforcements were effectively interdicted by German machine guns and the need to hang on to the top of the map compelled Dan to give the concession. The earlier momentum shift never switched back to the Russians. The Germans were holding at the top of the map and had finally gotten control of the K22 building and environs. All three STUG's were still in the fight and the weight of Geman firepower was decisive.

My Grenadiers had secured the win but paid a heavy price in casualties. A few more wins like that and the Germans would be no more in Stalingrad. My thanks to Dan for a tremendously fun ASL weekend. We changed things up a bit with back to HASL games. And you will see much more of that this year. We both have a desire to get some playtime with our many HASL packs that have been too long neglected.

And now for Dan's Post Game Comments:
"The plan did not work. The Germans had some trouble initially but as the Russians lost concealment the German firepower was able to tell. It has been said HASL games have no movement and they are all assault movement and advance into CC. That was the case here and the Germans cleared Hall 7 and the needed nearby multi-hex buildings. Well played by Grumble Jones! Defense in depth does not work the Russian must make each building a fortress."

That's a wrap from the Barrikady!
Dan and I will return next week for more Pegasus Bridge action and from the Fox Hill HASL map from LFT.
Should be a great ASL weekend...
(aren't they all!!!)

We will see you then!
No comments:
Post a Comment