Wow...2022 is just a couple weeks away from becoming 2023. It has been another outstanding year for ASL. So many great games and some really enjoyable moments. I would manage to get in 110 games for the year...which is an outstanding total. We'll talk more about the year in the 2022 Year End Post, which is a few days away from being posted.
You might have noticed that there was a bit of a lull in AAR's being blogged. In fact, I haven't blogged an AAR since Thanksgiving. There were a couple reasons for this. The quality of the games here at the end of the year has not been great. Dan and I would play a few blowout games with the concession given after three or less turns. Those are not great games to blog. And in pretty much each of those instances, dice were the culprit. In fact, a couple of them were just downright dicing affairs. Really nothing kills a competitive game quite as effectively as bad dice rolls.
Let's do a quick run through of the games played since last we spoke.
Today's AAR will cover the last three games: The Tombe Diversion, Castello Fatato and Stand at Sterlin's castle. A few of these were small scenarios and bad dice are not a good thing in a small scenario. So, we will end the year with 10 games. Dan would win 6 and I would win 4 as we came to a halt at the 2022 ASL Station.
The first of the three games for this AAR post is Q27 Stand at Sterlin's Castle. Q27 is another one of George Kelln's outstanding Quick 6 scenarios. These fast playing scenarios are ideal for evening play during the week.
Q27 is set in San Leonardo, Italy and deals with a somewhat famous battle near Ortona. Canadians troops would find themselves faced with heavy German attacks. An Italian villa would be defended by men of the Royal Canadian Regiment led by Lieutenant Mitch Sterlin.
Sterlin's band of brothers would repel several German assaults before withdrawing. The villa would be forever remembered as Sterlin's Castle.
A current view of Sterlin's castle.
Sterlin would not survive the war.
Historically, Sterlin's men would give a great account of themselves and knock the Germans around a bit. I wouldn't be quite as successful.
As the defending Canadians, I would command the men of the Company A, The Royal Canadian Regiment, 1st Canadian Infantry Brigade. My force would consist of 4 x 4-5-7's led by a 9-1 and a 7-0 with an LMG, 51 MTR, and 2 x Foxholes (roll for these per SSR).
.JPG)
As the attacker, Dan would command the men of Panzergrenadier Regiment 200. His force would consist of 3 x 4-6-8's and 4 x 4-6-7's led by a 9-1, 8-1 and 7-0 with 2 x MMG's and an LMG.
And now for Dan's Pre-Game Comments:
"The Germans must attack and capture the building on Board 9. The terrain is open and difficult to move across. Three 4-6-7 squads will enter with the 9-1 and all three MGs. They will take up a fire base position on the crag at level 3. The 8-1 will lead two 4-6-8 squads and 2-4-7 HS along the west flank. The 7-0 will lead a 4-6-8 and last HS on the east flank. Hopefully the 8 morale troops can cross the open ground to close with the Brits."
The Canadian setup is restricted to 2 hexes or less from hex Z3. I'm going to say upfront that this setup was hard to work with. The Canadians begin the game outside of the very "castle" that is the object of this scenario. Personally, I feel like this restrictive setup gives the Germans a significant advantage. It would also be nice if the Canadians had an MMG. Tough to muster any real firepower against the Germans can bring considerably more to bear during the fight.
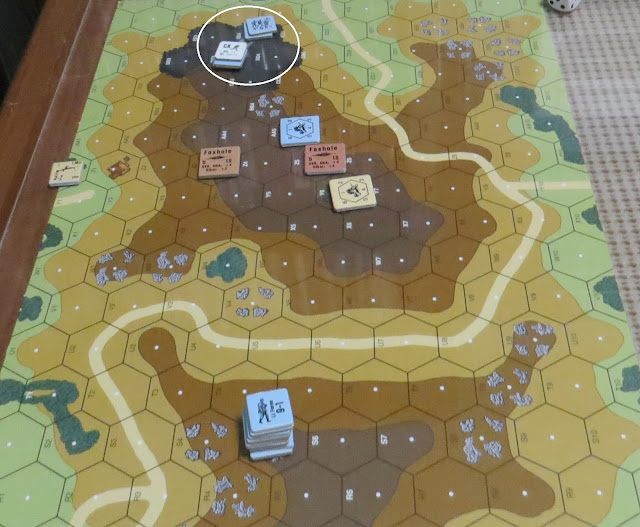
Turn1 German - Dan sends the half-squads at me. One is KIA'd and then a squad is broken along with the 7-0. His main kill stack suffers a few Pins But on the right side, The Germans easily move without detection. British setup makes it impossible to stop this.

Turn 1 would see the best performance of my single Bren gun.
With the Germans on the left and center temporarily rocked back on their heels. I send my boys into the "castle", while my mortar team ascended the adjacent level 3 hill position.
We skip ahead a bit to Turn 3 German - so, at this point, the Canadian sniper had KIA'd the German 8-1 on the right flank, but the two 4-6-8's essentially ran the gauntlets of fire unscathed. One would eliminate my 2-4-7 /MTR team on the Level 3 hill, while the other one made it behind my 4-5-7 in the foxhole by the mortar. And the 9-1 kill stack was all rallied up and sitting pretty at 26 firepower.
In my part of Turn 3 - I got smacked hard and my 9-1 and LMG squad were broken. My 4-5-7 in the foxhole by the level 3 hill had also broken and been eliminated for failure to rout. My 7-0 and a squad would successfully reach the castle. But at this point in the game I had only 1-1/2 unbroken squads with a 7-0 leader vs. 6 x German squads.
"Get in the castle lads!!! Jerry's right on your heels!!!"
Turn 4 - Dan's 7-0 would move up the left flank to eliminate my broken 9-1 and his LMG squad. The German 9-1 (26 factor) kill stack would now completely dominate the battlefield. The German 4-6-8's moved up to assault the castle.
"Mick...I think Jerry inside the castle.." "Shhh...Allen...mate...they'll hear us...we need to stay concealed...Grumble Jones sucks at CC."
Turn 5 German - My forces were shattered and dead on the field. A single squad and the 7-0 were all that was left of my force. I would fail to get any results shooting at Dan's force after Dan forced me to take a pin check and lose my concealment...oh and I would of course pin...so I couldn't move into close combat or go upstairs. Dan's dice were giving him opportunity and my dice were taking it away.

Turn 5-1/2 - Dan's two 4-6-8's (who had run all over my left flank) were now in the castle and would win ambush and wipe me out. From Turns 4-5-1/2 it was all German and became a pretty unfun game for me as I watched my boys just be annihilated. Obviously, a great win for Dan. Dan's aggressive play style paid off handsomely. His crazy flanking movement survived all my shots as I couldn't get get its even with -2 and those hits that landed, he easily made the morale checks. One of the key aspects of ASL has always been the deterrent effect of moving in the open in front of your enemy. The -2 modifier is enough to dissuade most folks from taking the risk...because an average roll of 7 becomes a 5 and even at 2 factors is an NMC. But opponents like Dan, don't care, because they understand that all rolls a random and they are willing to take the risk, because it pays off more than it doesn't. That is particularly true against me. I struggle wth bad dice rolls and watch my opponents just walk right up to me in the open. I hate it...I really do. We all know that in reality the defenders would easily hold their position. ASL usually models that pretty well, but if you don't get average to good rolls in Defensive Fire, you're done.

And now for Dan's Post Game Comments:
"The plan worked. It was a close run thing. With the 8-1 and two HS being KIA and one 4-6-7 squad ELR reducing. But they were able to cut the route paths for most of the British units and get into the building to win a 3-2 CC for the win. This scenario is difficult for the British who must set up outside the victory building and get units inside for the win. The German firepower is high and can keep that from happening. Like all small scenarios victory goes to who get the best dice. My thanks to Grumble Jones for a great game!"

Our second game for this AAR would be ASL Scenario 273 Castello Fatato...which means shot down while charging through the snow...if case you were curious. You know those scenarios, that after read the card...you say to yourself..."oh man this one will suck". Sometimes you're right and sometimes you're wrong. Designed by Steve Petersen and Brian Youse, this scenario takes us to the disaster that was the Italian Army as it retreated from the debacle at Stalingrad. Mark Pitcavage's Few Returned Action Pack covers this period pretty well with some grim scenarios. It's tough to play the Italians on a good day...let alone in the despair of Stalingrad with your '2' ELR. A '2' ELR is never good for me where I usually roll poorly on MC's.
This scenario has some interesting SSR's. It's a night fight in the snow and the Italians must setup and conduct a Turn 1 Human Wave assault with the entire force. Oh joy...
I get to send my Italians (I would be the Italians in this one...because of course I would be) into a Turn 1 death charge against Russians in nice warm buildings. Can't I just concede now and move to another scenario that doesn't guarantee me being slaughtered. Well at least we can get it out of the way early...as I imagine by Turns 2 or 3, I'll be pretty much wiped out.
I complain a lot about playing the Italians. I dislke the Red to Hit numbers, the poor morale, the poor firepower and usually very poor ELR. Not a great combination for a competitive game. If we're just playing out the history...cool...it's interesting to put yourself in that desperate moment that real human beings found themselves trapped in with no chance of just conceding and call it a day.
My lifetime record playing as the Italians is 20 and 12. So, despite my moaning and groaning...I have a winning record as the Italians. Strangely enough...
The battlespace is pretty contained. If the Italians can survive Turn 1, they may have a shot.
As the attacking Italians, I would command the men of 3 Compagnia, 3 Reggimento Bersaglieri and 172 Compagnia Cannoni Controcarro. This force would consist of 20 x 3-4-7's and 2 x 2-2-7's led by an 8-1, 7-0 and 2 x 6+1 (cause why not...2 ELR and 6+1 just go together) with an MMG, 3 x LMG's and 2 x 47 AT Guns.
As the defending Russians, Dan would command the men of the 1st Guards Army. This force would consist of 2 x 6-2-8's, 6 x 4-5-8's and a 2-4-8 led by an 8-1 and 7-0 with an HMG, 2 x LMG's and a 50 MTR.
And now for Dan's Pre-Game Comments:
"The Russians must defend the church on the steppe. The two 6-2-8 squads will set up HIP in the cellar locations. The 8-1 and HS with the HMG will set up in the steeple. A 4-5-8 squad will set up in each ground level location and the level 1 location not burning. The MTR will set up in location to fire on units approaching the victory building while the last two squads each with a LMG set up flaking the building to lay crossing fire lanes. Hopefully we can break enough Italians to keep the close combat to a minimum, and win the CC."
So, there I was...thinking to myself...why am I playing this scenario. The primary reason is that Dan chose it and is working hard to complete all of the official MMP scenarios. So, I'm game to help Dan meet that goal, which he will knock out next year. This of course means playing a few scenarios here and there which are not my "fun" zone.
By SSR - my Italians have to launch a Human Wave Assault and rush towards the burning building and get cut down in its illumination. And won't that be fun. This picture shows the two or three impulses. My two guns were marked with Opportunity Fire markers. They would wait to shoot at whatever Russians start shooting.
"Andrea...why are we doing this!?!" "Stefano...because of the SSR." "You know Andrea...we're going to get shot crossing this field!" "Well...hopefully that will finally shut you up!!!"
The chatter of a HIP HMG directed by the Russian 8-1 in the steeple would silence Andrea's and Stefano's voices for ever as they died together with two full squads in front of the HMG. Dan's first shot would kill 1/10 of my entire force. Other Italians would break and ELR as predicted with a '2' ELR. I would ELR several squads in the course of the game. Nothing fun about getting slaughtered in ASL.
Turn 2 - my human wave continued and still more Italians would be broken and killed. But I would enter the buildings.
Lately, I have struggled mightily to win close combats. It's always been an affliction and a really bad spot in play. Both of my primary opponents enjoy close combat against me...because I can be counted to roll between 8-12 fairly consistently. Tonight would be no different. I would lose every close combat but one...and all my boys would die in that one anyway...
You may recall at the beginning of this AAR, I had predicted that Dan would waste my boys by Turn 3. He didn't get rate of fire as much as he normally does and so the HMG wasn't hitting multiple targets. And the Italian AT Guns were managing to PIN Dan's 8-1. The guns would soon show their worth.
I would MALF one of my AT Guns on a 12, which in Extreme Winter removes the gun from play. That's was fun. My attacks would continue with more breaks and deaths along the way. Dan's two 6-2-8's were still hidden, but I knew they were in the Cellar of the victory building.
And let's talk about that. So, the Russians get HIP, they get a fortified Cellar, illumination and a nice HMG to blow everyone away. You'll have to forgive me if I just like everything was put in place to ensure a Russian victory. First, the Italians get massacred crossing the open ground...which takes longer because it's deep snow. Then, they are a disadvantage in close combat with just three factors. So even, if they take the ground level and upper levels of the victory location. The Russian player can just leave the 6-2-8's in the fortified cellar. All shots against them will be a +5 (+3 stone building, +1 Fortified, +1 night) and they are concealed...so half that. So let's say the Italians get the MMG, 2 x LMG's, and three squads with the 8-1. Their best shot will be 17 factors +4. Best possible result is a +2 MC. An average roll of '7' gives you a PIN Check. And unless you pin the 6-2-8's in the Cellar...you can't enter for close combat. Russian return fire will 24 factors +4. You get the drift.

Going into Turn 4, I was just staggering around in the snowy dark. My boys were locked in MELEE and being killed a squad at a time. My 8's and 10's were doing nothing and Dan was generally killing one squad with each contest. I would feed more squads into the MELEES...but to no effect. I was beaten and I knew it...but played on.
With no way to stop him, Dan moved reinforcements into the MELEES. I was a goner.
Turn 5 would see one of the stranger occurences in this or any game of recent memory. I would fire my remaining AT Gun into the MELEE. I had tracked the Russian 8-1 who had left the HMG (the half squad with it had been killed earlier). I would roll Snakes...and then Snakes again. Everyone died in the MELEE...all of my boys and all of Dan's. This was a first for us. But I had cleared that side of the victory location. The level 1 blaze had spread to the other level 1 and this revealed that both Russian 6-2-8's must be in the cellars....which of course they were. But that was the last hurrah. I would lose the two outside MELEES and another squad KIA'd in thevictory location building after a 6-2-8 emerged, ambushed and killed a 6+1 and 3-3-6. With that I gave the concession and Dan had the victory.
Well at least it was over...
The answer is no. I wasn't. I got blown away and still managed to close with the enemy, but then couldn't roll low enough to win the close combats against a superior foe. And even if I had won those...the Cellars were beyond my power to take. I honestly, wish I hadn't played this one. Of course, we always tell ourselves that playing ASL is always great no matter the scenario or the result. But I will say watching a slaughter is usually not very entertaining ASL.
And now for Dan's Post Game Comments:
"The plan worked. This game is hard on the Italians who must take heavy losses to get into CC. By Turn 5 the Russians had three squads left, but the Italians had less. My thanks to Grumble Jones for playing another from the 289 official scenario list."
Now on to the final game of the year... (Game #110 for me in 2022)
Rhianna wouldn't miss the final game of the year!!!
My final ASL game of the year would be from the new Lone Canuck Quick 6 Scenario V pack. This would be the second game from that pack in this AAR. Our selected Scenario would be Q30 The Tombe Diversion. This scenario covers the actions of the 4th Marine Raider Battalion on New Georgia. I would be the Americans in this one and yet again for the second game in a row...be forced to begin the game with a Human Wave...seriously!?! Hadn't I already suffered enough in the previous two games. I finally get some good troops and have to human wave into HIP Japanese and Panjis. Not the way I wanted to end what has been a pretty good year overall. But the coffee here at the end is black and bitter.
If you have not gotten this or any of the other four Quick 6 Packs, I highly recommend that you visit Lone Canuck or Ritterkrieg and pick up some copies.
These are great scenarios for getting into a game quickly and they generally can be finished in 2-3 hours. Perfect for weeknights and anytime you're game time is limited.
Lone Canuck is always of the highest quality. I continue to be a huge fan.
As the attacking Americans, I would command the men of the 4th Marine Raider Battalion. My force would consist of 7 x 5-5-8's, and 2 x 2-3-8's led by a 9-1, 8-1, and 8-0 with 2 x HMG's.
As the defending Japanese, Dan would command the men of 1st Battalion, 229th Infantry Division. This force would consist of 5 x 4-4-7's and a 2-2-8 led by a 9-1 and 8-0 with an HMG, LMG, and 50 MTR. They would aso receive Panjis a Pillbox, and 3 x Foxholes.
And now for Dan's Pre-Game Comments:
"The Japanese must defend the village building and huts. The 9-1 will set up in the pillbox with the HMG and crew. The 8-0 will set up in the building with a squad and LMG. Two squads will set up in foxholes flanking the pillbox and the MTR will set up on the flank where they can fire on jungle. The final squad will deploy and set up in huts. I rolled well enough to conceal everyone. The panji will set up to protect the building and east flank foxhole. Hopefully the Americans take some casualties attacking and in CC."
By SSR, the Americans must human wave on Turn 1. My two HMG's managed to pin the Japanese 8-0 and gave me just enough to make the rush forward. I would lose a full squad KIA'd during the charge, but would get into the Japanese positions.
Close Combat...oh how I hate it. I have a bad habit of rolling poorly in close combat. I couldn't afford to do badly at the beginning.

Fortunately for me, I would do ok. I was in the village and ready to bring my considerable firepower to bear.
A very bizarre series of events would now occur. Dan would send a squad into CC with my half-squad. Prior to that, Dan's 9-1, and 2-2-8 with the HMG had left the pillbox and moved into the vacated foxhole. Dan had set the HMG to defend the west. Having come from the east, I had managed to avoid the HMG and I did hit two Panjjis, but made my NMC's for no problem.
So in CC, Dan rolls a 12...so my half squad decides to infiltrate out of the CC and goes into the now abandoned Japanese Pillbox.
The Japanese squad would have to wonder...where the Yankees had escaped to...
Things were definitely going my way. My dice were average to good and not inflicting pain on me. Dan's boys were missing morale checks and struggling in Close Combat. Dan's 9-1 would break the HMG on its first shot. This opened the door for Marines to crowd him.
At this point in the game things were very pro-American. The Japanese 9-1 and 2-2-8 were killed in Close Combat and only a single striped squad was still holding out in the center. Da's mortar squad harassed me, but the mortar never scored a hit through about 5 to 6 shots. A really dismal performance by that squad.
Apparently, young Takahiro was struggling to master his mortar.
All resistance to the northeast of the village had been eliminated. .Dan only had 2 x 2-3-7's and a 4-4-7 with a mortar left to hold the line.
I pressed my attack and moved cautiously into the line of fire.
Dan's half squads would hold their fire and rely on their concealment.
I was able to strip concealment from one of the half squads in Advancing Fire and then take them down with two squads in Close Combat. American firepower was substantial and such a nice change after yesterday's Italian squads.
With all of the Japanese eliminated in the village, it was time to press home the attack and secure all the huts.
My 9-1 exhorted the Raiders to secure the village and eliminate Takahiro's pesky mortar.
With the village completely under American control, only a single 4-4-7 and Takahiro's mortar remained in the fight.
Sadly, Takahiro would not be able to get any hits.
With the battle nearing its end, Dan would send Takahiro and his squad into a desperate charge to try and take back a hut location. They would die in the Raider crossfire.

With that it was game over and an American Victory. It was a satisfying victory after a last few weeks of less than stellar results on my part. It did feel like a very hard scenario on the Japanese. The Marine Raiders are very tough and coupled with the good luck I had, were nearly unstoppable. It's amazing what you can accomplish in ASL when your dice cooperate.
My thanks to Dan on a great weekend series. Dan would win 2 and I would win 1. It was a great way to end the year. Between the two of us, Dan and I have played in excess of 260 scenarios. Our gaming partnership is one of the greatest joys of my life. I'm extremely grateful to have the opportunity to play so much quality ASL.
And now for Dan's Post Game Comments:
"The plan did not work. The Japanese did poorly in CC and the American firepower was overwhelming. Nice little scenario. But like all little scenario a few bad rolls and it ends quickly. Congrats to Grumble Jones on the win!"
So, we bid farewell to 2022 and look forward to herding scenarios once more in 2023. Dan and I will be back in January and look forward to another great year's worth of ASL. We hope you will join us!
Wishing you all the happiest of Holidays!!!


.JPG)


.jpg)


No comments:
Post a Comment