

This past week was an interesting one for ASL. It was a week without Dan, as he continues to enjoy his vacation. Instead, I played two games against my buddy in St. Louis and Dave Mareske. My STL buddy and I would play a great Starter Kit Scenario S83 Off to Oslo. I'll do a separate AAR on this game later in the week. I don't generally do SK AAR's, but I want to with this game and talk about out Starter Kit itself.
My Saturday Game would be against Dave Mareske, my fellow Kansas City Club Member. Of course, living in Tulsa makes me quite the member at large, but I call the KC Club my ASL home. Dave and I have played 17 games since our first one in 2016. My record against Dave is 4-13. Tonight's game would be a fairly unique scenario.

Our selected game would be TX-5 Rush Hour (designed by Mike Seningen). I played my first scenario from this pack at the 2013 Texas Tournament. I've tried to work in a game from this pack every now and again. It's a very good scenario pack and deserves more attention.
As I hinted earlier, Rush Hour is a very unique scenario. Turn 1 is shared by both players with alternating units. The German player goes first. Going first is often a good thing...but going second may be more advantageous in this scenario. But I'll let you decide for yourself.
After, Turn 1, the player with the fewest VP at that point in the game gets to move first in Turn 2. I would jump out to the lead in our game and this would allow Dave to move first in Turn 2.
Meeting engagement scenarios are difficult to design, but I think Mike nailed it pretty well.

As the Americans, I would command the men of the 80th Infantry Division. My force would consist of 4 x 6-6-7's, and a 3-4-7 led by a 9-1 and 7-0 with an MMG, 2 Bazookas, 5 X Tanks, 3 x Armored Cars, motorcycles, and 5 Halftracks.

The "Blue Ridge" Division would earn its first battle honors in WWI. At the Meuse-Argonne, they would gain their motto, ""The 80th Division Moves only Forward!".
The 80th would land on Utah Beach and go to be one of the work horse divisions of Patton's Third Army. They would see nearly 300 days of action in the drives across France, later at the Bulge, and ending the war in Czechoslovakia. They are also rumored to have fired the last shots on the Western Front.
The Division would participate in Desert Shield and Desert Storm.


As the Germans, Dave would command the men of Kampfgruppe Himmler. This force would consist of 3 x 5-4-8's, and 3 x 4-4-7's led by an 8-1 and 8-0 with 3 x LMG's, 2 x Panzerschrecks, 3 x Armored Cars, 11 x Halftracks.

The key to this scenario is controlling the 27 intersections. Each intersection is worth 5 VP. Grabbing as many as you can at the beginning is critical.

And now for Dave's Pre-Game Comments:
"The Germans are out matched in the armor department so at least the initial strategy will be to let the fight come to them but they also can’t give up too much ground right away. Looks like a fun and unusual beginning to a engagement."

Now, tonight's AAR should not be confused with the less famous Rush Hour movies...
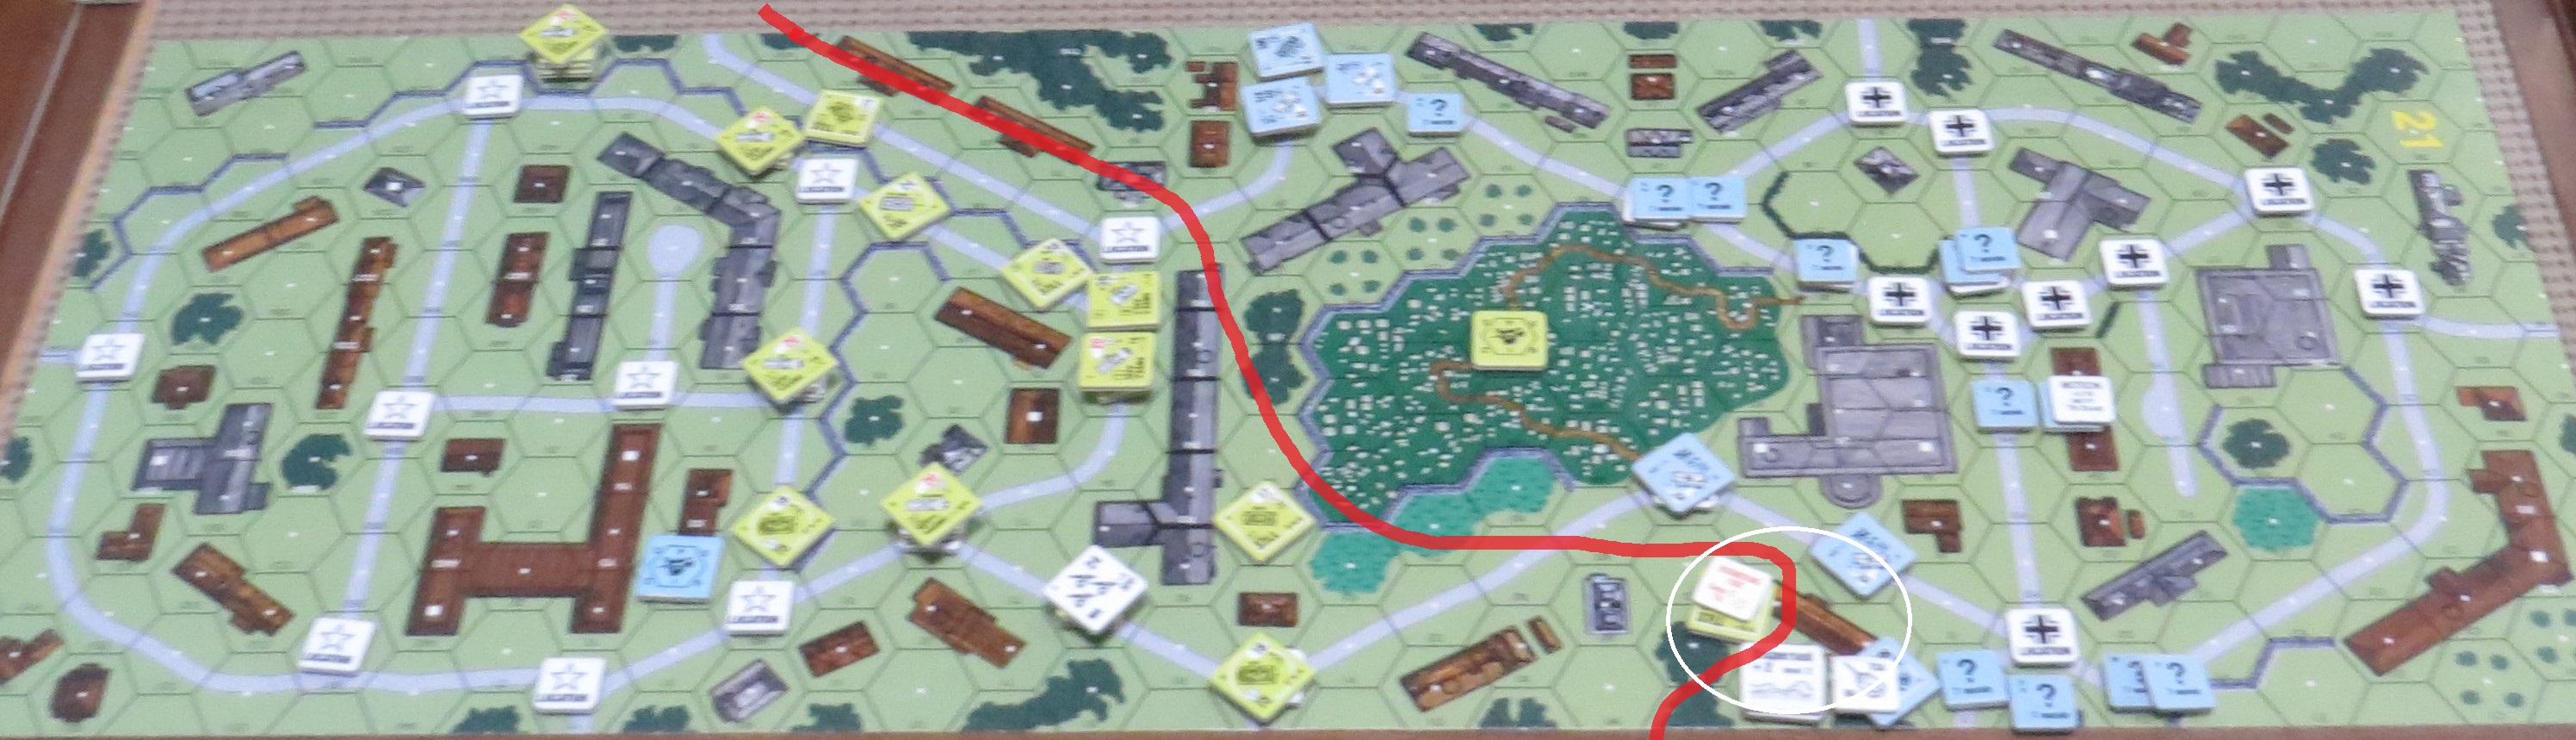
Now a heads up, this scenario may not be as interesting to view on the map. After Turn 1, the action restricted itself to the middle of the board as Dave and I played out an ASL WWI scenario!!!

As I mentioned earlier, Turn 1 is a race to take the intersections. Both sides have the ability to penetrate deep into the other side's territory...but how much risk are you willing to take as you don't want to give your opponent easy CVP opportunities.

And we were off!!!

Dave and I were very careful to avoid contact we each other. We were both a little bit risk averse. But I would take one risk and send an M8 Greyhound into Dave's territory and bounding fire on a Half-track with a 4-4-7 passenger. I would hit and burning wreck.
So at the end of Turn 1 - Dave had 65 points and I had 72. So...Dave would get to move first on Turn 2.


Turn 2 would start badly for me. Moving first gave Dave the first opportunities to knock out American vehicles. My bold M8 Greyhound would be knocked out and then my lead Chaffee would be immobilized, a Stuart would be knocked out and a halftrack would be knocked out.

The Pumas would deal the first blows of the game.

On my part of Turn 2, I would knock out two German halftracks.

The remainder of the game would be spent sparring along this line. Dave and I would both be hesitant to move into each other's LOS...so our limited infantry would do the bulk of the fighting going forward.


The fighting on the south would involve my two Chaffees against Dave's 75L Halftrack and a PUMA. I would manage to shock the PUMA...but Dave would recover in the next rally phase. I would lose another halftrack in the center.

As we neared the midpoint of the game, Dave would make a push up the center. His halftracks would try to support his infantry, but the terrain would severely limit they movement options. I would go after one of them in Close Combat. I would immobilize it, but then get stuck in Melee.

 Dave's infantry would gain the upper hand in the north and in the center. I would MALF both MG's on my remaining Stuart as well as my 50 CAL. Boxcars are such a great way to lose a position fast. Dave would punch forward. At this point, Dave had the slight lead in points as we see-sawed back and forth.
The MELEE for the immobilized German halftrack would suck in some of Dave's Grenadiers as well.
_saving-private-ryan-half-track-cover-full.jpg)
So let's talk about bypass movement as the halftrack had been in bypass between the building and the woods. Now during our Melee, Dave would fire into the melee from a unit in the cemetery. I questioned that shot because the halftrack was in bypass and not in the woods hex...so I argued that the firing unit could not see the halftrack on the other side of the hex. Dave informed me that the unit is considered in the woods hex. I didn't argue it further...but it seems to me that bypass movement allows too much "eating your cake and saving it too" nonsense. I say this, because I'm certain had I fired a bazooka from the same hex at the haltrack in bypass, I would have been told that I couldn't see it. Just my thoughts on bypass...of which I'm not a big fan.

The MELEE would finally end with a burning halftrack...but my 7-0, a Hero, and a 6-6-7 would be killed as Dave rolled snakes and created an 8-0 officer in the process. Ouch...that hurt.

With my center collapsing, Dave's grenadiers made a dash to get into my backfield. This was a critical moment in the game. I had next to nothing to stop them from gobbling up my backfield victory locations. But a miracle would happen as I pinned both attacking stacks and would go on to break both and force the Germans back.

Despite the setback to his infantry in the center, Dave wasn't done trying to take control of the game. He would send a halftrack to occupy my southern victory location and switch it to German control. This would be a 10 point swing as I lost 5 and Dan gained 5. At this point, Dave's daring had paid off and he had a strong lead. His halftrack would stay in motion in bypass of the woods hex adjacent to my Chaffee...but of course since it was in bypass...it wasn't adjacent.
So let's talk about bypass movement AGAIN (we'll also revisit this in my Starter Kit AAR...where bypass is not possible). I would go on to destroy the halftrack, but the crew would survive and enjoy the benefit of the woods hex...which they had bypassed...but were now somehow safely within its foresty confines. More cake...? (Please forgive my sarcasm but I really think bypass movement is flawed.) Ultimately, it seems wrong to locate a unit in an imaginary hex line and then grant that unit the benefit of the terrain...which they were bypassing. I know...heresy..just call me Horus...

So next we headed into Turn 6 American. I had the last movement phase and thank goodness for that. I succeeded in retaking my lost victory hex and with the elimination of broken German units, and a halftrack, I would vault to 109 points to Dave's 104 and that would be game.

A final look at the conclusion of a really fun scenario. Dave and I kept this game competitive all the way to the end. My turn 1 risk with my Greyhound would ultimately make the difference in points. Those 7 extra points on turn 1 were crucial. For Dave, he suffered some cruel dice rolls that caused every Panzerschreck and Panzerfaust shot to miss...every one of them. Had those shots landed, it would most likely have been a German victory. ASL is a fickle mistress to be sure.
My thanks to Dave for a fun and exciting game of ASL. I look forward to our next game!

And now for Dave's Post Game Comments:
"With battle lines drawn both side were afraid to cross and when we did we were not rewarded with success. I missed some critical PSK and PF shots which I think was the turning point of the game. I think there might be some more aggressive moves at the beginning that might give the Germans an advantage but might also give up the first turn. Tricky scenario!"

Well, that's a wrap on this AAR.
I don't have any games on deck until July 23rd...so next week will be quiet.
But I will post the AAR for our Starter Kit game S83 Off to Oslo and delve into Starter Kit. And trust me...you wouldn't want to bypass that!!!
Until then.
No comments:
Post a Comment