2021...what an incredible year for ASL. I thought 2020 would be impossible to surpass. I was wrong. After 104 games played so far this year...I had to just stop and reflect on how amazing that number is...it's November and I'm already averaging 2 games of ASL a week. This past week, Dan and I played Monday, Friday and Saturday. We decided to play three March Madness scenarios. I've been a big fan of the March Madness packs from the Kansas City crew since playing my first one at the 2013 Texas Tournament. My association with the Kansas City ASL Club has been life changing.
This link will take take you to the KC website where you can order the scenario packs or you can download them from the ASL Archive. And if these are new to you....trust me when I say they are very good and you'll be glad you gave them a playing,
No matter where I am living, the Kansas City ASL Club will be the one that I am a member of...now and always.
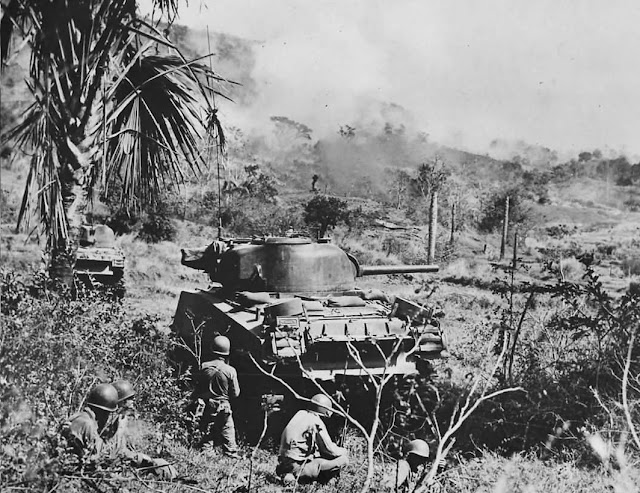
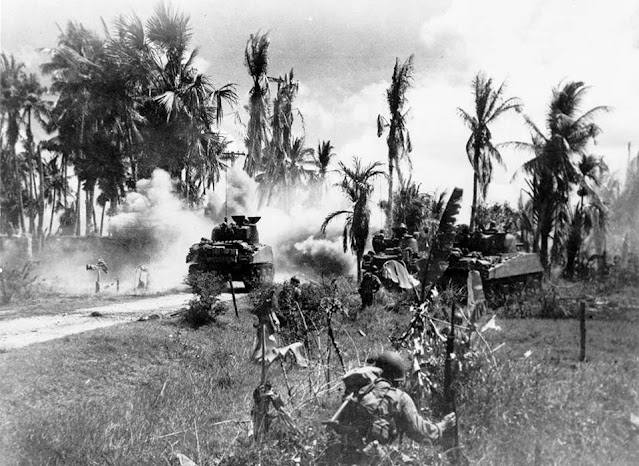
Our first scenario would be MM67 Urdaneta Ambush. Designed by Paul Works, this scenario takes place in the Philippines in 1945. A Japanese force attempts to delay or halt the advance of the US 6th Infantry Division
Paul Works was recently interviewed on the 2Half-Squads Podcast. Great interview and worth a view.
At 5-1/2 Turns and with small force size, this is a great scenario to play in 3-4 hours.
The ASL Archive has it with 5 Japanese and 1 American win, while ROAR has it with 2 Japanese and 0 American. So...the early prognosis shows it be pro-Japanese. HIP tanks certainly contribute helping the Japanese win this one.
As the defending Japanese, I would command 2nd Mobile Infantry, Shigemi Detachment, Geik Force/2nd Tank Division. My force would consist of 5 x 4-4-7's and 2-2-8 crew led by an 8-0 with an MMG, 3 x 50 MTR's, 6 x Panjis, 2 x Foxholes and 3 x 97B Chi-Ha Tanks with an 8-1 Armor Leader.
As the attacking Americans, Dan would command the men of the 6th Infantry Division and Company A, 716th Tank Battalion. This force would consist of 4 x 6-6-7's and 5 x 6-6-6's led by a 9-1, 8-0 and 7-0 with an MMG, 2 x BAZ 44's, and 3 x Sherman Tanks.
To win the scenario, Dan's Americans would have to exit 16 EVP off the east edge of the map. My tanks would be dug in and HIP...just waiting to pounce on the Americans as they came up the road. By SSR, the Sherman Tanks cannot leave the road until a Japanese Tanks is seen.
And now for Dan's Pre-Game Comments:
"The Americans must attack down the road and exit the board. With all the swamp and marsh leaving the road is risky for bog. The tanks will move the required six hexes with escorting infantry since the Japanese may set up HIP T-H heroes. The leaders and a 6-6-7 squad will be with each tank. The 9-1 will be with the lead and have another 6-6-7 with the MMG. The other two will have the bazookas. Four squads will move south around the swamp and try to flank the ambush Hopefully no one routes into the panjis once the ambush happens."
I set up my tanks with their turrets facing to the rear. My plan was not to fire until I had a rear shot on the first Sherman Tank. To accomplish this, I would need the supporting infantry to be stopped, so that the tanks were advancing with their support. My MMG would be placed in the road in order to lay a fire lane down the road.
Turn 1 American - Dan begins his advance up the road. My MMG lays the fire lane and proceeds to breakup the American attack as they struggle through the resid. Dan would create a Hero in the process. But I had managed to peel away the infantry support from the armor.
Dan sent a strong flanking force on the east side. I had Panjis awaiting their arrival.
After one turn, Dans had made some good progress, but had hit two of the Panjis..
The Panjis would break the flanking squads.
Turn 2 - on the Road - Dan's first Sherman moves into the kill box.
I would fire two of my three tanks and fail to get a good hit until a rate shot connected and knocked out the Sherman.
Dan's remaining Shermans would take revenge.
At the mid-point in the game, the Americans were struggling to get up the road. The flank attack had been stopped as well.
Dan pressed his attack home and tried to push me out of the way. I would X Out the MA on my 2nd Tank as I intensive fired and rolled a 12. But one of my mortars would immobilize a second Sherman. Just like that Dan and I were down to 1 tank each and my third tanks was still HIP.
Going into Turn 5, Dan would do a quick calculation to see if he had a chance to win the scenario. His east flank attack had been completely destroyed and his push up the road had stalled under intense Japanese fire. With only one tank left, he didn't have the juice left to reach the 16 EVP required for the victory. So Dan offered the concession and my Japanese had the win.
It had been a fun game for me. Dan enjoyed it, but it was a bit frustrating to watch the Panjis do so much damage to his force.

And now for Dan's Post Game Comments:
"The plan did not work. The southern flanking group ran into panjis and broke. They were slowly eliminated. While the road group was under a fire lane. The Japanese tanks eliminated one American tank and the 50mm MTR immobilized one. By the time the Americans were able to break the ambush there was no time for the infantry to exit. Well played by Grumble Jones! This scenario is a fun PTO action good sized for a tournament. The Americans must be aggressive and break up the ambush. They cannot do that with a flanking force."
Our next game would be from the 2009 Partisan Pack. The Kansas City Club is well known for their excellent Partisan based scenarios. So if you enjoy the irregular combat of Partisan actions...March Madness has something for you!
Our selected scenario would be PP01 Crushed Pride. This aptly named scenario would crush my pride as I rolled horribly and denied myself a decent chance of winning this scenario.
Designed by Steve Swann, this scenario is set in 1942 Greece and covers the attempts by Greek Partisans to destroy railroad trestles guarded by Italians. This is a night scenario the Partisans are stealthy and the Italians LAX. So this should be a slam dunk for the Greeks. But...leave it to me to find a way to miss the basket!!
ROAR has this scenario with 1 Italian win and 0 Greek wins. The Archive has with 2 Italian and 0 Greek wins. But having this played this scenario as the Greeks, I'm convinced that they can win this scenario. I came so close at the end to blowing one of the trestles and winning the game and that was in spite of just terrible dice rolling. So, yeah, the Greeks will win this scenario.
As the defending Italians, Dan would command the Italian Bridge Guard Detachment. This force would consist of 8 x 3-4-6's and 2 x 2-2-8 crews led by an 8-1 and 7-0 with an MMG, 2 x LMG's, a 45 MTR, 6 x Foxholes and 1 x Pillbox.
As the attacking Greek Partisans, I would command the Greek Resistance Group. My force would consist of 9 x 3-3-7's and 2 x 1-2-7 crews (to carry the DC's) led by a 9-1 and 8-0 with 2 x LMG's and 2 x DC's.
To win the scenarios I would have to destroy either the 40J1 or 40K2 bridge span. Any other result would be an Italian win.
And now for Dan's Pre-Game Comments:
"The Italians must defend the bridge. The Greek partisans being stealthy and the Italians being lax and with all CC being H-t-H the biggest fear is CC. The pillbox with the 8-1, 2-2-7 MMG will set up in the valley hex 40H3. They can lay a fire lane to the bridges or defend each bridge although the CA of H2 and I3 will not allow fire at the approach hex of K3. The 7-0, 3-4-6 LMG will set up HIP in 40J0 and the other HIP squad will be in 40L0 with a LMG. Two squads will deploy despite the loss of 1/3 the firepower to defend more area and make bump checking more difficult for the partisans. Hopefully the Italians can delay the partisans long enough to prevent the bridge from being destroyed."
I intended to attack the bridge from the west side and all the counters on the east side would be Dummy Cloaking counters. To my chagrin...Dan's primary defense would be on the west side as well...drats!!!
My attack on Turn 1 would be very cautious. I wanted to take the Italians out in CC and hopefully win the ambushes and keep concealment. But HIP units would be undoing...I really hate HIP in ASL.
Dan's first HIP unit would break three squads moving with my 9-1. Just like that...my attack was nearly stopped in its tracks...tracks...I crack myself up...but really I would not make my morale checks tonight and my 9-1 couldn't rally a gaggle of geese...
I had good odds in our first CC...but couldn't roll less than an 8 to win the hand to hand. So eventually Dan would waste me.
I had pressed closer to the bridge, but my force was struggling to stay unbroken and do anything to Dan. After winning a couple CC's against 1-2-6 squads...I really didn't do anything else.
Yep...I wasn't really accomplishing much.
And on the final movement phase, I sent both 1-2-7's onto the bridge with their DC's...but alas...both would be broken. Game over and an Italian win. Thank goodness this game ended quickly. It was a singularly unfun experience for me. There does come a point where bad dice rolls suck all the fun out of a game. Dan would take the victory and a very sound one at that. His Italians performed very well.
And now for Dan's Post Game Comments:
"The plan worked. It was very close with the partisan DC units being broken in their attempt to place the DC in the last turn. A lucky spray and pray defense turn one broke the Greek 9-1 and squads who took too long to rally back. This is a fun, tournament sized, night attack scenario, great if you want to learn some night rules. Also if you like a battle of three firepower troops. Great partisan action. My thanks to Grumble Jones for a great game!"
Our third and final game of the week would also be from the Full Rule Book ASL pack. We would select MM63 The 26th at Troina. Designed by Paul Works, this is a very large and complicated scenario with some challenging victory conditions.
Dan and I would be the first to record this scenario in either ROAR of the ASL Archive. Now for some words of warning. As stated earlier, this is a big scenario. The primary battlespace is at the intersection of 4 boards. This can be problematic with aligning all the boards correctly. Additionally, there are a lot of overlays that are also set up on the board intersections. Not easy to place these.
The victory conditions give the Americans the immediate win if they exit 10 EVP off the the south edge of Board 2 or at game end by having more squads on Board 39 at level 3 than the Germans.
Well...the Americans set up on Board 39...so...pretty much they are winning the game from the start and therefore...why would they ever go for the exit points...especially when the Germans have the approaches well covered with bunkers, trenches and machine guns.
Oh and this scenario is chock full of OBA. The only thing missing is armor and honestly...armor is needed in this scenario. This scenario appears to have both sides on opposing hill tops just blasting away at each other with good protection and hoping that OBA swings the momentum one way or the other.
So...this scenario requires a lot of energy to set up and the pay off may or may not be there depending on what style of ASL you enjoy. If you like to maneuver...then you won't like it...if however you enjoy blasting away at your opponent...then yes, this game will be fun for you. And lastly, give yourself an ample amount of time to play this game.
As the attacking Germans, I would command the men of the 129th Panzergrenadier Regiment Kampfgruppe Fullriede, 15th Panzergrenadier Division. This force would consist of 19 x 4-6-7's and 2 x 2-2-8's led by 3 x 9-1's, 2 x 8-1's, an 8-0 and 7-0 with an HMG, 3 x MMG's, 5 x LMG's, 4 x Pillboxes, 13 x Trenches, 3 x Foxholes, 2 x 81mm MTR's, offboard 100mm OBA, a Radio with 80mm OBA and 36 factors of AP mines...which can only be set up certain ways.
As the defending Americans, Dan would command the men of the 26th Infantry Regiment, 1st Infantry Division. This force would consist of 14 x 6-6-6's and a 2-2-7 and Hero led by 3 x 8-1's, an 8-0 and 2 x 7-0's with a 50 CAL, 4 x MMG's, 3 x BAZ43's, 2 x 60 MTR's, an 81mm MTR, a Radio with 155mm OBA, 8 x Trenches and 2 x Foxholes.
Good grief...I'm knackered just giving you the order of battles!!!!!
Pay close attention to placing the overlays. They are a critical aspect of the game.
And now for Dan's Pre-Game Comments:
"The Americans can defend the high ground or attack to exit on the southeast flank. With the woods all being olive groves the Germans can see on to the American hill and have two OBA modules to blast their way in. The Americans have one OBA module to defend with. I will break up the defense to make for poor OBA targets. With the OBA observer HIP in 39Z1. The 8-1 squad and 50cal HMG will set up forward in 39T2 to support. The rest will be spread out with no more than one squad per hex and two squads deployed. Hopefully we can defend the hill and if the OBA gets a chance to blast a path to exit a force will be ready to make the run."

I set up the pillboxes to cover any attempt by the Americans to go for the exit VP. Honestly though, I couldn't see why Dan would even consider it. I put my trenches in reverse slope positions to protect against the American 50 CAL, Mortars and of course the 155mm OBA. I then set up 8 squads to make a general assault and get up the hill. I knew that wasn't enough to win the game unless I managed to eliminate a fair number of his men. But that was my plan. It would prove to be a daunting task.


My attack went forward and I assault moved into the gully blocking my access to the Board 39 hill. Honestly, this gully would just be a pain in the backside. I mean honestly, there was no way to flank the Americans. I just had to lower my head and go straight ahead. Not really ideal in ASL. My 81mm Mortars would smoke two US positions and lucky for me one of these had the 50 CAL. But that was the only smoke I would get and I would MALF the second mortar. I would go on to MALF the other one as well as my Radio on the first attempt for Radio Contact. I would also MALF an MMG. The two Mortars and the Radio would be lost with rolls of 6 on the Repair Attempt. If you really question the veracity of my struggles with dice rolling...consider that rolling 5 boxcars in only two turns of play borders on the ridiculous. Thank goodness my 100mm OBA didn't require a dice roll for contact.


Dan's boys only needed to dig in and wait for my grenadiers to walk into their sights.
In spite of terrible dice, I pushed forward and made some progress in getting up to level 1. Dan was also struggling with dice rolls and ELR'd nearly every morale check. This was giving me some hope that I would push Dan out of his front positions. And my OBA eliminated the squad with the 50 CAL. And I accidentally moved into the hex with Dan's 155mm OBA Observer. I would succeed in killing him and Dan's 155mm OBA was lost to him.
Up to Turn 2 - the turns go long as there is so much to move in this game...I was advancing...but my force was being degraded and I was down to 4 good order squads on the hill. Dan had taken some losses, but nothing significant yet. I would have to commit more squads to the hill assault.
Dan would capture a squad with his HIP 81mm MTR when I routed onto it. HIP...ya gotta hate it. The crew would be broken...but the prisoners did not pass the task check to attack their broken guards.
A final look at the battle. Dan and I had finished three full turns and on Turn 4, Dan would get his 3 squad reinforcements, which would make up for his losses up to that point. With my force struggling on the hill...Dan and I talked and decided we had had enough. I gave the concession and Dan would take the win. Dan would win 2 out of 3 of our March Madness Scenario Week. In fact, the defenders won all three scenarios.
So the big question...did we do the scenario justice. The short answer is no...but losing the 155mm OBA...the 80mm OBA, all three of the 81mm MTR's....left Dan and with nothing capable of decisively smashing the other side. My ridiculous number of boxcars had literally stripped me of the assets required to inflict damage on Dan's well dug in troops. And similarly...Dan lacked the firepower to inflict damage on my dug in troops. So we were locked in a stalemate, which wouldn't be broken. And the only choice available to me was to try and send more troops into the meat grinder on the hill...with not much chance for success given the way my dice were performing. So...that's how the game went. And this highlights my earlier comment about the need for armor. The terrain certainly does not favor armor, but a few Stugs would go a long way to giving the Germans some additional punch in the attack.
My thanks to Dan for a great week of ASL. While the game didn't necessarily play out the way that we had anticipated...it was nevertheless a great bit of ASL playing.
And now for Dan's Post Game Comments:
"The plan worked. Helped by the Germans losing both MTRs and the Radio to boxcars and bad repair attempts. This limited the German use of smoke and their attack was broken up. Although the American observer was overrun early and the American MTR left HIP to take some prisoners. This scenario plays out rather basic with the game winding down to a shoot out across the valley between the two hills. Once the American reinforcements came on the hill was secure. While not very exciting to play the game is good for those learning OBA rules and how to use smoke effectively. My thanks to Grumble Jones for another great game of ASL!"
Dan and I had a fantastic week of ASL and got to play 3 very good March Madness Scenarios.
Dan and I will return next week for more ASL action!
We will see you then!


No comments:
Post a Comment