As I write this AAR, November 2020 is one day away from passing away. This November is one I'd love to forget...but unfortunately, this November has probably seared its way into our collective memories. Hopefully all of you out there had safe and happy Thanksgivings. We spent the five days off, walking around Quincy, Illinois...and watching a lot of football. I do that most every year, so it wasn't terribly different from last year...except for not traveling to see family. Dan Best and I had planned to play a double-header weekend with ASL Scenarios 201 and 202. Friday and Saturday night would see two epic fights as Dan and I traded victories over the course of two very hard fought scenarios. I have to say that both games were quite good and both went right down to the wire. In fact, Saturday's game would end on Sunday at 12:01 AM. I was so knackered...that I didn't even clean up the counters....nope....I just crawled upstairs and went to bed.

Now in all honesty...ASL wore me out...but life has made me exhausted. Stress...stress...stress...I told Dan...that playing ASL was keeping me from completely flipping out...So Dan thank you Sir!
I want off the ride...please...
Our Friday scenario would be ASL Scenario 201 Hunters from the Sky, which covers the actions around Operation Varsity. The last great airdrop in Europe would be a decidedly unsatisfactory operation. While the Allies would enjoy success...the losses were heavy for a war that was only 8 weeks away from ending.
Dan would command the attacking Americans and lead the men of the 513th Parachute Infantry Regiment, 17th Airborne Division. This force would consist of 10 x 7-4-7's led by 9-1, 8-1 and 2 x 8-0's with 2 x BAZ 45's.
As the defending Germans, I would command the men of the 84th Infantry Division. This force would consist of 9 x 4-6-7's, and 2 x 2-2-8's led by a 9-1, 8-1, 8-0, and 7-0 with 4 x LMG's, a STUG, 2 x Trucks and 2 x 20MM AA guns.
To win the scenario, the Americans must control their selected "Assembly Point" at game end. There are six possible, which the American player secretly rolls for prior to play. ROAR has the 201 version of the scenario with 5 German and 5 American wins.

And now for Dan's Pre-Game Comments:
"The Americans must drop and capture one of six randomly determined "assembly point" buildings. In my secret roll it was building 2M9. I chose the accurate drop zone to be on board 2 near building 2M9 and the random zone to also be on board 2. The Americans will then attack to capture the victory building and then move to take as many others as possible to make the German counter attack pick a possible victory location. The accurate drop zone wing will have both BAZ 45s and both -1 leaders. While the random drop zone wing will have both 8-0 leaders. Hopefully the random drop zone is on the same half of the playing area as 2M9."
I placed my AA guns on either end of Board 4. Keep in mind the hills do not exist and grain is brush. So my AA guns were best situated to shoot at falling paratroopers...and unfortunately not much else as the game went on. I defended all but one of the 6 possible assembly areas...and yes...you guessed it...that was the one Dan had rolled.
Dan's landing would go well. I would break one 7-4-7, but everyone else would land intact and two squads would land off board. My AA guns wouldn't do much and rate of fire and I are usually not on speaking terms...
As Dan's boys moved towards the assembly areas, I pushed some of my boys forward.
Dan would begin collecting at his designated Assembly Point. He also moved towards others...but my instincts told me that he was after the M9 location.
Dan and I would see some good close combat actions in this scenario, with Dan generally getting the better of me.
Turn 4, my infantry reinforcements would enter the battle. I was moving them to take a position to put down fire on M9 from outside of Dan's range, but inside my range.
I sent my trucks careening down the road in an effort to draw fire and create some "Russian Smoke". I was partially successful and Dan always delights in destroying my trucks. He likes a tidy battlefield.
Turn 5, I would get the last of my reinforcements with a STUG and a squad. I would sent them directly towards M9.
Two major fights would develop. My eastern reinforcements would be surrounded by Dan's boys in a battle to the death, while I sent everything I had left towards M9.
Dan would start to get the better of my eastern force, although they would inflict some losses on Dan's paras before he took them down. I would take some prisoners myself near M9 as my boys began putting downs some serious pressure there.
Close combat would erupt all across the battle space. Dan would go after my STUG with a vengeance.
Dan would capture all of my boys in the east and destroy my STUG. These two close combat victories would help secure the victory for Dan.
With time running out...I positioned my boys for a last ditch attempt to take the M9 Assembly Point.
Game end...my attempts to pin or DM the boys in the M9 locations would fail and make the officer there Berserk...isn't that special...so that was it...Dan had the victory and well deserved. Dan was able to shake off a long losing streak. I really enjoyed this scenario. It has lots of movement and at times was a real chess match. Going up against American 7-4-7's is never easy. I would recommend this scenario as a good one for introducing para drops. With just two sticks, it goes pretty easy and the Germans don't have a lot of stuff to damage the landing Americans. So this is a good scenario for that. My thanks to Dan for a fun game!
Dan's boys would celebrate the win.
And now for Dan's Post-Game Comments:
"The plan worked. The random drop zone was also on board 2 and together the two wings quickly captured three victory buildings. The drop went well with only one squad broken. The Germans were not fooled and attacked toward 2M9. But the Americans were able to break up the counter attacks. The were helped when the StuG reinforcement group was delayed one turn by random roll. It was a near run thing with the Germans making a last turn assault and the Americans having to CC the StuG to defend 2M9. Well played by Grumble Jones but those 7-4-7 MMC are hard to beat. This scenario is good classic ASL with 10 turns to recover from initial set backs and lots of maneuver. My thanks to Grumble Jones for a great game!"
And now for Round 2 -
ASL Scenario 202 Hitdorf on the Rhine.

Our second game, played on Saturday evening would be ASL Scenario 202 Hitdorf on the Rhine. Set in April 1945, this scenario depicts the actions of the 82nd Airborne Division following a crossing of the Rhine River near Hitdorf. The fight for Hitdorf would end in a bloody repulse of the Americans. The Germans still had a fierce bite when cornered.

Now, Hitdorf on the Rhine is a true oldie. This scenario first appeared with the original Squad Leader. And I had not played this scenario since 1978 or 1979 as a Squad Leader game. So, I was looking forward to revisiting this classic scenario. (and yes...it always bothered my OCD that Russians were on the scenario card for an American vs. German scenario...it bothers you too...you know it does...).
On ROAR, this 202 version of the scenario shows 4 German and 3 American wins. My one complaint about these old scenarios is length...9 turns...oh shoot me now...and you may have noticed that Hunters from the Sky was freaking 10 turns long. Let me just say, that both of games on this double-header were a bit of a grind after turn 6. The older I get, the less I enjoy long scenarios. These two in particular were exhausting as we neared the end. Now to the credit of the scenario designers...both scenarios were competitive until the end.
Once again, Dan would command the attacking Americans and command the men of the 82nd Airborne "All American" Division. This force would consist of 15 x 7-4-7's led by 2 x 9-2's, 2 x 9-1's, an 8-1 and a 7-0 with 4 x BAZ 45's, a Radio with 100mm OBA, a DC, and an MMG.
And I woulda again be the defending Germans of the 62nd Volksgrenadier Division. Thankfully...4-4-7's didn't exist when SL came out...so in the ASL version...I still got to have my 4-6-7's. My force would consist of 9 x 4-6-7's, and 3 x 2-2-8's led by a 10-2, 801, and 2 x 8-0 with an HMG, 5 x LMG's, a radio with 80mm OBA, 36 factors of mines, a Half-track, Truck and 4 x MKIV's. 10-2 Leadership with Volksgrenadiers...YEAH BABY!!!

And now for Dan's Pre-Game Comments:
"The Americans must capture 2 stone buildings on board 3. The initial assault will come from board 4 through the 3M2 stone building into the board 3 center village. Getting the 7-0 with radio in place in the upper levels of 3M2. One squad will deploy with the 9-1 leader and the first 9-2 leader with 3 squads the DC and one BAZ 45 will attack through the 3L4 building into the center village. The second 9-2 leader will deploy a squad and attack with two squads and two HS plus a BAZ 45 toward building 3R3. Hopefully they both can get into the village and capture building to diffuse the German counter attack."

At start, my Germans are all HIP...all 1 squad, one crew and one leader of them. I can't remember starting a scenario with such a small force. I placed 6 x 6 Factor mines and the white circle indicates where I should have placed a mine...I cannot believe that I left a shell hole position open. This would nearly cost me the game as it would serve as a ready made path into the village. Silly mistakes like this are what win or lose ASL games. You simply should not make them...but I'm me...and I'm a B- player on a good day...ok C+...
"Hans...tell me again...how we are going to slow down 9 squads of 7-4-7's..."
Have I told you about my friend Dan Best...and how hyper-aggressive he is as an attacker? Well he is and he hits you with a literal barrage of half-squads. And it can take every bit of patience you have not to shoot at them...since...they are begging to be shot. Dan would hit two minefields and a 9-1 would be wounded. My LMG crew held their fire even as a 3-3-7 sat right next door...and it paid off as I got a 3 down 2 shot at an officer moving with 2 squads...but an 11 did nothing...that's just peachy...
Turn 1 would end with Dan in control of 2 Stone building locations....hey guess what!?! Yeah...that was his victory condition. Yep, Dan was already winning the scenario. Now I would have to find a way to take away one of those two locations...and at the same time...not lose any more.
Turn1 my reinforcements stream into the village. As a diversion I launched my 8-0 and his 2-2-8 in a desperate bid to take back one of the two stone buildings. Yeah that effort would fail miserably. But, my other boys would get into good positions in the village.
A look at my newly formed defense.
By Turn 2 - I was dropping Arty on Dan...but it wouldn't be all that effective.
And in another bonehead move, I would send two 2-4-7's into Close Combat with a 3-3-7 in the open shell hole road hex...you know the one where I neglected to place a minefield...yeah...it was Dan's favorite path into my village. Dan would go on to kill both of them. Drats!
Dan' s reinforcements entered the game and were coming from the east, while he tried to push around me on the south.
Dan's reinforcements were heading to the north to take out my arty observer and flank around me on the north. So, I had to quickly move troops to both flanks and try to keep the center manned.
My defense was intact and my next goal was to find a way to take back the single hex stone building that Dan had occupied.
Dan's reinforcement moved into position on the north and center. I successfully repulsed another assault on the south edge of the village...but just barely.
A look at Dan's position. He still held his two stone buildings and was putting serious pressure all around the village. His radio operator struggled to get contact and would even break the radio at one point.
The battle would begin to take a weird turn. For most of the game, Dan and I rolled miserably...I mean just terrible. It was like two drunken boxers who stagger around the ring. We just couldn't do anything much of the time. But that said Dan was rolling my sniper all the time. For much of the game it never activated...but then it did and it would single-handedly eliminate Dan's southern flank. The sniper would break a squad and leave Dan with two broken squads covering the south. Opportunity was knocking and I was running to let him in!!!
Back in the north, Dan's 45 Bazookas would continue to shower me with sorrow. I hate those things. Fortunately for me, Dan rolled very few hits. He would hit my half-track though and turn it into a burning wreck.
I saw a chance to eliminate Dan's brokies on the south and moved to make that happen.
And then my snipe struck again...Friedrich Zoller in the house!!! He would KIA the 9-1 in N2 and the Radio operator and 7-4-7 squad would both break. Just like that the south flank was open.
Dan would send an 8-1 dashing through all kinds of German fire to try and get to the N2 building and rally those broken units before my grenadiers got there.
Dan picked the right man for the job...because he got there and he would rally them.
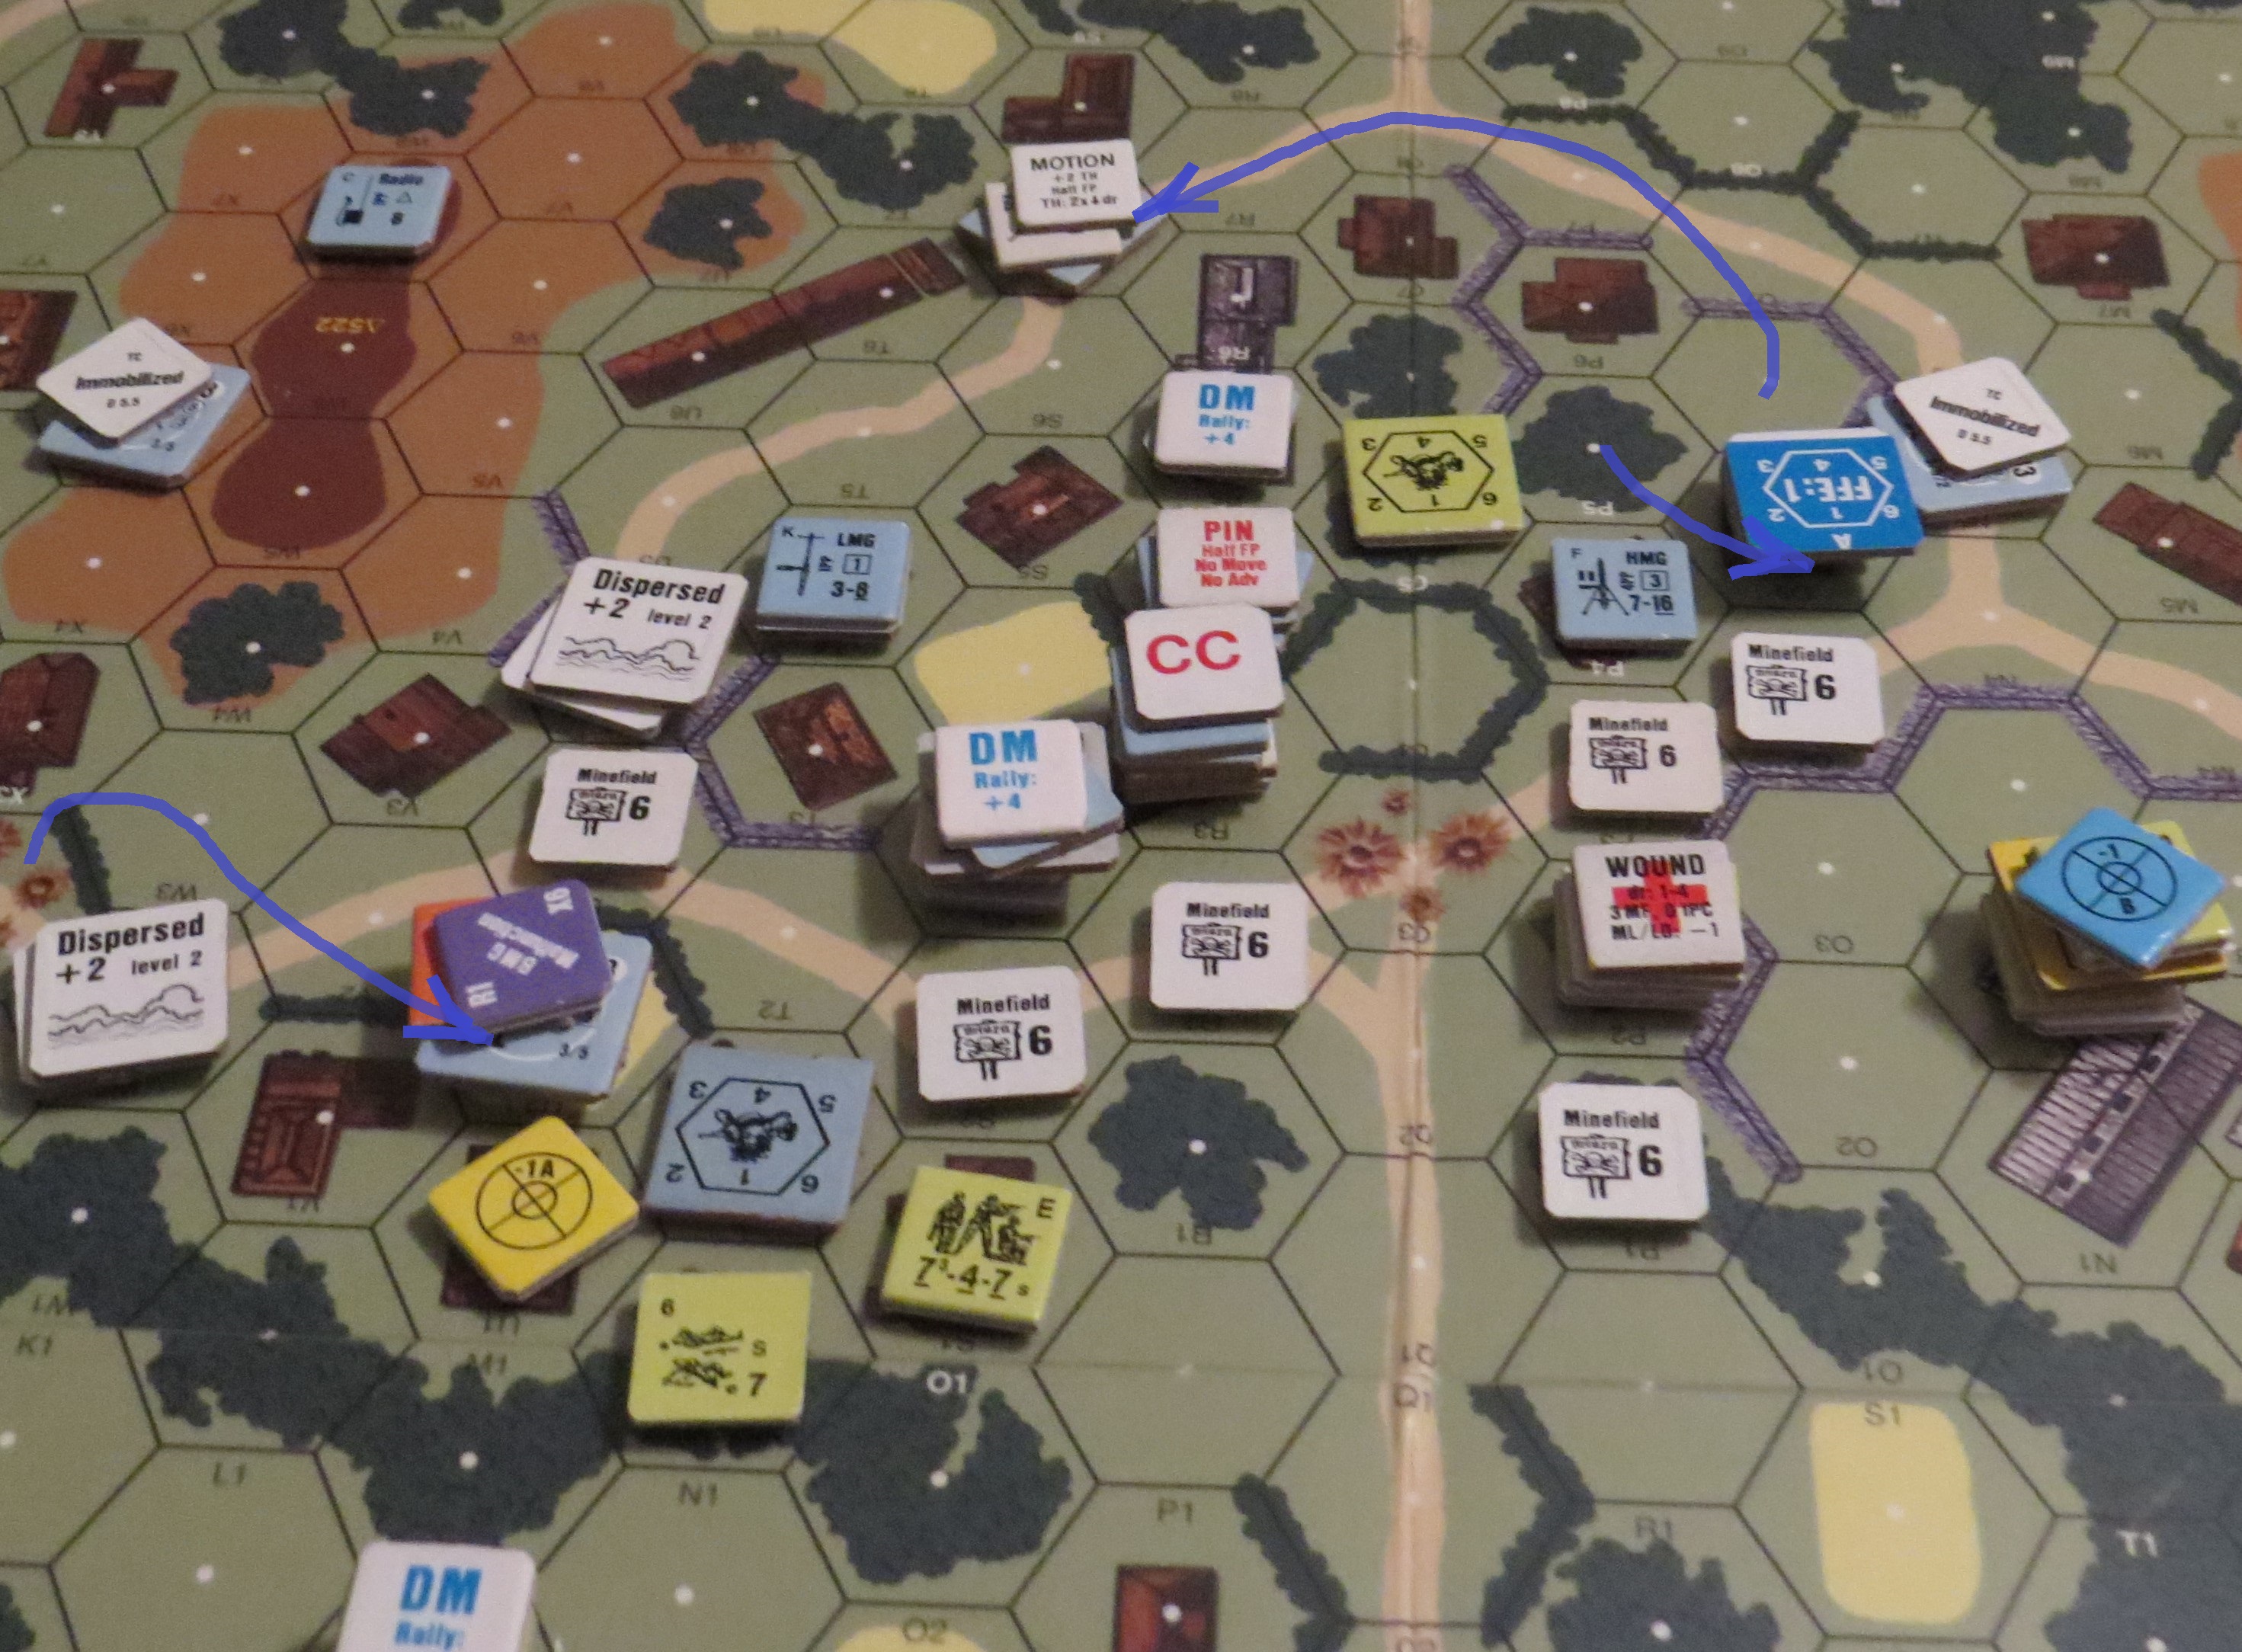
Close combats...Dan's shell hole avenue once again put his boys into yet another stone building. But...I had managed to get a concealed 2-2-8 next to a broken squad. They would not survive the encounter.
Dan would KIA my 8-0 radio operator and with that my ineffective arty was gone. But I managed to surround Dan's brokies on the south. They too would not survive the encounter.
Back on the south, I was finally forming up to make my counter-attack and take back the second of Dan's two stone buildings. My 10-2 was helping to shape that assault.
Turn 6 German saw the arrival of my four MKIV's. They would help trap another group of broken Americans on the north edge and eliminate them while the other two would help encircle Dan's boys in the second US stone building. It was all good...but I made yet another bonehead move by not making tanks on the north CE for their movement. I had to try and go for an extra MP to surround the broken Americans and failed my ESB roll...yep another 11...which was my favorite roll of the evening. I immobilized one of my precious tanks.
A quick tally of our rolls for both games combined would be as follows: Dan would roll 14 snake eyes and 12 boxcars. I would roll 6 snake eyes and 11 boxcars. My dice were pretty cold for much of both games., but I was firing at Dan moving in the open enough times...that I was still able to get some results despite higher rolls.
My other MKIV on the north flank would break both the BMG and the CMG at just the wrong time. Dan's boys made another serious push on the north edge, but I would them off. I had also succeeded in eliminating Dan's boys in his second stone building location. I had launched my counter-attack at just right time. Dan's radio roared back to life and he began dropping his arty right on that location.
My grenadiers would hang on despite the pounding 100mm OBA.
A look at my newly restored line.
I tried to move my two MKIV's out of the incoming Arty...but one would be immobilized. The other would escape and move to help shore up the north, where Dan's forces were still his strongest.
Turn 8 was a bloody one for us both. Dan would bazooka my MIV on the north and break many of my squads. We were both very weak...but each had about 4 functioning squads left to play out the last turn.
Turn 9 American....Dan would launch his last ditch assault to try and take at least one more stone building location. But it wasn't meant to be. My defensive fire pinned and/or broke everyone and that was game. My Germans had the win...and I couldn't help but think how lucky I had been with my sniper. Without those key breaks, I might never had succeeded in taking back the one location. So as I say often...never underestimate the value of your sniper.
My boys would celebrate the win...but ultimate defeat was only days away.

And now for Dan's Post-Game Comments:
"The plan did not work. The Americans found all six minefields and one 9-2 was wounded. While we were able to capture a second stone building in 3O5. The Germans were able to defend the others and were building for a counter attack on 3O5. The American reinforcements attacked toward 3R3 but were stymied by mines and OBA stopped reinforcement of 3O5. Then the sniper killed the 9-1 and broke the 7-0 with radio and squad. The arrival of the tanks allowed a successful counter attack which re-captured 3O5. The Germans were able to hold off the Americans for the rest of the game despite significant attrition of both forces. Well played by Grumble Jones with a well timed counter attack. This scenario is a classic from the original Squad Leader and still great fun to play. My thanks to Grumble Jones for an excellent game!"
Okay...that's a wrap on our double-header weekend! Some epic ASL was played.
Dan and I will return next Saturday for a playing of ASL Scenario 203 Hard ROK.
We will see you then!


No comments:
Post a Comment