

After last Saturday's slugfest in Normandy, Dan and I would slingshot around the world to Angaur Island in 1944 as the men of the US 81st Infantry Division found themselves in fighting a desperate battle in the "BOWL"...forever after known as the Wildcat Bowl. Lately, I have been playing a lot of PTO with my buddy in St. Louis. We are finishing up the last scenario in the PTO Starter Kit 4, which is full of great scenarios. My PTO credentials are pretty weak. I had Code of Bushido for a long time before I wandered into the jungle. And I won't lie, I'm not much more comfortable in the jungle than I am in the desert sands. I am most at home on boards 3 and 4.

Dan would choose this night's scenario. And he would pick MM59 Wildcat Bowl. This rather large scenario covers the efforts of the 81st Infantry to subdue a tough Japanese foe defending a serious cave complete on Anguar Island.
This scenario is found tin the March Madness The Close Combat Pack. Additionally, this is one of Dan's own designs...so I'm sure he will know some tricks to playing this one.
To date this scenario doesn't have any recorded ROAR or ASL Archive Playings. That's about to change!
This is a 9 turn scenario with a lot of squads, arty, guns, caves, bunkers, panjis, trenches, mines, PFZ's (look that up), road blocks and some Sherman Tanks....cause you gotta have Sherman Tanks.
Now as you know...6 turns is my sweet spot for games...so not all that excited by a 9 Turn Game, but Dan and I play fast...and if my dice don't cooperate...well it may only 6 Turns!!!
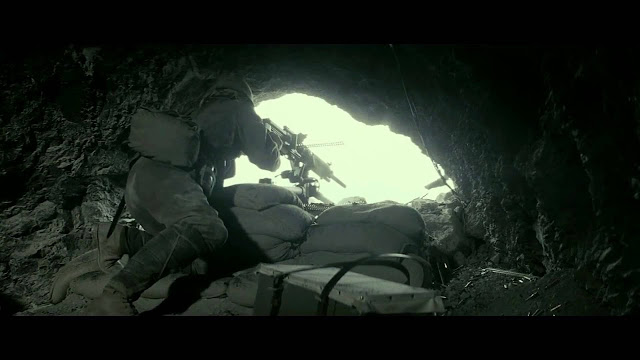
Blogging PTO scenarios can be challenging. I try hard to use pictures from the actual event whenever I do an AAR. Usually, I don't find many specific to the battle at hand, but you can get close. Of course Stalingrad, the Bulge, Normandy, Arnhem, Kursk and some Italy battles are relatively easy to find the right pictures to accompany the AAR. While surfing Google and Bing for tonight's AAR, I was pleasantly surprised by the high number of pictures of the US 81st at Anguar. The Japanese...not so much. Late war is tough to find Japanese pictures that are not war porn of dead and mutilated bodies. I try to never post pictures of the dead...out of respect. A silly blog is not the place to make light of any soldier's death. Just a personal rule I have. Of course I can find some instances in my early blogging where I did include a fallen soldier from time to time. But suffice to say that won't occur again. So, the pictures of Japanese mostly have to come from movies. Letters from Iwo Jima provides some of the very best and so the caves of Iwo Jima will fill in for the caves of Anguar.


Personally, I think Dan is a very fine scenario designer. I've played more than a few of his designs over the past seven years and have found them all to be enjoyable. Dan also likes to utilize caves and some complex terrain features. I also find these complex terrain features to be very formidable. With caves, panjis, mines, PFZ's (did you look it up yet?) and HIP...I foresee a lot of pain for yours truly...


Despite the size of the scenario, I do appreciate keeping it with two boards. I love using my custom board holder. I only have one, so my other game is played without it. And yes, my office has at least 2 Cardboard via SKYPE games set up at all times...thank goodness for my man cave!!!

This scenario comes with a map play aid for your caving expedition goodness!

There's a lot of counters pulled for this big boy!

 By now you have figured out that I will be the attacking Americans and command the men of the 2nd Battalion, 322nd Infantry Regiment, 81st Infantry Division "The Wildcat Division"! My force is huge...not like Space Force...but like you know a regular force. It would consist of 5 x 6-6-7's, and 8 x 6-6-6's led by a 9-1, 8-1, 8-0, and 7-0 with a 50 CAL, 2 x MMG's, 3 x BAZ44's, a Flammenwerfer, 4 x DC's, 2 x 60 MTR's and a RADIO with 100mm OBA. I would also have an 8-1 Armor Leader with 4 x Sherman Tanks...because we have already established that Sherman Tanks make everything better!
Ain't it so!!

As the scenario Defender, Dan would command the men of the Japanese Imperial Army 1st Batalion, 59th Infantry Regiment, 14th Infantry Division. This force would consist of 4 x 4-4-8's, 7 x 4-4-7's, and 6 x 2-2-8's led by a 10-1, 9-1, 9-0 and 8-0 with an HMG, 2 x MMG"s, 4 x LMG's, 2 x 50 MTR's, 6 x DC's, 14 x ?'s, an 81 MTR, a 47L AT Gun, 70 INF Gun, 12 x 1+4+6 Caves, 3 x 1+5+7 Bunkers, 6 x Trenches, 8 x Foxholes, 4 x Roadblocks, 10 x Panjis, 3 x PFZ (still wondering?) and 42 Factors of AP mines. GOOD GRIEF...this is a crazy tough force. I need more Flamethrowers!!!!
The Victory Conditions are as follows: either side wins immediately upon inflicting >25 VP on the other guy. I might blunder into enough Panjis and mines to make this a quick game!!

 And now for Dan's Pre-Game Comments:
“The Japanese must inflict 25 CVP
on the Americans while not taking 25 CVP.
Basically the first side to get to 25 CVP wins immediately. In the Palau Islands the Japanese changed
tactics to dig in. Using the best
terrain on the island to make a strong defensive position. From this position they hoped to hold out and
inflict the maximum casualties on the attacking Americans. A war of attrition. The American weakness is their tanks. Each is worth 7 CVP (with the crew). The plan is to use the limited terrain to
channel the American tanks into kills zones.
Where the AT mines can destroy them.
Or the four Japanese HIP Tank Hunter Heroes with DCs can attack them, or
the 47mm AT or 70mm INF can get a rear shot.
While the MTRs will set up on the hill and fire at all targets in
sight. You must keep them spread out so
the American OBA does not have a good target.
The Japanese get three concrete Pillboxes and 12 caves for their 14 total
squad equivalents. The Caves and
Pillboxes give ample HIP. Plus trenches,
foxholes and panji. In addition they get
4 roadblocks to channel the tanks.
Hopefully the Americans expose a few tanks to the Japanese for
destruction.”
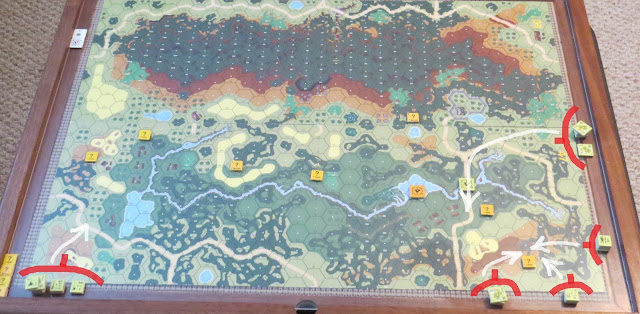
My starting positions. This scenario is a bit of a bug hunt for the Americans. I was struggling at the beginning because I had no objective. I like to have a focus for my attacks. So I picked concealed units and went for them. They would all be Dummys.

"Where should we go Sir?" "That way boys!"

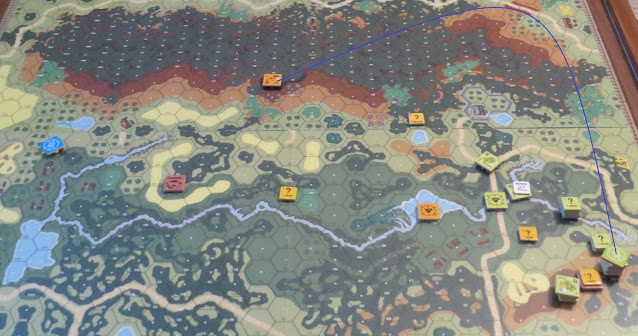
My group entering from the east went down the railroad (all roads are railroads by SSR). At the rail intersection I would hit a mine and be immobilized. My boys would bail and abandon their tank.


On the west edge, I sent my heavy machine guns, mortars and one Sherman to set up a fire base on the hill. I wouldn't get much from the effort.

I was moving cautiously to engage what I thought were real units. They weren't.

I couldn't find Dan's Japanese...but hey I found this cool Unicorn!!!

When Dan didn't shoot me and didn't send a Tank Hero at my Sherman...I figured that I was not facing a real unit...I know...I'm slow to figure things out.


On the east, I was facing only Dummy units, but still didn't know it.
I was beginning to doubt that there were any Japanese until Dan's 81 MTR started lobbing shells. It would fail to connect and this would bedevil Dan throughout the game. None of his mortars would achieve any results. One of my Shermans would get a critical hit on the mortar and take it out. This would provide me with the bulk of my victory points in the scenario.

A good look at the rail line that the Shermans used for roads on Anguar.

The terrain and land mines conspired to cause me to move my tanks in all sorts of weird and ineffectual ways. A pillbox appeared with a 4-4-8 and an LMG. I moved armor to confront it, but Dan would simply run them into the tunnels and they would reappear again beside the pond north of the pillbox.

At least there were some Japanese actually in the battle, that I could focus on!

On the west edge, I was working on enveloping another dummy unit. I did it very well...


My mortars would also end up shooting at dummy units. My OBA didn't get into the battle until Turn 3 when I finally got Radio Contact, but then I couldn't see anything to shoot at. So I never did.

"What do you mean...you can't see anything!?!....Staros...you get the Artillery firing and get it firing now!!!"

I continued to move cautiously on the east side. I knew that mines and panjis were out there somewhere.


As Dan bugged out of the pillbox, a mortar would open up on me from the hillside.


On the east edge, I had cleared all the dummy unit and headed for the hills. I figured there were bound to be some caves up there.


Panjis...if you have never hit one of these...DON'T...good grief are these things brutal and maybe a bit over the top. Suffice to say that my 8-0 broke and ELR'd and my squad broke, ELR'd and was halved. And this wasn't because my rolls were that bad...it's Panjis. I had no idea how bad they were.


The panjis would stall my move on the east side. Honestly, I wasn't interested in hitting any more of them....so I just stopped.

In the west, I was on the hill and moving towards the center. Now, I was not searching...probably should have been, because in this picture I am on a Japanese cave....can you see it....me neither!!! But it would reveal itself shortly. So don't be like me...SEARCH...and SEARCH OFTEN.

I had stranded my Shermans in the east and had to trail break through the jungle. I would bog one Sherman, but both would utlimately break through.

In the West, I did manage to take down a Japanese half-squad in a trench with a mortar. A few more points for Gryfinndor.

I think I only got a point....but I'll take it!!

In the east, I tried to getting myself out of my bottleneck and moving up the rail line. A cave would show up and break my boys as they came out of the gully. My flamethrower squad would be eliminated and my flamethrower would sit on the tracks for the remainder of the game.

My Shermans tried to move up and drew the attention of Dan's 47L AT Gun in a bunker...now I knew what the Panjis were protecting.


Dan would immobilize the Sherman and for the second time in this game, my crew would bail. But this time, they would be shot down.
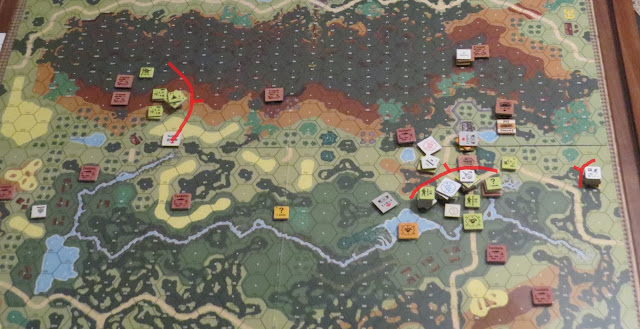
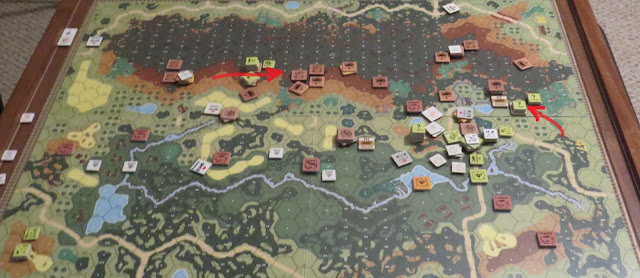
A look at the game around Turns 7-8. This is a 9 turn game. Dan and I would play all 9 turns in about 5 hours. Which isn't' too bad.

Final shot of the game. Dan would throw a DC Hero at me from a cave. I would fire at him with 60 down 2 and he disappeared. My abandoned tank would finally be destroyed by the AT Gun, while I basically gave up in the east and moved ultra slowly in the west. Why did I do this? Well, I don't enjoy being ambushed and just watching my force be ground down with little ability to return the fire. So I decided I would accept the draw and force Dan's Japanese to come at me to get the victory points they needed to get a win. Both of us had to come up with 25 or more VP, otherwise the game is a draw.

"Staros...are you prepared to lose any of your men!?!"

"That'll be a NO."
So we would finish the game with 6 points for the Americans and 11 for the Japanese.
And now for Dan's Post-Game Comments:
“The plan did not work. The Americans were cautious in attack and
never let their tanks be unsupported by infantry. Still one tank hit mines and was immobilized. Another tank did go into the kill zone for
the 47mm AT and was eliminated by a side shot.
However, three Japanese THH failed in their attacks and the Japanese
only got to 11 total CVP. The Americans
inflicted 6 VP. So the scenario ended in
a draw. Many American players struggle
with the lack of a terrain objective in this scenario. As happened frequently in play test, Grumble
Jones moved the Americans around the board but failed to find and engage the
hidden Japanese. There was much Japanese
movement within the cave complexes but the Americans never presented undefended
tanks and always had good fire groups. I
was surprised how little searching the Americans did...none for the game. Instead finding the Japanese by sweeping the
battlefield. There are many rules to learn in this scenario, panji, caves, cave
complexes, THH, and prepared fire zones.
Making it a great scenario for learning new rules. My thanks to Grumble Jones for a good night
of learning PTO rules.”

My thanks to Dan for a great evening of ASL. Dan is a master of these kinds of scenario designs with fortifcations, difficult terrain and lots of HIP. I think there are a lot of folks who will enjoy the challenge of locating and eliminating hidden enemy fortifications.

Well...another AAR done. Dan and I will return for a Wednesday game. Dan has graciously agreed to play GJ076 Kapitulieren Nein. Looking forward to a later war DASL with Jagdtigers and Pershings.
Until then...stay safe...
we all have a lot of ASL yet to play!
No comments:
Post a Comment