

For our first game of 2020 - Dan Best and I would reach back into the ASL past to find a suitable scenario. When we left 2019, Dan and I were slogging through the snow of the Ardennes Forest. But for our next game we would leave the frost forests for the sunbaked sands of North Afrika!!!

We would go West of Alamein to the edge of Tobruk to wage battle!
Oh the memories! I can recall when West of Alamein first came out. It was the first time that ASL hit the desert and it was as exciting as it was daunting. In fact, for my group of players...we punched the counters, read the the scenarios and cut out the overlays...only to play something on the Eastern Front.
Yep, we chickened out. Rachi Ridge got a playing, but after that we generally took a pass on Desert ASL. And yeah, I was a little sad about that, because I have always been enthralled by the North African Campaign. 8th Army and Afrika Korps...epic tank duels in the Sahara...what could be better!?!
Despite my enthusiasm I was not able to motivate my group of players back then to read the rules and play through the pack. So WOA languished on my shelf as it's cardboard warriors fought everywhere from Dunkirk to Sicily to Italy to France and Holland...but never set foot upon the desert sands of North Africa. But then I met Dan Best and suddenly the doors to North Afrika would open before me!!!


Dan and I have played a couple desert scenarios since 2016, but there are still a great many that neither of has played. ASL Scenario 37-Khamsin is one of those. So both of us were looking forward to playing it.
ROAR has this scenario with 69 German wins and 70 British wins. The ASL Archive has it with 7 German wins and 5 British wins. First glance tells us that this scenario is well-balanced. So it should be a great shootout in the western desert for Dan and I.
This scenario takes place in June of 1942 as the Gazala Battles were finishing up and the final German drive on Tobruk was beginning. Several British strongholds still barred the way to the prize, so Rommel's Afrika Korps had to batter through them. One of these would be the Knightsbridge Box. In the fighting for this stronghold, the British would send an armored support to reinforce the Scots Guards on Rigel Ridge.
As they arrived on the scene, the German 21st Panzer Division was already driving to pierce the positions of the Scots Guards. As the battle began...the desert winds picked up and soon a full Khamsin was blowing the desert sands all across the battlefield.


A very substantial force with the Marder providing the punch necessary to take down any Allied armor encountered.


My force would consist of 4 x 4-5-8's, 6 x 4-5-7's and a 2-2-8, led by a 9-1, 8-1 and 8-0 with an HMG, 3 x LMG's, 2 x ATR's, 2 x 51 MTR's, and a 2lb AT Gun. On Turn 1, I would get armor support of 2 x Grant Tanks, 2 x Crusaders, and a Stuart with a 9-1 Armor Leader.
 And now for Dan's Pre-Game comments:
“The
Germans must capture three hillock summits and not lose two more vehicles than
the British. The German plan is to
Schwerpunkt across the southern half of board 27 to keep as far away from the
British entry hexes. The Schwerpunkt
will then capture each hillock in turn.
The dust will make engagements a close battle. When the British tanks arrive they will be
engaged by the German tanks and the German infantry and halftracks will
continue to assault the British sangers and capture hillocks Hopefully the British AT gun will not go on
a rate tare and the tank battle will be an even exchange.”

My boys would look at to the west for the approaching Panzers as the Khamsin began blowing in from the southwest. It would ultimately hinder their defensive fire quite effectively.

Drats….I so enjoy fighting on pretty days...
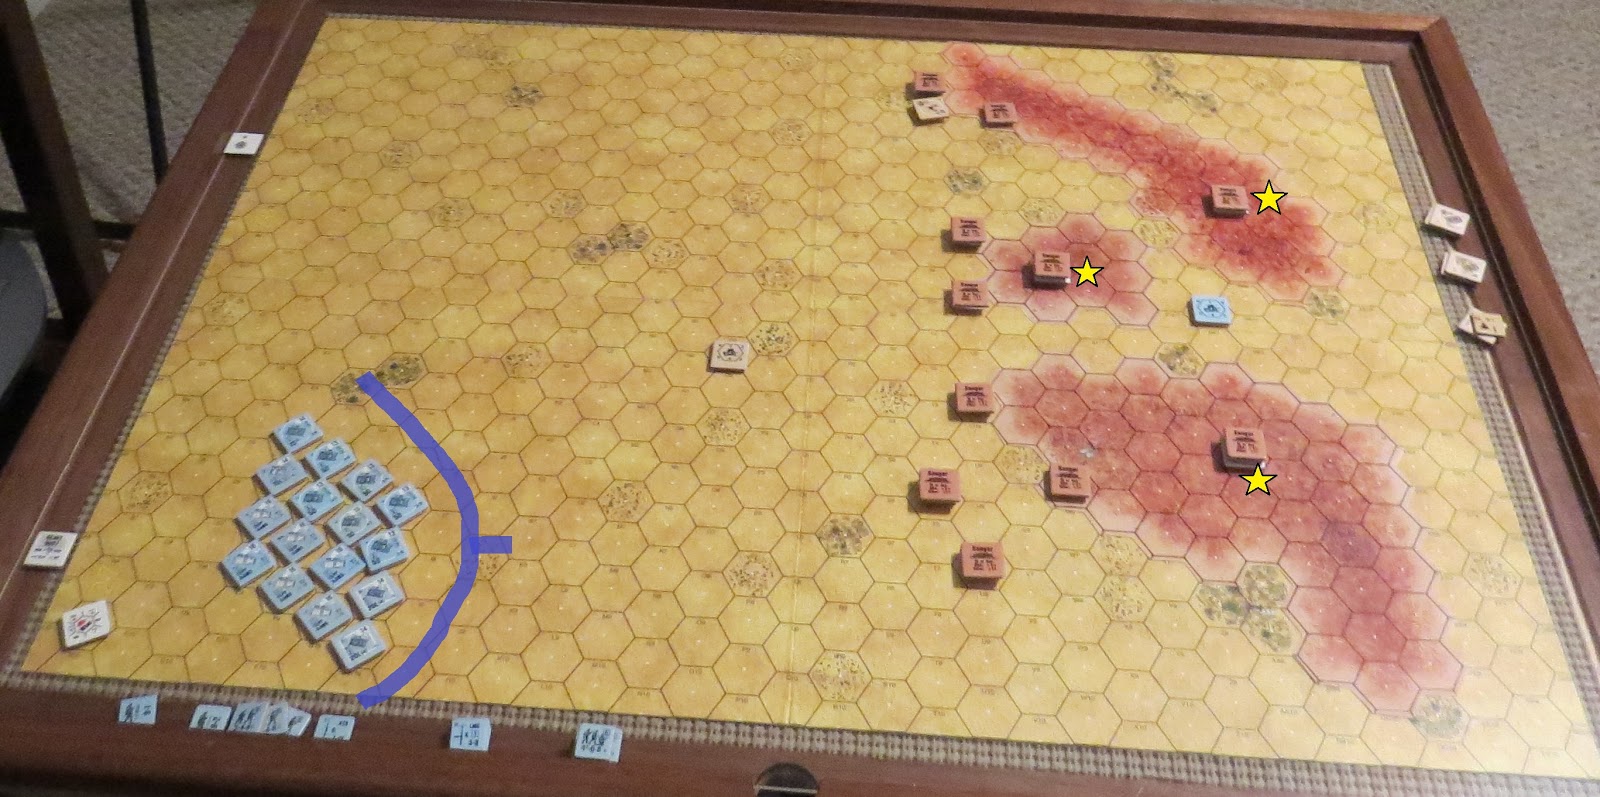
Ok two things to note here #1 - I suck at setting up Desert Defenses...it's like I've no idea what I'm doing. #2 Dan loves Schwerpunkts - and if ASL had a Schwerpunkt rule - the one pictured would be an Extreme Schwerpunkt.

"You cannot stop the Schwerpunkt Englander!!!"

 Now, one of the reasons DTO scenarios don't receive as much love as other theaters is the additional rules that come into play. This would be my first experience with Heavy Dust F 11.73 and for the bottom half of Turn 1 I would roll Gusts and we would have Very Heavy Dust F 11.731 (and yeah...there's a possibility for Extremely Heavy Dust F 11.732). Sometimes ASL can get into the weeds with certain rules and in my opinion this is one of those times. At some point, the environmental conditions get tot he point of just calling the game on account of weather!!!
Dan's Panzers would be immune to defensive fire as they moved across the desert floor. With Heavy Dust there would be a +1 hindrance added for every two hexes of range. This would make shots beyond 12 hexes impossible and everything else nearly impossible!!! Now Dan and I applied this consistently throughout the game...but there is a FLAG ON THE P LAY...

So what was the infraction you might wonder. Well, after entering our game in the Scenario Archive, we noted comments made by Michael Rogers about Light Dust and Heavy Winds. So Dan and I reviewed the rules and sure enough....we made that very goof.
 For analysis we turn to Professor Rollwright, our chief ASL advisor to Grumble Jones.
So what Dan and I missed is that we were supposed to add in a dr that is halved (FRD) of additional pluses for
light dust which is in addition to the plus for every two hexes. On a dr of 1 there would be no plus.
On a dr of 2 and 3 would be
+1. On a dr of 4 and 5 would be +2. And dr of 6 would be +3. This is what Michael Rogers was talking about
in his comment on the ASL Archive. (Our thanks to Michael for making that note!)
The impact of this goof would certainly be that a few more shots would have been misses, but as we consistently forgot to add it during play, neither side benefitted or suffered due to its omission.
Still, you hate to goof any of the rules and once again, the ASL World Record is safe...as there still has never been a perfect game of ASL played.
As I have said a few times already, DTO can be complex and getting the rules right all the time can be challenging as well. But the key is to play through it and get comfortable with the rules. Eventually, you play enough DTO or PTO and the unique rules become more familiar and easier to integrate into the game. So Dan and I will be playing more DTO this year for that very reason.

Turn 1 was pretty boring...as both sides moved to contact. I had an upfront defense, which would prove to be the wrong kind of defense. The Heavy Dust slowed everything down as it added 1 MP per hex. On my part of Turn 1 I would roll gusts and have to add 2 MP per hex, which significantly slowed me down. My mortars would be non-contributors for much of the battle due to the Heavy Dust. My infantry would be equally non-threatening for most of the game. My Sniper However (because Dan rolled too many Snakes) would contribute more than anyone else by forcing a Halftrack Recall and stunning the Marder.


Another factor in DTO is Hammada, which can immobilize wheeled and half-tracked vehicles on a 12 if you move adjacent. Dan would take this roll several times in the course of the game, but only one Half-Track would suffer the dreaded Boxcars!


At least something was stopping Dan's Schwerpunkt!!!


The battlefield would be filled with acquisition counters as both sides traded misses in the Heavy Dust. As the Panzers fired away, Dan's Grenadiers were slowly mopping up my ineffective infantry. My defenses were crumbling fast.


Dan's Grenadiers would wining the close combats as the southern Hillock fell completely into German hands. At this point, I still had control of two Hillock Summits and had the lead in DVP with greater than the 5 more than Dan. So going into my part of Turn 4, I was very much in the fight.

My remaining infantry were digging in for the next phase of the game.


But then total disaster...my Turn 4 Prep Fire was worthless and did nothing. Dan's Defensive Fire would be the decisive moment of the game. He would destroy both Grant Tanks, shock one Crusader, and destroy the other. Oh good grief...I could only stare at my board as Dan methodically wipe me out. I struggled to get any hits in my Prep Fire and had actually MALF'd both 75's on my Grant Tanks. So while I was rolling 11's...Dan was rolling 3's and brewing up my armor across the battle space. While you have to cheer your opponent's success...it was an absolute bummer of a phase for me. I felt like this entire battle that I was on the ropes against the Schwerpunkt and to suddenly watch every tank be hit and destroyed was overwhelming.


A last look at the battlefield. As Dan destroyed my last tank, I gave the concession. I was left with only my 2lb AT Gun and a few squads. This was not enough to stop Dan's overwhelming force of Armor and remaining Grenadiers. Dan had the victory and had proven the power of the Schwerpunkt once again.

Dan could report to Rommel that Rigel Ridge had been taken and the drive on Tobruk could continue! Congrats to Dan on a great win!!!
And now for Dan's Post-Game comments:
“The
plan worked. The Germans were able to
cross the board and engage the British infantry effectively. Although one halftrack was immobilized and
another recalled. Also one tank was
immobilized in CC. The tank battle was
an even exchange with each side losing one tank and the Germans losing a
halftrack. Until Turn 4, then German
killed three of the remaining British tanks and got a Shock on the fourth. This gave the Germans a huge lead in the
DVP. Considering the British had also
lost over half their infantry, there was little remaining to stop the Germans
from taking the last two hillocks. This
scenario played very similar to our game of Castles on the Horizon (J186) only
the dust storm was more of a hinderance to both sides firing. Once again, the German Schwerpunkt was not to
be stopped. My thanks to Grumble Jones
for some great desert ASL!”

Dan and I will be back next Saturday for a playing of Lone Canuck's Q8 New and Untested.
See you then!
No comments:
Post a Comment