

Another week has passed and we say goodby to March and hello to April. Last night's game would be my 30th for the year. So I'm a 10 game per month pace, which is awesome. I'm not likely to maintain that as work and vacation events come into play, but I have to say that March 2023 was very enjoyable. I'm still thinking about the March Madness Tournament and how much we had there. And I'm equally disappointed that the Texas Tournament was cancelled. I already have my vacation submitted and approved for that event and was looking forward to a 10-year anniversary tour of the central event in my ASL life.
Our good Hong Kong Wargamer, recently posted about the importance and fun of attending ASL Tournaments. Dan and I also talked about that subject and how best to encourage veteran and new players alike to dip their toes in the Tournament Pool. 10 years ago, I was not playing my best ASL and as game time began to fade with my long-time St. Louis opponent, I knew I had to branch out if my game was every to improve and move to a new level within the ASL community. The 2013 Texas Tournament did all those things for me...improved my game, gave me the self-confidence to compete, a incredible host of new friends, exposure to the vast array of Third-Party products, and of course, my friend Dan Best. I have logged 711 games since 1990 (played many more that were never recorded). And of that 711, 436 have been played against Dan Best. So, I cannot emphasize enough how important meeting Dan Best at the Texas Tournament has been for my ASL life. Even this blog owes Dan a debt, because without our games, there would nothing for me to blog about. So, if you find yourself on the fence about attending an ASL tournament for any reason, sweep them aside and make the journey. You will not ever regret that decision.

Our Friday night game would be from the new March Madness Pack. Scenario MM89 Task Force Darby, which is another small, very fast playing scenario in the pack. Designed by none other than Dan Best, this scenario depicts late war action in Italy as Task Force Darby takes control of German airbus and mops up straggling German units.
The German ELR in this scenario is a 2 and reflects the end of the war fatalism that plague the Germans at the end. No one (real or cardboard) wants to be the last to die in a war that is already decided.
This scenario is a very subtle design. I did not appreciate its nuances at the onset of play. In fact, I was a bit irritated with another attempt at defense with a skeleton force. Don't misunderstand, I liked the maps, the basic scenario premise, and the inherent options for movement in this design. What I didn't like and this is not limited to this scenario, was my force. I looked at my force and didn't see how I could defend the broader front effectively and hold the airfield. With 3-1/2 squads (4-4-7's at that) and only 2 x LMG's...I just didn't think I had a chance against Darby's 6-6-7's with an M-10 and jeeps with removable 50 CAL and 2 x MMG's. Now, I did have 2 x 37L AA Guns and these can be devastating if they get targets. So, my mental state at the start of the game was poor. I had already conceded the game in my head. This can be a bad habit, because I was so focused on my force that I didn't appreciate just how brittle Dan's force was. The M-10 is open topped and can't ignore the 37L's and on Turn 3 - the Germans would get 4 more 4-4-7's, 2 x LMG's, 8-1 and 2 x Trucks and a Kuebelwagen.
The victory conditions award CVP to both sides normally. Additionally, the Americans get 1 VP for each runway hex that is controlled, and the Germans get EVP for any German units which exit the north edge after Turn 3. And the Americans must have 10 more VP than the Germans at game end. Dan had a knowledge edge on me as the scenario designer and having play tested it three times. He knew the likely placement locations for the German 37L AA Guns and had a good sense of the flow of play for the American forces. But as you will see, such advantages are not always enough to guarantee a victory. And I must say that it is a testament to a well-designed scenario. I think you will agree at the end of this AAR that first impressions are not always valid and game play will often change your perspective and appreciation for a scenario.

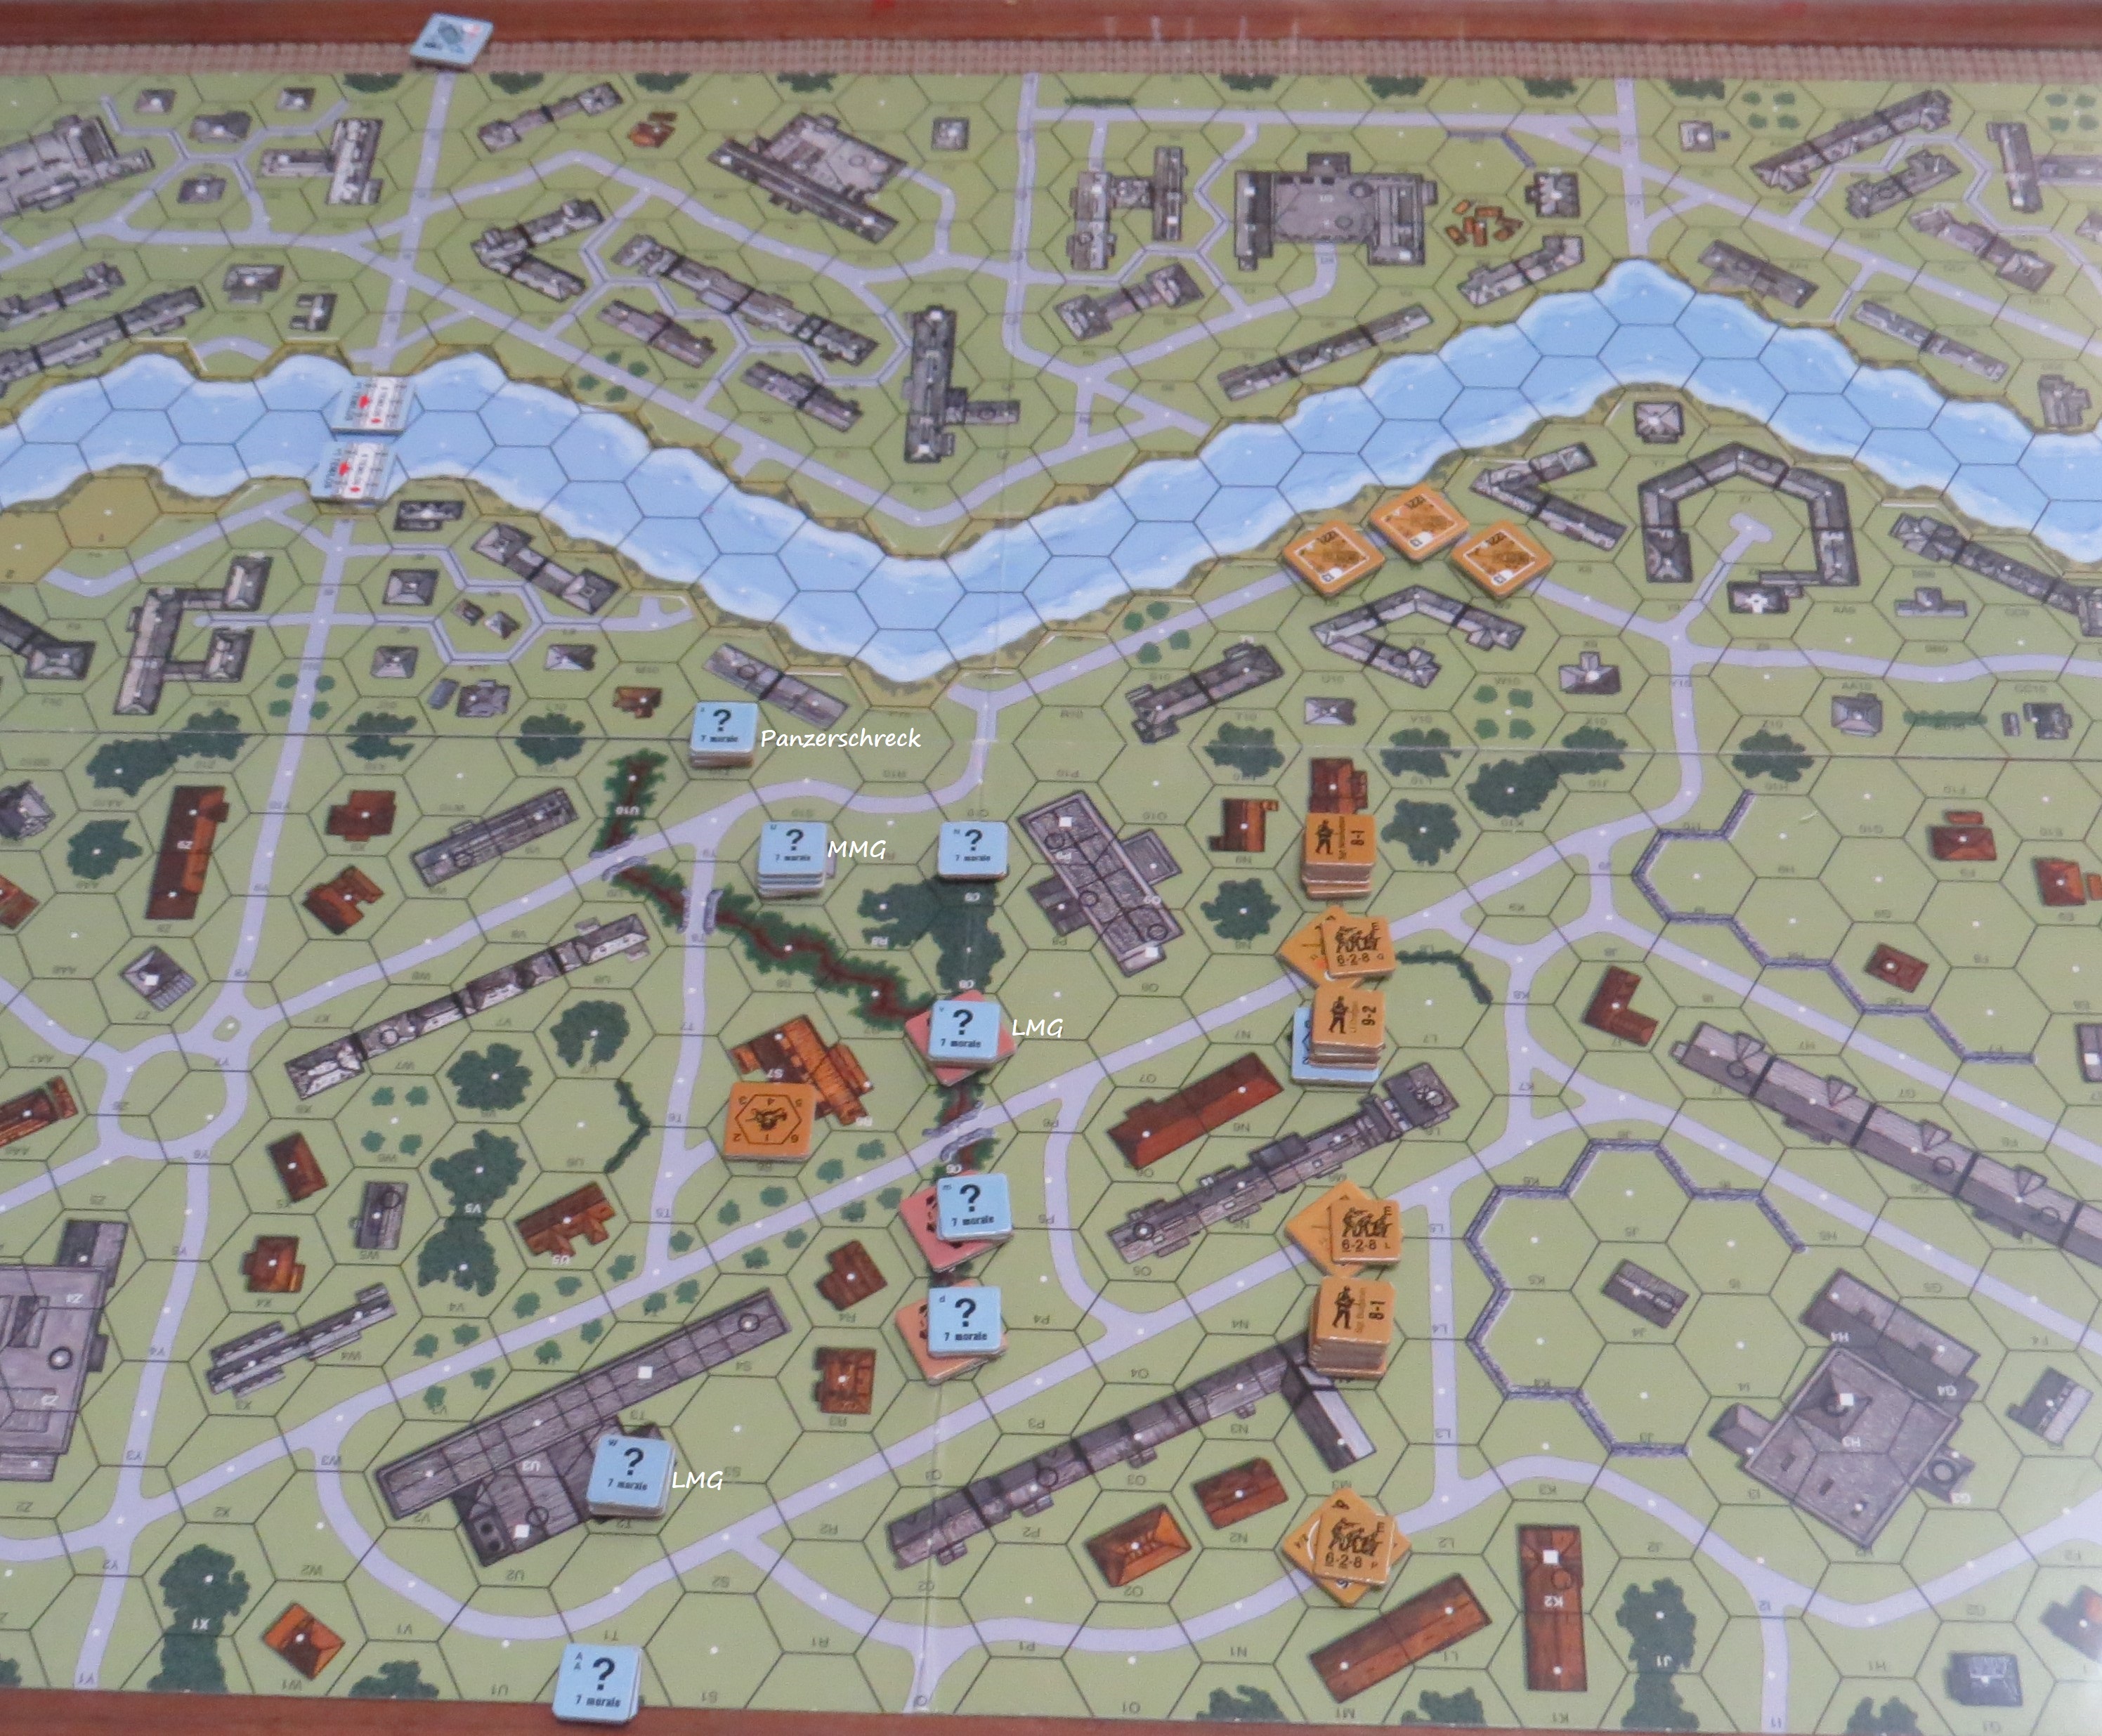
As the defending Germans, I would command elements of LI. Gebirgskorps. This force would consist of 7 x 4-4-7's, 2 x 2-4-7's and 2 x 2-2-8's led by an 8-1 and 8-0 with 4 x LMG's, 2 x 37L AA Guns, 2 Trucks and a Kuebelwagen.

As the attacking Americans, Dan would command elements of 1st Battalion, 85th Mountain Infantry Regiment, 10th Mountain Division. His force would consist of 5 x 6-6-7's, and 3 x 3-4-7's led by a 9-1, 8-1, and 7-0 with 60 MTR, BAZ45, 3 x Jeeps, 3 x Trucks and an M-10.

And now for Dan's Pre-Game Comments:
"The Americans must attack and capture the airport. It is important for the Americans to capture prisoners as they are worth double the CVP. The plan will be to attack with two truckloads of four squads the 9-1 and bazooka from the tree line on the east side of the airport. This the 8-1 and two MG jeeps set up a fire base by dismounting the MGs from the jeeps. The last truckload with the 7-0 two HS and the MTR will set up a screen on board 70 to block the German stragglers from making a run for the exit. Hopefully the M10 can knock out the AA guns without being shot up in return."

Dan's boys are lined up and ready to go. Meanwhile at the airfield, my boys hunker down and hope for the best.


Turn 1 American - The M-10 rolls forward towards the airfield. Dan sends 4 squads with the 9-1 around the east flank. The Jeeps with three half-squads and the 8-1 head to the center and the remainder take up positions to control the road and stop my reinforcements from easily crossing the battlefield for the EVP.


A look at Dan's positions at the end of Turn 1.


Turn 3 German- my reinforcements arrive. I sent the Kuebelwagen in an ill-advise attempt to keep Dan's 9-1 broken. I couldn't get there in time. I sent my infantry to the west side to engage with Dan's half-squad screen. I would also avoid being seen by Dan's 8-1 who had an MMG and 50 CAL with him on the 1st floor of the center building.


Turn 4 German - my 37L AA Guns were holding the airfield. Meanwhile my boys to the southwest were receiving Dan's attention. With no way to exit my boys, I decided to hold them back and tie up Americans and therefore weaken the general attack on the airfield.

My 37L AA Guns were key to the German defense.

Turn 5 American - Dan makes a strong attempt to take the airfield. The M-10 crew is stunned by a 37L AA Gun, while other American units are broken by German small arms fire. Dan's 9-1 goes after my now fleeing Kuebelwagen. The prospect of easy CVP led the 9-1 away from the battle at the airfield.

Dan's boys were struggling with limited options for taking the airfield.

German Turn 5 - my Kuebelwagen escapes and its contribution was drawing the 9-1 away from the main fight. My boys in the southwest had managed to break 2 of the 3 American 3-4-7's, but no board exit option would be available to them. Their mission was to tie up Americans and not become CVP.
So, Dan did the math at the end of 5 and was going to offer his concession. I pointed out that he still had an opportunity to win, by taking airfield hexes...if they survived my 37L AA Gun fire. So Dan decided to give it a try. His 8-1 fired the 50 CAL but wasn't able to get a result. He also activated my sniper...and wouldn't you know it...the Sniper would shoot the 8-1 in the head and that was it. Dan gave the concession, and it was a German win. Very interesting scenario. Worth the time to play.


"The plan did not work. The AA guns stalled the American attack in the tree line and the sniper suppressed fire from the MG fire base. Eventually the 8-1 was killed by the sniper and the CVP advantage was gone. Well played by Grumble Jones who conserved his force for the game and stayed in the fight. this scenario gives several options for each side to be aggressive or conservative and can be great fun to play. My thanks to Grumble Jones for a great game of ASL!"

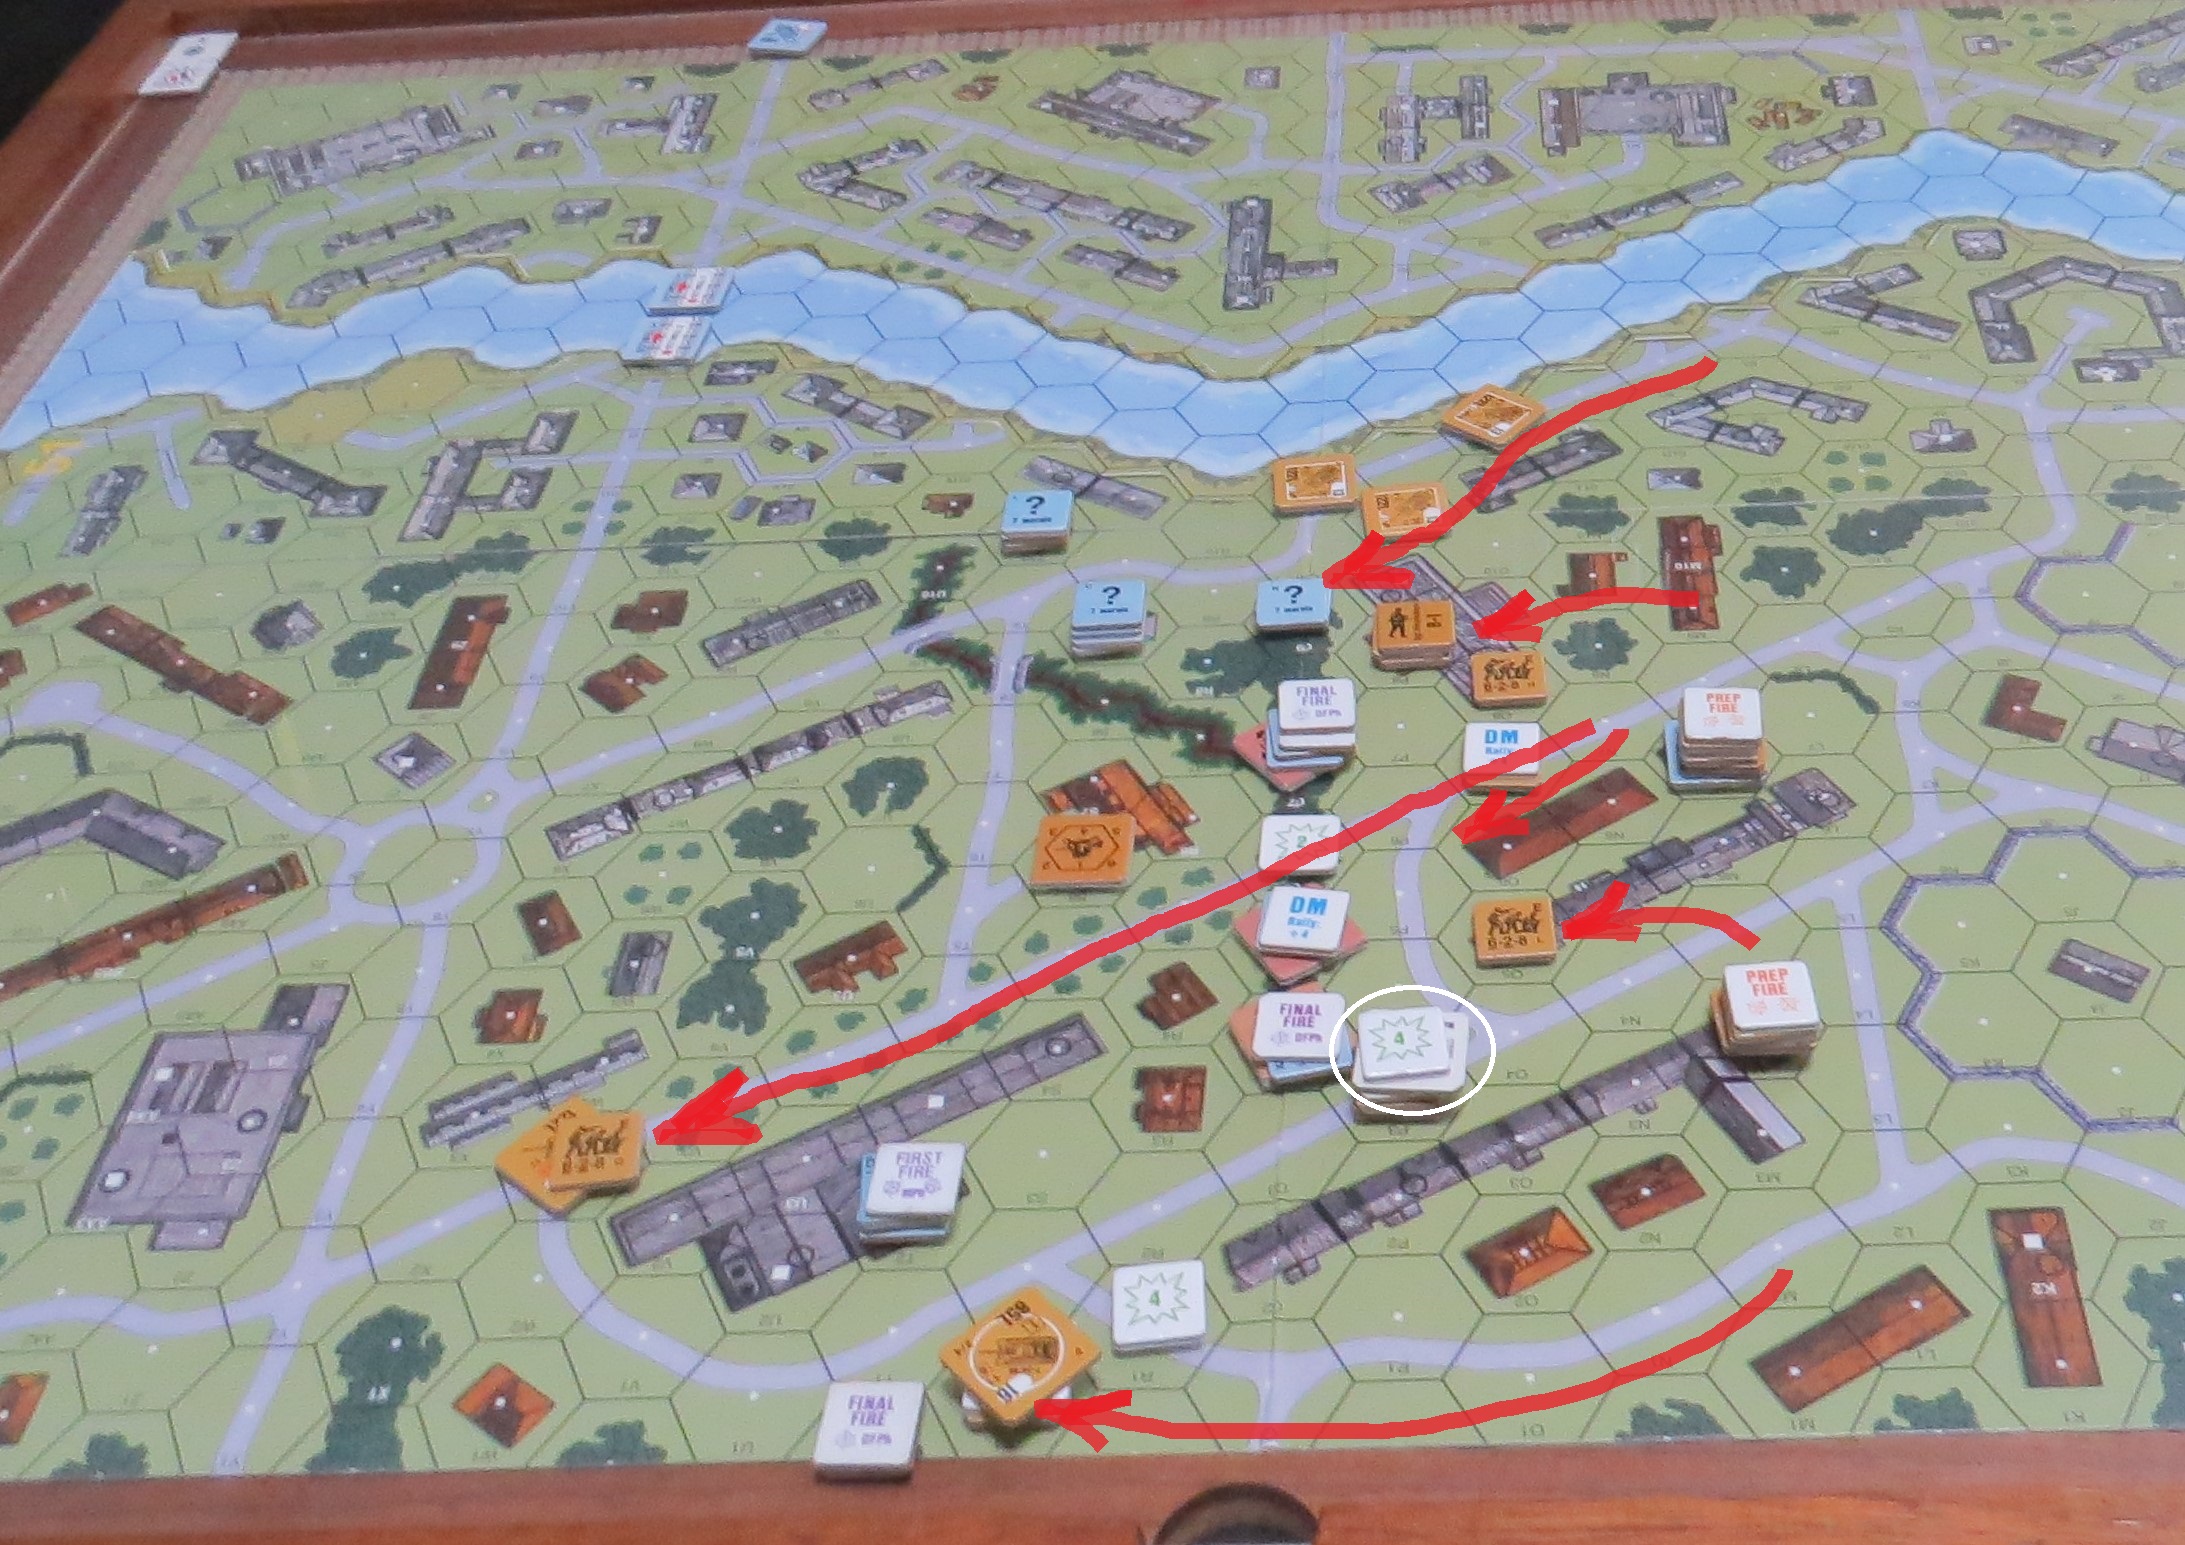
For our Saturday game, we would choose another 1945 scenario...Schwerpunkt Scenario SP234 Teltow Two-Step. Designed by Evan Sherry, this scenario depicts attempts of veteran SS troops to escape from the Soviets by successfully crossing the Teltow Canal at Neukoelln, Germany. With only seven days left in the war and Berlin near collapse, the Germans and especially SS Units were nearly desperate to escape the Soviet encirclement.

I have spoken many times about my love for Schwerpunkt scenarios. The are usually short, manageable orders of battle, clear victory conditions and a quick move to contact.
They are just awesome on so many levels and really hit my sweet spots for scenarios.
Teltow Two Step begins with both Germans and Russians on the southside of the Teltow Canal. The Germans win immediately when they have 18 VP of good order units from Group# 2 north of the Teltow Canal.
German group 1 is tasked with holding off the Russians for a long as possible to enable the escape of German Group 2, which enters on Turn 2.
On Turn 1, the Germans have a King Tiger show up. The Russians have six tanks and 4 of them have 122 guns.
German ELR in this game is a 2...even with SS units. That might be a first for me in a game involving SS to have a 2 ELR and actually see an SS squad ELR during the game. This of course reflects the panic among the Waffen SS veterans and the desperation to escape. The Russians would have a 3 ELR and I found this odd given the high morale of the Russians as they took the war in German. Dan pointed out that the Russians didn't want to get killed this close to the end and thus the 3 ELR in this cause made sense.

A look at the battle space for this scenario.
One key SSR note: the bride is already set for DEMO...so one halftrack can cross safely. Once a second one crosses, you roll to see if the bridge is destroyed. So you will see me play this like a steely-eyed missile man. We'll review this at the end.


As the Russians, Dan would command elements of the 9th Rifle Corps, 396th Guards Heavy SU Regiment and Guards Heavy Tank Regiment, 5th Shock Army. This force would consist of 6 x 6-2-8's, and 6 x 4-5-8's led by a 9-2 and 2 x 8-1's with an MMG, 2 x LMG's, a Flamethrower, an ATR and 6 Tanks.

As the Germans, I would command elements of SS Panzergrenadier Regiment 24, SS Freiwillingen-Grenadier Division 11 "NORDLAND" and Panzeraufklaerungs Abteilung 11, SS Panzer-Abteilung Hermann von Salza. My force would consist of 7 x 6-5-8's, 3 x 5-4-8's and 5 x 3-4-8's led by a 9-1, 2 x 8-1's and a 7-0 with an MMG, 3 x LMG's 2 x Panzerschrecks, a STUG, a King Tiger and 3 x SPW 250/1's.

"The Russians must break through a screen of infantry and block the Germans from crossing a bridge. The plan will be for the three IS tanks to attack along the canal while the 9-2 three 4-5-8 squads and MMG provide cover fire for the FT and three 6-2-8 squads led by the 8-1 attack in the center. The rest of the 6-2-8 squads are riders on three tanks. The last 8-1 attacks with three 4-5-8 squads two LMG and an ATR attack on the south side. Hopefully the infantry can keep up with the tanks."
So, my mission as the Group 1 Germans is to hold the line and not let anyone or anything pass through to interdict the road to the bridge. Panzerfausts and Panzerschrecks and Street Fighting or all I got to try and top the six Russian tanks. I set up in woods and at crest in the gulley to give me the best opportunities to safely fire my fausts. In the course of this game, I would fire about 20 of my available 36. It would be enough.

"Panzer alarm!"
Turn 1 Russian - here they come and right at me. I would get in a couple licks...but Dan would get his infantry in place as I held my fire to faust his tanks. In some cases, his boys moved adjacent and I had to shoot them...even though I didn't want too. But this would have an unanticipated benefit. Breaking the infantry would strip them from supporting his tanks as they punched through. I would take down one ISU 122 with a faust.

But one would get through and head for the bridge road.

Turn 1 German - I send my King Tiger into the action and forget that the IS-2m's can take me out with a turret hit. Worst move I made in this game.
.jpg)
"Herr Hauptmann!?!" "What!?!" "Where are you going?" "To the bridge...I'm going to hold the bridge" "Not for long you won't...those are big Russkie tanks across the canal!!" "Dude...I'm in a King Tiger!"

Turn 2 Russian - more Russian tanks blow by me, but the second ISU 122 is destroyed. Dan's flamethrower cooks a few of my grenadiers, but I create a Hero, who will hold one of the little bridges for two turns and kill a squad of Russians in Close Combat and a half-squad in the street.


Little things like Heroes in ASL can have major impacts on the game.

Losing a King Tiger and it never doing anything at all is just gutting. So much potential just gone. I had forgotten the King Tiger's vulnerability to a turret hit. Dan's 122's were 25 to KILL vs 14 armor. Anything but a 12...against a King Tiger...oh good grief. My personal ELR bottomed out. I should have parked my King Tiger with a view to the road and out of sight of three 122L guns. But I didn't...and paid the price. The crew would get out, but then be KIA's by machine gun fire.

Turn 2 German - I run my reinforcements into the fight. I have a concealed 3-4-8 ready to jump on the T-34/85 in Close Combat. My STUG armor assaults with a squad and Panzerschreck and is promptly knocked out, but one of the IS 2's had fired. These can't Intensive Fire. So my Half-tracks make their way into bypass locations. His other IS 2 takes a shot and misses. With both fired, I run my last Half-track right past them both and across the bridge.


My close combat attempt against the T-34/85 fails. But my defensive line is still intact against the Russian infantry.


Turn 3 Russian - oh what a miserable turn for my boys. I do well against the Russian infantry, but just awful against the tanks. Panzerfaust checks end up as PINS and Dan successfully places his tanks all along the main road to the bridge. He even has one on the bridge. (and as far as we know, this was perfectly legit.) The King Tiger could not enter the bridge and another German half-track crossing would require a Bridge DEMO dr of 1-2 would destroy the bridge and the third half-track would DEMO the bridge on a dr of 1-4. But the SSR said nothing about Russian tanks on the bridge.


Turn 3 German - I hold my half-tracks in their bypass positions. Can't risk them yet. I only need one Movement Phase to get across the bridge. I'm going to wait until Turn 5. My grenadiers move up Panzer Strasse to take on the four Russian tanks blocking my route to freedom.


My MLR had been pushed back but was still keeping the bulk of the Russians away from the bridge area. And my boys had taken out two more tanks. Only two more were left. The day of the Fausts wasn't over yet.


Turn 5 Russian - Dan's infantry move up behind me on Panzer Strasse, but my 8-1 continues to hold the rest of them off.

Only a single Russian IS 2 remains.


Turn 5 German - this is it! Only one IS 2 stands between us and victory. (unless the bridge collapses) My 4-4-7 fires a Panzerfaust...hit and then rolls an 11...no effect...WHAT something survived a Panzerfaust hit!!! HOLY COW...never...ever seen that. Go for a second Panzerfaust...I got it...fire...a hit...and a 4 = destroyed IS 2. The way is open.

My grenadiers had done their job.

My second half-track waits until the infantry that can have crossed over. Then it goes...I roll a dr and roll a 5 no collapse. The last half-track crosses over and I roll a dr, 4. The bridge collapses. With that it was game over and a German victory.

Germans in 1945 with Fausts and Schrecks and ATMM's are lethal in an urban setting. Dan's armor had limited options and had to preserve their Main Armaments in case I tried to move my half-tracks. Despite losing my King Tiger and STUG, my Grenadiers were able to faust four tanks, schreck one tank and kill the 6th in street fighting with an ATMM. The success of my Group 1 Germans to hold the line for as long as they did against the Russian infantry was key to the German victory.
My thanks to Dan for two fantastic games of ASL. Both games went down to the wire and could have gone either way. They were just great, straight up ASL at its cardboard violence best.

And now for Dan's Post Game Comments:
"The plan did not work. The infantry did not keep up with the tanks and soon the Germans were able to eliminate the unsupported armor. When the last tank was knocked out the Germans were able to exit the required VP. Well played by Grumble Jones who survived the loss of the King Tiger to stay in the game for the win. This scenario is great fun with both sides needing to keep their combined arms attack and defense. My thanks to Grumble Jones for a great game of ASL!"


That's a wrap on another outstanding ASL weekend!
Dan and I will return with more ASL HEAT next week!
We will see you then!
No comments:
Post a Comment