

When last we met, Dan and I were locked in a desperate fight in Normandy. But now we would find ourselves in the dark and bloody ruins of the Red October Factory in late October 1942. Yes...STALINGRAD. We have spoken often of the impact that Stalingrad has on ASL and SL before it. It is in Stalingrad that most of us fought our first tentative battle of SL and ASL. And yet, the new Red Factories and Red Barricades before it take us into an ASL experience beyond the skill of average ASL playing. Red Factories presents you with a master class in ASL tactics and rules management. You cannot approach these scenarios lightly. The terrain and the situations will challenge the best players to find offensive and defensive solutions that grant victory despite the vagaries of dice rolls and the strength of your opponent's tactics. A beer and pretzels mind set will not serve you well...the Guards Counter-Attack yes...but Red Factories will force you to levels of concentration and focus beyond the early days of Cpl Uhl and Lt. Dubovich. And let me say that this is ASL at it's best and most satisfying. It'r remarkable to me as to how well ASL provides a flavor of the difficulties of offensive actions at Stalingrad. A few playings of these scenarios and you realize the enormity of the challenges facing the Germans in Stalingrad as 1942 neared its end.

Readers of my blog will recall that I have often commented on a bit of dislike of the heavy attritional fights associated with urban scenarios. This opinion remains unchanged. I still will always prefer the more open maps and the ability to influence the battle with maneuver. But there is also a time and place to enjoy the challenges of the kinds of fighting seen at Stalingrad.
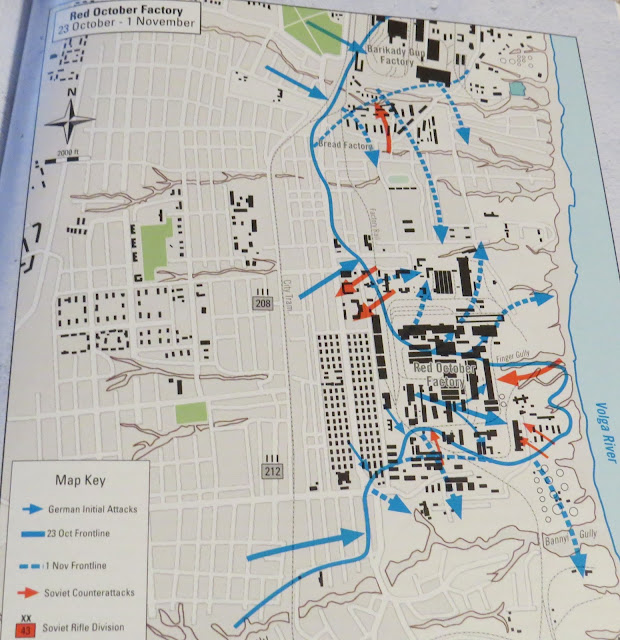
Dan and I elected to play Charles Kibler's scenario, RO2 Second Step. In this scenario we follow the Grenadiers of the 79th Infantry Division as they attempt to push through the Red October Factory and reach the mythical Volga River. Despite horrific losses, the Germans would advance through the factory. Of course replicating history in ASL is no easy task. ROAR has this scenario with 8 Russian and 2 German victories. So...this scenario is tough on the Germans. The Germans are tasked with securing 3 of 6 Factory Halls by game end. 6-1/2 turns is all the time allotted for this objective. This means the German assault has to make some quick gains and retain enough force to take on concentrated Russian defenses in the remaining objective halls.

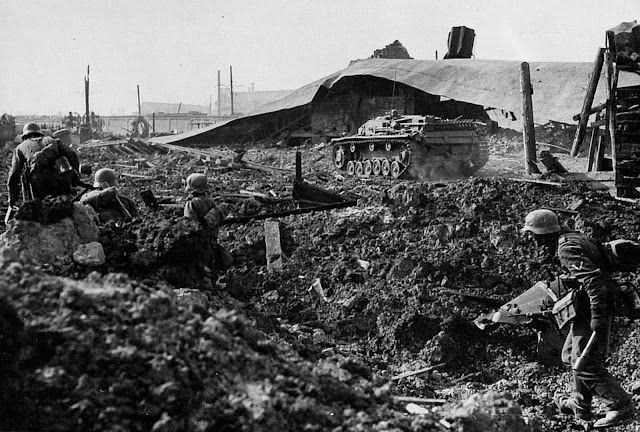
The Red Factories maps are absolutely fantastic. I can think of no other wargame out there that so completely puts you in the actual streets and buildings of Stalingrad. I say it often, but ASL stands alone at the top of WWII wargames.

As the attacking Germans, Dan would command the men of Infanterie-Regiment 212, and Sturmgeschuetz-Abteilung 244. This force would consist of 7 x 5-4-8's, 12 x 4-6-7's and 2 x 2-2-8's led by a 9-2, 2 x 8-1's and 2 x 8-0's with 2 x MMG's, 6 x LMG's, a Radio with 200mm Rocket OBA, 2 x 81mm MTR's, a STUG 75* and 2 x Stukas.

As the defending Russians, I would command the troops of the 112th Guards Rifle Regiment, 39th Guards Rifle Division and Factory Militia. My force would consist of 8 x 6-2-8's, 9 x 4-5-8's, 6 x 4-2-6's, and 2 x 2-2-8's led by a 9-2, 8-1, 8-0 and 7-0 with 1 x HMG, 1 x MMG, 4 x LMG's, a DC, a 45L AT Gun, 12 factors of AP mines, 2 x 1+5+7 Bunkers, 2 x Trenches, and 3 x Wire.
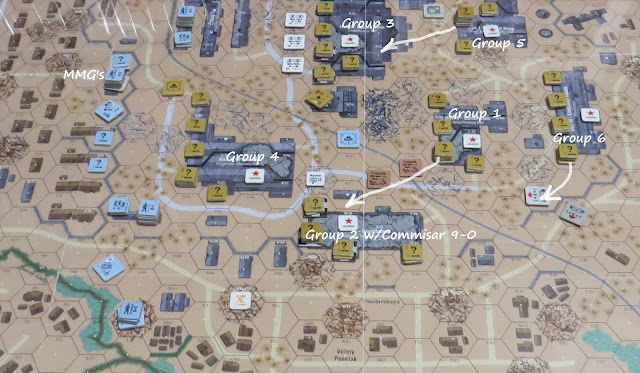
NOTE: The Russians are divided into 6 Groups and the Russian Player sets up the up with one group in each of the 6 victory location halls.

A look at the six halls that the Germans will be gunning for.

And now for Dan's Pre-Game Comments:
"The Germans must capture three factory buildings. The Russians get six groups of defenders who outnumber the the Germans, but all must set up in a different building. The Germans will attack with two battle groups each led by an 8-1 leader and with three 5-4-8 squads with an LMG. Each battle group will attack the building on the north and south ends of the board. The overwatch team will be the 9-2 with three 4-6-7 squads and two MMG to dominate the middle of the board. Plus, the 8-0 with the radio and a 2-4-7 HS. The radio will immediately go for the 200mm rocket OBA and place it in the middle of the board. Hopefully the OBA will disrupt the defense and allow one of the battle groups to exploit the gap."
The Russian Player has some serious decisions to make when setting up. You get 6 fortified locations, 3 x Wire, 2 x Pill Boxes and 12 MINE Factors. How you place this is critical to your success or failure. I would place the Group 4 Militia in the Plate Mill. I expected that would be the Germans first target and I expected it to fall quickly. Group 3 and 2 would be the 4-5-8's and they would be placed in my main line of resistance. A trench would connect Group 1 to Group 6 so that I could quickly funnel 6-2-8's to the Warehouse building. The Warehouse building concerned me the most as it is adjacent to the Plate Mill. Dan's Germans could literally advance right next to it from inside the plate mill. I placed three fortified locations here to keep the Germans out. Then I placed all 12 Mine Factors as AP in the debris hex that connected the two locations.
Group 5 was placed to support Group 3 and lastly Group 6 would have the HMG and advance into the pill boxes covering my southern flank.

Of course...no plan survives contact with the enemy!!!

This line would be the Russian MLR. Keeping the Germans behind this line was my objective.

Turn 1 German - Dan's mortars go on a Smoke rate tear and smoke me pretty good. He moves a large group along the north edge. I had hoped my wire would dissuade him from that approach. It did not. But his biggest move was against the Plate Mill, which I had assumed and my 4-2-6's held him off..as incredible as that was...


On my part of Turn 1 - I ran my 6-2-8's from Groups 1 and 5 in to support Groups 2 and 3 upfront. My HMG advanced towards the pillbox locations. The Germans had begun to swing around my southern flank. This was the major vulnerability of the Warehouse location.


Turn 2 - Dan would get radio contact and the Nebelwerfers would hit me in the center. I would lose a 4-5-8 and the AT Gun Crew. Dan would also crater the area pretty good. But otherwise my force was unaffected.


At the end of Turn 2 - my boys had done well. The German advance to flank the Warehouse was completely eliminated even after a German Hero was created. And in the Plate Mill, one of my 4-2-6's would start their journey to becoming Heroes of the Soviet Union. They would eliminate 3 German squads in Close Combat and then jump onto Dan's STUG. They would not destroy the STUG, but would break and escape back to my Commissar in the Warehouse.
ASL games are won or lost by the most unlikely events. I had written off the 4-2-6's in the Plate Mill. They were supposed to be a speed bump to slow down the Germans for 1 or 2 Turns. Instead, they were killing German squads and forcing Dan to spend valuable time overcoming them in fierce fighting. 1/6 of Dan's infantry were eliminated by a single 4-2-6. Casualties like this would have far reaching impact on Dan's offensive punch by the end of the game.

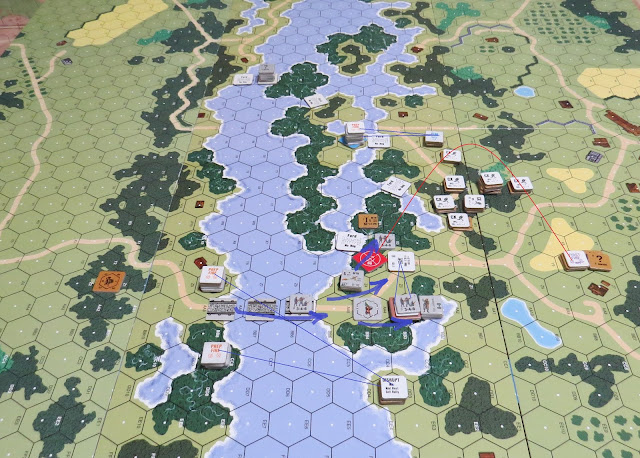
Turn 3 - Dan would roll a 1 and the drone of Stukas overhead would cause Russian eyes to peer skyward as Dan's attack shifted to support the attack on the northern flank. For the moment, the southern flank attack was finished. The STUG had move around the Plate Mill and Dan funneled more grenadiers into the Plate Mill to eliminate my stubborn Militia. But things were not all good for the Russians. Dan slipped around the wire and entered the Sorting Hall through the rubbled fortified location. His ARTY had opened up my MLR at this point. My gun was out action and my boys were being pummeled by Dan's 8-1 with 3 x 5-4-8's and 3 x LMG's. I couldn't stand up to that kind of firepower. For the first time in the game, I was becoming very worried. If Dan broke through and took the Sorting Hall he would find the other two locations filled only with Dummy units. This would force me to shift some of my 6-2-8's away from the Warehouse and back down the trench and into the Calibration Hall keep Germans out of my backfield.


The Stukas lined up to drop bombs on my 9-2 in Q39. This was indication that Dan was eyeballing the Warehouse to be his third victory location.

Both Stukas would miss their sighting task checks.

Whew...safe for the moment as the Stukas circled overhead.


After 3 Turns, a look at the German advance. I was still holding the Plate Mill and the Sorting Hall. Losses had been high on both sides, but my Russians and particularly my Militia were hanging in there.


Turn 4 German - Dan continues his efforts to take the Plate Mill and the Sorting Hall. His STUG had moved to the rear of my boys in the Plate Mill as his mortars dismantled and moved. His Stukas were also still flying above.

Turn 3 German would end with not much progress. The Plate Mill had not fallen and I had taken a defensive stand inside the Sorting Hall.

Dan's leaders had taken a hard hit as well. My Sniper would KIA an 8-1 and an 8-0. This loss of leadership at the key points in the advance would slow Dan's attack still further as he couldn't rally several squads.

My Sniper wasn't overly active...but when I got him...he was harsh.

On Russian 4 - I tried to keep a presence in the plate Mill and reinforce both the Sorting Hall and the Warehouse as these two were the logical German objectives once the Plate Mill was secured. Dan's Stukas would bomb both Q38 and Q39. My 9-2 stack would be hit...broken and casualty reduced. But the bomb aimed at Q38 and my Commissar stack would miss.


A look at the Russian MLR after 4 turns. We had reached the half-way point. Only 3 German Movement Phases left.

Inside the Sorting Hall, I had set a DC...but wasn't yet two hexes away from it, when Dan moved into the location. My 6-2-8's would hammer them nonetheless...


Turn 5 German- Dan's attack would finally break all my units in the Plate Mill, but I had made local counter-attacks in the Sorting Hall and slowed down the German advance.


Turn 6 - German - The Plate Mill belonged to the Germans. Dan would attempt to move forward towards the Calibration Hall in the center, but my boys would repulse them. The STUG would attack Hall 10 in the Rear and take control as all I had there were Dummys.


Turn 6 - Last Russian Movement Phase. I sent boys back to recover Hall 10 and reinforced my attacks in the Sorting Hall, which would force a large stack of broken German units to leave the building.


At the end of Turn 6 - I had even sent a hero and squad back into the Plate Mill.


A look at victory location control at the end of 6. My boys had control of all the halls except the Plate Mill.

Turn 7 German - this was it. Dan's mortar would go on another smoke rate of fire tear and prepare the way for a final assault on the Warehouse. But first Dan conducted the attacks in the north. These were repulsed with heavy losses. The STUG had moved towards the Calibration Hall in order to VBM Freeze my HMG...but it bogged in the debris. With that Dan conceded and it was game over and a Russian Victory. It had been a bloody fight. I had lost 12 squads and Dan had lost 9.

My boys had won the day. Dan and I both agreed that this had been a fun three evenings of ASL. It's a good scenario, but it's very difficult on the Germans. Even with smoke and huge firepower killstacks...it was the lowly 4-2-6's in the ruins that won the day and stopped the Germans early in the battle. The Plate Mill has to fall quickly in order for the Germans to reconsolidate and renew their assault. German squads have to have numerical superiority against each of the halls. The mutliple attacks diffused Dan's attacking force too much and allowed the Russians to hang on and in some cases outnumber the Germans in the halls. My thanks to Dan for a great game and for never losing heart. He was attacking me with as much enthusiasm on Turn 7 as he did on Turn 1.

And now for Dan's Post Game Comments:
"The plan did not work. The sniper killed one 8-1 and a 4-2-6 conscript squad went on a CC bonanza to eliminate three attacking squads one after another. The 4-2-6 eventually battle hardened into a 4-4-7 and created a leader. This disrupted the southern attack which only captured one building. The OBA drifted north and opened a gap, but the north battle group made little progress and could not take a building. The StuG went on a joy ride and captured an unoccupied building but could not hold it. Well played by Grumble Jones, with good use of reinforcements and his fortifications. My thanks to Grumble Jones for some great Stalingrad action!"

Our second game, which was played on Saturday would keep us on the Russian Front. Dan is a big fan of ASL Scenario 54 Bridge to No Where. This would be our first playing from the new Hollow Legions 3rd Edition. I first played this scenario in 1994...yes 28 years ago and I lost it as the Italians. My original Hollow Legions was purchased in Ballwin, MO in 1989. My Italian counters were not doing well. And I stopped using them for the most part in place of the new LFT Italian Counters, which I have grown quite fond of using. So after 28 years...it will be awesome to have a new, better looking and better die cut set of counters for my Italians. My lifetime victories as the Italians is 11 wins and 7 losses. This surprised me to be honest. I never feel very confident of winning when I have the Italians. I don't enjoy playing ASL with 3 factor squads and bad morale. Breaking and ELR'ing are too common place. And 3 factor shots attract snipers if you get any results. Italians also force you to stack more than you would like just so can get enough factors for a decent shot. This is of course risky with a stack of 6 morale units. But you can win games with the Italians and my own record confirms this fact.

My copy of the Hollow Legions 3rd Edition arrived today...literally two hours before game time. I didn't have time to use any of the counters, but could use the updated Scenario Card. This edition of Hollow Legions is fantastic. The quality of MMP products these days is really second to no one else. We spend a lot of money on these games and so quality is pretty important when you're shelling out over $100. Thank goodness the games were not that costly back int he early days. I could never have afforded them and would have had difficulty convincing my wife that I needed to spend that kind of money, when it was a substantial sum in those days. It's still a chunk of change, but much more manageable these days.
A Bridge to Nowhere, as I stated earlier is one of Dan's favorite scenarios and I believe this would be his 6th of 7th playing...but of course this would be his first playing of the 3rd Edition verion. Designed by Eugene Murrell,, this scenario depicts a surprise river crossing assault by the Italians against unsuspecting Russians in the Ukraine. This is one of the all-time ASL classic scenarios. ROAR has it with 103 Italian and 76 Russian wins.

As the attacking Italians, I would command the men of the 1 Battaglione, 80th Reggimento Fanteria "Roma". This force would consist of 8 x 4-4-7's, 7 x 3-4-6's, and 4 x 2-4-7's led by a 9-1, 8-1, 8-0, and 7-0 with 2 x MMG's, 5 x LMG's, 2 s 20L ATR's, and 2 x 45 MTR's. A pretty nice force overall.

As the defending Russians, Dan would command Elements of the Soviet 9th Army with a Bridge Security Platoon and Village Garrison. Dan's force would consist of 2 x 5-2-7's, 3 x 4-4-7's, 7 x 4-2-6's and 2 x 2-3-7's led by an 8-0, 7-0 and 6+1 with an MMG, 2 x LMG's, 3 x ATR's, and 2 x 50 MTR's. On Turn 2, the Russians would get a T-40 Tank with an 8 factor CMG.

A look at the battle space for this classic game. The Italians have options to cross the river using the fords to the north or the bridge in the south. I would sent too many of my best troops to cross via the fords. This is a mistake...which I will discuss further.
And now for Dan's Pre-Game Comments:
"The Russians must defend the bridge and approach road on board 7 and hex 17Y10. I like the scenario because of the change in terrain that makes a big difference in the game (all Marsh is Woods). Also a battle between ELR 2 troops makes for fast degeneration of each force. The bridge defense will be centered on the 4-4-7 and MMG in 7AA3 foxhole, joined by the 7-0. Dummy stacks will set up in 7Y9 and 7CC8. With a 4-2-4 in 7EE8. The other 4-2-6 will set up with the ATR in 7DD3 and the 2-3-7 HS with MTR in 7W4. Hopefully these troops will hold two turns until the village garrison can arrive and set up a defense around 17Y10 to 7Y3 road."

I would send my two best leaders with all of the LMG's and 6 of my 4-4-7's to cross the river using the fords. I didn't understand that entering a ford takes all of your movement. I would never get my two kill stacks across the river...not during the whole game. Some of this is by choice, but remember this when following this battle. The Italians would be attempting to win this scenario primarily with 3-4-6's led by an 8-0 and 7-0.


I figured that Dan would cover the bridge with a MMG Fire Lane. And he did. One squad would break, but we would move up and my Opportunity fire shot with my two MMG's would manage to break Dan's MMG squad and his 7-0 Officer would be KIA'd.


With Dan's MMG squad broken, the bridge could now be crossed.

The abandoned Russian MMG would become very important for my Italians.

A look at the Italian line after 2 turns.


Dan would aggressively move the T-40 towards my boys. My ATR's would get a hit, but no penetration. My captured Russian MMG would also get a hit but nothing more. The 8 factor CMG on this would be no joke.
Turn 3 Italian- all roads led to Rome this turn. I would disrupt the far south Russian 4-2-6 with an ATR. I would similarly eliminate the Mortar half-squad on the north side of the bridge. And my captured Russian MMG would knock out the T-40. Dan's 50 MTR in the grain field would cause me some grief, but overall, my Italians had been very successful in getting across the bridge. My 9-1 was stalled and for the remainder of the game would move no further. I would spend the game firing at whatever Russians appeared in the R1 building.

I really didn't like these guys...

Turn 3 Russian - Dan sends his 6+1 officer to try and rally the disrupted 4-2-6 in the south. He would also consolidate his positions in the center woods.


A look at the Russian MLR after three turns.

Weapon malfunctions would plague the game (don't they always!?!). I would break and destroy a 45 MTR and an MMG and just break the other MMG and an ATR. Dan would break two of his ATR's and not repair either of them. In other news, Dan's wheatfield mortar would continue to drive me bananas!!

My remaining mortar tried unsuccessfully to take out Dan's mortar.

With my kill stacks playing Bocce on the island...my 3-4-6's pressed forward the attack.

A look at Dan's final MLR. I would have to start breaking some Russian squads if my Italians were going to have any hope of winning. Dan's 9-0 Commissar was doing his part to keep the broken Russians in the fight. He also made an example of 2 full squads...which he gave the Makarov treatment.

Sometimes...motiviation isn't easy...

As the game began to wind down, my boys had secured a nice bridgehead.

Turn 9 - the final Prep Fire Phase for my boys. I would have to get some breaks. And I would get enough to reduce Dan's firepower pointed at the road to 14...2 less than the 16 needed for victory. My Italians had won despite me stranding 6 of my 4-4-7's and all of my LMG's on the island. My thanks to Dan for a great week of ASL. These were two memorable contests.

My boys could celebrate the win.

And now for Dan's Post Game Comments:
"The plan did not work. The Italians attacked strongly and broke the 7-0 and 4-4-7 and got across the bridge. The tank counterattacked to plug the gap but was knocked out by the captured MMG. The Italians continued to push into the 7Y3 to 17Y10 road area and slowly wore the Russians down. In the end the Russians could only place 14 FP factors on the road. Well played by Grumble Jones! This scenario has been modified to give the Russians another 4-2-6 in the village in HL3. It is still a great scenario where low quality troops battle it out for a bridge. My thanks to Grumble Jones for a great game."

That's all for now.
Dan and I will return next week for another Red Factories Scenario and something else yet to be determined.
We will see you then!
Very cool - looks fun!
ReplyDeleteRarely do I see a scenario pictured 'in play' that just absolutely jumps out at me as a "must play". RO2 is now an exception! It really looks like a fun and dynamic scenario. ROAR record not withstanding, it looks like a helluva fun play. [BTW, that pic of the first Stuka wave failing their STCs and swooping on by? Those are the kind of pics that I really enjoy, and no other blogs do stuff like that. Adds to the flavor!]
ReplyDelete