
COVID-19 continues to impact us all and has resulted in another forced vacation for myself. Certainly, a small discomfort to endure, when so many others are suffering far worse. All told I have to burn 80 hours of my 2020 vacation, which is 10 of the 15 days I get. This will of course mean that if and when the various lockdowns end, I'll have no available days to do or go anywhere. My nearest family lives an 8 hour drive at the closest, so losing vacation days will add to the general misery that 2020 has been.
Having said all that, the bright side of all of this has been the opportunity to play a lot of ASL. So...it's not all bad after all. So far this year, I have played 36 scenarios, which is the most ever in only five months into the year. This certainly takes away the sting of not being able to attend tournaments this year. So that brings us to a Wednesday game. Since, I'm off this Thursday and Friday, I thought why not get in a game on Wednesday night to kick off my vacation in style!

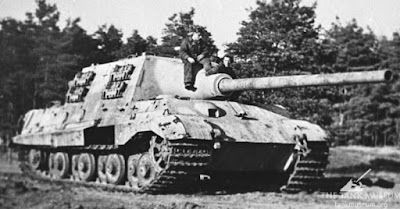
Dan was gracious enough to indulge me in a playing of one of my 2019 scenarios. Kapitulieren Nein was one of my favorites from last year and is of course a hypothetical scenario regarding the surrender of Schwere Panzerjaeger Battalion 512 at Iserlohn, Germany. This event was captured on film and is fascinating to watch. A quick search of YouTube will bring up any number of good clips of this event.
Scenario design for me is a process that begins with a spark. A picture or a paragraph detailing a close combat action is often the catalyst for putting a design on paper. I usually work fast while the steel is hot to put as much of the scenario together as I can before the inspiration evaporates. More than a few scenarios have ended in the recycle bin over the years. Sometimes, I lose interest and can no longer take it from inception to completion. Other times, I have it all laid out and start walking through on the selected boards and discover, it's just not workable, playable or interesting. So that's a bit of insight into my process. It's not necessarily the best way to work up a scenario, but when you are trying to create a new one each month, you have to ride the lightning when it strikes!

As an ASL player it's hard to watch an entire platoon of Jagdtigers just que up for surrender without firing a shot in anger. On the plus side, many...many lives were saved by the actions of Hauptmann Albert Ernst. This unit had in fact inflicted heavy losses on the US armored forces arrayed against it, but Hauptmann Ernst understood the math and realized that his unit's resistance would contribute nothing positive to a lost cause and whose surrender would spare not only his men but the people of Iserlohn. And of course, more than a few American lives were also saved.

The pictures of the German surrender that day and the tremendous number of machine guns and panzerfausts laid out in front the of the Jadgtigers got me to thinking that the Germans were certainly loaded for bear and would have given a hard accounting of themselves in any fight for Iserlohn. And so a scenario was born!


The American 99th Infantry Division would take the surrender of Ernst's Panzerjaegers. The 3rd Armored was also in the area and had Ernst decided to fight it out, would have been called for support. For this scenario, I would include Pershing M-26's and M-45's to confront the Jagdtigers.
The Americans would also have a ton of infantry support and well-equipped with Bazookas. Additionally, I included a search function for the Americans to located stores of Panzerfausts within Iserlohn. Overall, the Americans are well-equipped to deal with the armor.
The scenario victory conditions give VP to each side based on the following. The Germans gain a point each turn that they control the Rathaus and this is multiplied by the number of functional Jagdtigers still in play. So for a 7 turn game, the German player can conceivably earn 21 points. The Americans gain points for each stone building controlled at game end. So the American player can conceivably earn 15 points at game end. This disparity in points, compels the American Player to do one of two things quickly...1) capture the Rathaus or 2) destroy Jagdtigers. Naturally, the German player needs to keep 2 or more Jagdtigers alive and retain control of the Rathaus. Since CVP don't matter, the American player can certainly be aggressive with the infantry. The Germans have two HMG's, which can slow the Americans down.

Oh did I mention that this is a DASL scenario? Oh yeah, DASL where the ranges are nice and short. The Rathaus has a level 3 Clock Tower/Steeple. Even an LMG up there has the range to hit anything it can see. And again, an aggressive American infantry assault can cover ground very quickly. The German player will need a full combined arms defense to hold out before the American armor arrives on scene.

After rolling for sides, I would get to command the Germans of Hauptmann Albert Ernst's 512 Schwere Panzerjaeger Battalion. My force would consist of 8 x 5-4-8's, and 2 x 2-2-8's led by a 9-1 and 8-0 with 2 x HMG's, 2 x LMG's, a Panzerschreck, Kubelwagen, 250 Half-track and of course 3 x Jagdtigers. A very stout little force.
 The 9-1 Armor Leader represents Hauptmann Albert Ernst. He is the rock of German morale and the will to continue the fight and if he is killed, German ELR drops to 1 for the remainder of the scenario.
While serving on the Eastern Front, Ernst would receive the nickname of the "Tiger of Vitebsk" following the destruction of 19 Soviet Tanks with his Nashorn. Can't recall reading about that many Nashorn aces...so here's one of those. Interestingly, Ernst would die in 1986 in Iserlohn. So his decision to surrender that April day had more meaning for him personally, than we might have guessed.

 As the scenario attacker, Dan would command the "Battle Babies" of the 99th Infantry Division. This force would consist of 3 x 6-6-7's and 12 x 6-6-6's led by a 9-2, 9-1, 2 x 8-0's and a 7-0 with an HMG, 2 x MMG's, a Flamethrower, 5 x BAZ 45's 2 x DC's and 3 x Halftracks. On Turn 2, the 3rd Armor would show up with 2 x Pershing M-26's and 2 x M-45's. A very substantial and hard-hitting force. In fact, it is almost overwhelming, which is a bit of the idea. At this stage of the war, the Americans were very much in control and able to put considerable force against any Germans, foolish enough to resist. As we know historically, Ernst understood this math and decided that further resistance in the face of superior American force, could only end in defeat.
On of the things I have noticed over the years as I blog, is the relatively low number of pictures that are actually available of American combat operations in Europe. At the end of the war, books like the one above were quite prevalent and provided by nearly every major American formation as a sort of yearbook for those who served in their ranks. These books are incredibly hard to find today. I have run into one or two at antique stores, but they are extremely expensive if they are in good condition. Libraries may have had them in their collections decades ago, but not today. These books represent a lost trove of history of the American fighting man in World War II.
 And now for Dan's Pre-Game Comments:
“The Americans must attack into
the town and capture the central victory building to limit the Germans from
accruing VP. the then go for capture of
other stone buildings for points of their own.
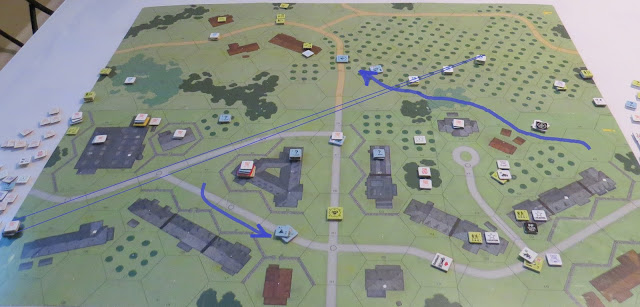
The plan is for the Americans to send the 9-2 three squads with a MMG
and 50 cal into the center to have over watch and make a direct attack. While the 9-1 and elite squads with FT and DC
attack on the right. The two 8-0 each
lead three squads with BAZ through the orchards into town. While the half tracks carry a HS through the
lines into the back field to capture buildings.
Hopefully the tanks can keep the German JgdPz occupied and help with the
assault.”

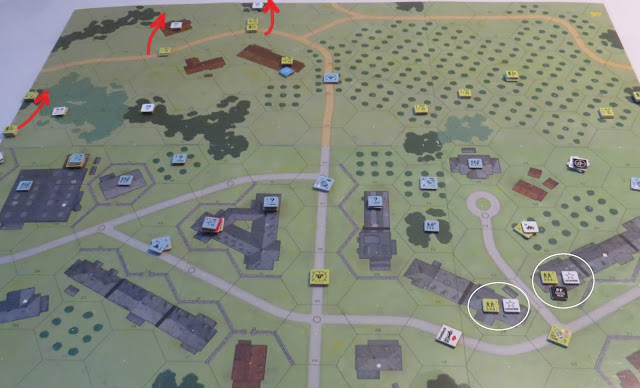
In my own walk-throughs of the scenario, the Americans would armor assault through the orchard and enter the village there. I had an HMG on the opposite board edge set up to put a fire lane all the way across and into the orchard. One Jagdtiger covered the right flank.

Dan is not a fan of playing the Americans. They break too easy and in general he just doesn't enjoy them. But he did surprise me by not attacking in a Schwerpunkt.


Dan's attack on the left would be hit hard by my elevated LMG positions. I put the LMG's in a second level building and in the third level Steeple location at the Rathaus. I had a crew with each of the LMG's to allow them avoid cowering and to self-rally when broken. Why didn't I put the HMG's there? I wanted my HMG's to have fire lane opportunities. I had one in the Rathaus and the other in the woods at O2 on Board I. Remember this is DASL...so the LMG's would easily cover the range to the American infantry points and the HMG cut literally fire all the way across the map. My O2 HMG would lay down a fire lane when the first Half-track went by and this would help slow down the American advance in the orchard. My Jagdtiger would destroy one half-track and the other two would get into town and start unloading half-squads to begin taking victory locations.

I had managed to throw back Dan's first turn advance. He would create a Hero and that Hero would charge towards my half-track on the left. He would be a bullet magnet, but a successful wound would stop him from placing a DC on the half-track. He would go into CC with the half-track and be killed.

On the right, Dan had secured two victory locations and in CC would successfully scrounge one Panzerfaust.
Turn 1 - German - Dan's two half-squads in my rear spooked me. They also had a Panzerfaust and two half-tracks to cover any attempt by my grenadiers to come after them. In Prep Fire, my O2 HMG would fire at Dan's boys all lined up in the orchard. I went on a 6 shot RoF which shredded all three hexes. With the Americans down, I started my Jagdtiger on the far right and sent it forward into the orchard. It was a risky move as Dan's tanks would come on in the very next turn, but I couldn't sit and wait for a Panzerfaust blast to my rear.


As turn 2 ended, Dan's infantry were routed out of the orchard and pushed back from the town.

Turn 1 had really been devastating to the American infantry.
Turn 1 Point Totals were:
3 for the Germans and 2 for the Americans.

Turn 2 American - Dan would secure additional victory locations with his two half-squads in my backfield. I was content to let them house hunt unmolested. My roadblock did its magic and effectively kept the half-tracks from penetrating to the Rathaus. Dan would use one half-track to destroy my Kubelwagen and then the other would try to draw fire from my Jagdtigers. I didn't take the bait, cause I knew I would create a burning wreck and blind myself to Dan's oncoming armor. So Dan parked it in front of me.

Not a bad move by Dan to try and shield his armor as they entered the game.

Dan would secure additional victory locations and bring his total to 6 buildings out of 15. Not too shabby for 1-1/2 turns worth of movement. But...my part of Turn 2 would bring a of of pain. First my Jagdtiger would destroy a Pershing that had come adjacent to my front center Jagtiger. Then a faust would find Dan's half-track in the street. Then my front and center Jagdtiger would pivot and shoot at Dan's remaining Pershing tank. I wouldn't hit, but no had my front to it and the 90L would need a snakes to affect me. One bright spot was the American sniper would head shot my 9-1 officer and KIA him. So my center HMG would lose its leader and an 8-0 would be the only German officer left on the field.

I checked off another ASL bucket list item with my first Pershing Tank kill.

We then went to full Defensive Fire for Dan. The game had taken a toll on Dan. He is not a fan of Americans and the many breaks of his 6-6-6 and 6-6-7 troops had shattered his infantry attack. And the realization that he couldn't kill the Jadgtigers from the front added to his misery. His 9-2 had a kill stack in a level one location in the center and took a coupld shots at my boys in the Steeple and Level 2 location. He would MALF the 50 CAL after sustaining it, which would elminate it from play. That was the last straw for Dan and he gave the concession. And I don't blame him one bit. The German had already won the infantry fight and the Jagdtigers would more likely eliminate the American Armor in the next two turns. So, I think Dan was correct in calling it game over. His force had been weakened too greatly to take the Rathaus away from the Germans.

It had been a tough...tough hammering of the Americans. Two full turns had left a force of 15 squads broken and eliminated from the fight. In my own scenario walk-throughs which I use to create my scenarios, the Americans armor assaulted with the half-tracks through the orchard and into the outskirts of town. Their strong advancing fire along with the flame-thrower quickly gained them building locations and successful searches provided Panzerfausts. Then on Turn 2 - the Armor also came through the orchard and linked up with the infantry. This combined force then moved on to assault the Rathaus. Dashes would allow the US infantry to quickly get into the Rathaus and by Turn 4 or 5, it was in their control. Once the Rathaus falls, the Germans can no longer earn any victory points. So the American player has to carefully avoid a straight up fight with the Jagdtigers and rely on the strength of its infantry. At least in theory that is how it was supposed to work.

Yep, theory and practice don't always meet one another. Naturally, my "basement quality" scenarios are that because they lack the play testing required to elevate them to the next level. This is the truth and sometimes a design is going to fail to work as you expect to. So in this case, I think the combinations of poor approach terrain and solid German defensive assets conspire to make this one heavily favored to the Germans. At least this playing of the scenario would lead me to that conclusion.
 And now for Dan's Post-Game Comments:
“The plan did not work. The Americans were shot down on all
assaults. The German JgdPz VIs were
invulnerable from the front and took out my 9-1 AL in a Pershing tank. My infantry were broke crossing open ground
or in the orchard by a rate tear by the HMG.
By turn 2 there was little hope left and then I lost the 50 cal on
sustained fire shot of 12. There was
little hope of making it into the victory building in time to stop the Germans
from accruing the VP. The Americans can
be methodical...but they do need to get the victory building by turn 3 or 4 or
knock out 1 or 2 German JgdPz. Great
game design and fun scenario from Grumble Jones. Too bad my assault was too aggressive for
American troops to execute. My thanks to
Grumble Jones for a great game. I
recommend the scenario for someone better at American play to try.”

My thanks to Dan for being a great sport and playing my scenario.
And now I'd like to recognize two great ASL sites on YouTube for their gracious and supportive comments about Grumble Jones.

Illuminating Rounds

Stew's Replays
I am very humbled to receive the kind comments from respected members of the On-Line ASL Community. I started this blog in 2011. I had no idea what I was doing, but received support from Chris at Battleschool, Jackson Kwan at Hong Kong Wargamer and Rick Reinesch of the Texas ASL Club. Their encouragement kept me focused on making the blog better. And almost 10 years later, the blog continues to move forward and my greatest hope is that it contributes positively to the greater ASL Community and inspires others to play this greatest of games and to add their vision and voices to the ever expanding On-Line ASL Community.

Thank you again my friends.
Fancy designing a DASL scenario!! Terrific little playtest with Dan Best. I find DASL scenarios grittier and more personal in general. Thanks for the write up and thanks for your kind comments. I think reality is we support each other all this way!
ReplyDeleteJack