Sunday, May 31, 2020

Our Saturday Game - ASL Scenario J157 - Rage Against the Machine

Our Saturday game would see a return to the war in Northern Europe. Specifically, Dan and I would travel to the Kurland Campaign. A quick search on YouTube will bring up any number of WWII Archaeology videos of digs in the Kurland Pocket. The last months of the war on the Russian Front would see concentrated and heavy fighting in this part of the world. It would leave a long lasting legacy of relics, which fill the forests and fields of the Baltic States. The Kurland/Courland Pocket would hold out almost until the end of the war and exist as a forgotten front of that savage war between Nazi Germany and Soviet Russia. And interestingly, the woods and wetlands of the Baltic States produced one of the stiffest German defensive stands of the latter part of World War II. German tactics and infantry support weapons had evolved sufficiently to provide the German defenders with the capability to hold and retake their positions. Naval and limited air support were also present for much of the campaign. And lastly, the focus of the Soviets on reinforcing the final drive on Berlin would also strip the Russians of some of their offensive punch against the stubborn German defense. 

 A few maps of the Kurland/Courland Pocket.


The Scenario J157 Rage Against the Machine came with the ASL Journal 10. Designed by Chris Mazzei and Peter Struif, this scenario covers the fighting in the Courland Pocket on December 21st, 1944.

It covers a specific engagement where German Kampfgruppe Zoll was defending a key crossroad near Libau/Liepaja, Latvia.

A German Hauptmann Bidermann would lead a desperate German defense against a heavy Soviet armor assault. Bidermann and his grenadiers would hold the line and destroy over 20 Soviet Tanks in the fighting. Such successes only forestalled the inevitable German defeat, but would contribute to heavy Soviet losses in a campaign that would no longer have a bearing on the outcome of the war.

ROAR has this scenario with 81 German and 63 Russian wins. The ASL Archive  has it with 21 German and 10 Russian wins. So yeah...pro-German. And I would be the Russians....UGH...


Bidermann gives a full accounting of this fighting in his book, In Deadly Combat, A German Soldier's Memoir of the Eastern Front. Dan has this book, but I have not had the opportunity tor read it. I'll certainly add it to the wish list for future books. 

The scenario is 6-1/2 turns long and the Russians win if they control two of three objective areas, which consist of four buildings and two bridge locations. I really like this kind of victory condition as it gives the attacker some choice in what he wants to achieve and adds uncertainty to the defender's defensive choices as well.

So I definitely was excited to play this scenario and thoroughly enjoyed it. Yes, it's pro-German, but in spite of that, it's was still fun to play as the Russians. I would recommend it and especially for anyone interested in playing some of the bigger Russian tanks.


As I write this latest AAR, the United States is enduring a trial of our national conscience. No matter where we sit individually on the political spectrum...watching the unfolding drama across our nation is painful beyond words. Forgive me as I blog a bit here. So tonight's scenario is entitled "Rage against the Machine". Bizarre that this title would be so absolutely appropriate to what is going on in the country. Millions of Americans are in fact raging against the machine. 2020 has been a horrific year that shows no sign of letting up as it keeps it Rate of Fire. Minneapolis is the epicenter for the latest horror-drama to afflict us. Minneapolis is personal for me. My wife is from Minneapolis (Dan is also from there.). I was married in Minneapolis and had one of the greatest weeks of my life in the Summer of 1985 as I visited for the first time and met my future wife's family. A month later I was in Reutlingen, Germany and would not see my future wife for almost six months. So the memories of that week sustained a relationship that is celebrating 33 years of marriage this year. So watching Minneapolis suffer these past few days has been difficult. I pray that we will endure and move forward from these dark days.


The dice rolls for sides put me in charge of the attacking Russians. I suck with the Russians...so knew my chances in this scenario would be very bad at best!! I would command the men of the 1st Baltic Front and 18th Tank Corps. My force would consist of 6 x 4-5-8's, 6 x 5-2-7's, and 4 x 4-4-7's led by a 9-1, 8-1 and 7-0 with an HMG, 3 x LMG's, and 2 x DC's. My armor support would consist of 2 x ISU-122's, 3 x ISU-152's, and 4 x T-34/85's. The tank force would be powerful but low ammunition rules would diminish the potential effectiveness. Ultimately, I would not do much to Dan's Germans with my tanks. As sign of the late war period, was that my Russians would have an ELR of 4, which was handy

Dan would have the defense in this scenario and would command the men of Kampfgruppe Zoll, Infanterie-Division 132 and Sturmgeschuetz-Brigade 912, Panzer Division 12. This force would consist of 2 x 4-6-8's, 4 x 4-6-7's, 2 x 4-4-7's, 3 x 4-3-6's, and 5-4-8's led by 2 x 9-1's (one wounded at start), an 8-1 and 8-0 with 1 x MMG's, 3 x LMG's, an DC and Panzerschreck with 75L AT Gun, 2 x JdPzIV's and a Stug IIIG. Dan would get to HIP two squad equivalents. Dan would deploy both 4-4-7's and conceal all 4 of the 2-3-7's. A brilliant defensive idea, but unfortunately, these half-squads, despite surprising me, failed to do anything of value against me.

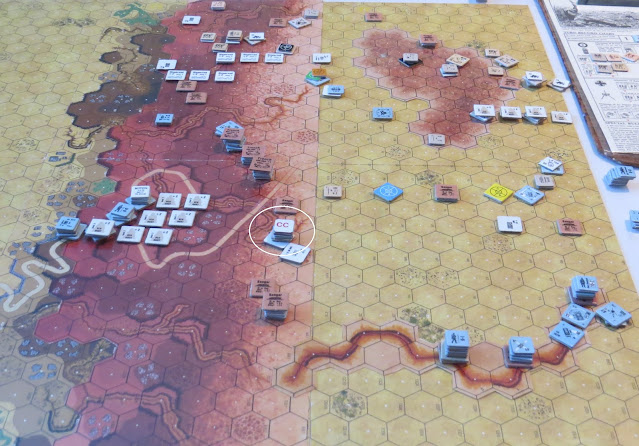
A look at the battlespace. I did not pick which two objectives to focus on. The bridge seemed out of reach as I fully expected that Dan would put his AT Gun in the house with a direct line of side down the river road and given the slow speed of my tanks (no road bonus by SSR and grain is brush) I doubted that I could safely get to the bridge before Dan's reinforcing armor came in on Turn 3. Now remember I said this, because you will see that I actually do reach the bridge area before Dan's armor arrived. 

And now for Dan's Pre-Game Comments:
“The Germans must defend two of three victory location on board 3a.  The big defensive position will be building P7 on 3a.  With the unwounded 9-1 and two 4-6-8 squads with a MMG and LMG.  I will deploy the two 4-4-7 squads and set them out in HIP ambush sites to get PF attacks at likely points where the Russian tanks will come through the dense terrain.  The 75mm AT will set up in the N11 building on board 3a hopefully the will get some tanks moving along the road.  The 8-0 and 4-6-7 with LMG will cover the board 42 cross roads with a 4-6-7 PSK in the orchard / hedge across the street.  The other 4-6-7 squads along with the 4-3-6 squads will set up in a screen on board 42 and 40 and fall back to the village.  Hopefully the Russians do not overwhelm the infantry with a single board Schwerpunkt and the tanks get out ahead of the supporting infantry for maximum PF effectiveness.”

I did not do a full Schwerpunkt and that was primarily because the terrain was already so limiting that I was afraid of just bottle necking my boys and making it easier for Dan to concentrate his scant forces to that point of contact. It would matter either way in the end.

I always get excited to have the ISU-152's...but then they never actually do anything. 


Turn 1 Russian - I came on conservatively. I was trying limit my risk and probe Dan's positions to root out the dummys.

Dan's boys would stay concealed.


Turn 1 was relatively  uneventful. I managed to break and reduce a 4-3-6 on the north board edge and had one of my own squads broken and reduced. The biggest event was foolishly shooting at concealed locations with my big guns and incurring 3 Low Ammo's in a row as my dice continued to roll their favorite number 10.

My big guns apparently didn't bring enough ammo for the fight. 


So as my part of Turn1 ended, I had revealed little and accomplished even less!!!


So in his part of Turn 1 - Dan did something truly surprising. He fell back...he never does that. He completely skulked away and established a new line. Who was this person that I was playing and what did he do with Dan!?!


Turn 2 - I moved forward along the whole front. I would find the first of Dan's HIP 2-3-7's as my armor went bypassing through the center of the map. 

Dan's HIP 2-3-7's were a great idea, but as I said earlier, they failed to get fausts and when they did, they failed to hit.

At the end of Turn 2 - I had a nice front moving forward, but I was not where I needed to be before Dan's reinforcements arrived. I had also broken a BMG on a T-34/85 and the MA on one of my SU-152's. It would roll a 6 in the next Rally Phase and be recalled.

Turn 3 - I knew Dan's AT  Gun was waiting for me...but took the risk anyway. I would lose one ISU-152 to the gun after Dan intensive fired. As you know, Dan and I both will intensive fire as often as we can in spite of the risk. In today's scenario, intensive fire would serve Dan well and MALF a gun for me. I would then immobilize another trying to ESP by the bridge. And a single German 4-3-6 would succefully FPF me and not break. I was feeling the hurt.


 As my part of Turn 3 ended, I had made progress, but had done little to Dan's forces.

Turn 3 - Dan's reinforcements arrived and honestly, once they came on, it was pretty much game over for me.


Dan would send his reinforcements into the village to take control of the two objectives located there. His AT Gun would pivot and miss. I would manage to break the crew. I would also manage to destroy one of the Panzerjaeger IV's that moved adjacent to my T-34/85. One of my only snakes in the game.

I had struggled for much of the game with some pretty consistently high rolls, so taking down a Panzjaeger IV was one of the better moments in an otherwise frustrating game.

My precision dice...probably about 10 of them were sent flying around my office at one point as I threw them off my desk. Not proud to admit that...but I'll be honest...I'm really getting tired of averaging 10's on my rolls. So I turned to my red and white Chessex dice. Even over SKYPE Dan has learned how to read my emotions and knew that I was crossing over into madness...


Turn 4 - I secured control of the Bridge Objective and so now would only need to take 2 building locations of the four available. I continued my advance and did ok. I was threatening the Germans from three sides. Unfortunately, my infantry were not in a postion to support the armor.

My 5-2-7's were stalled in the center.

Dan and I would fight one close combat during the game and one of his 2-3-7's would be lost.

End of Turn 4 - Dan's armor came after me. I would MALF two guns and fail to hit a concealed German squad that moved into Panzerfaust range against my ISU-122 in the north. It was at this point, that I abruptly told Dan that I conceded and congratulated him on the win. I could see a very bad future. My ISU-122 in the north would fall to a Panzerfaust, the German AT Gun crew would get back to their gun and my T-34/85 in the center would go down to the Pannzerjaeger IV or the Stug III. That would leave me with only one tank and with Dan's boys embedded in the village..it was going to be a very diffcult task to take the required objectives. So after 4-1/2 hours of game play, I threw in the towel. 


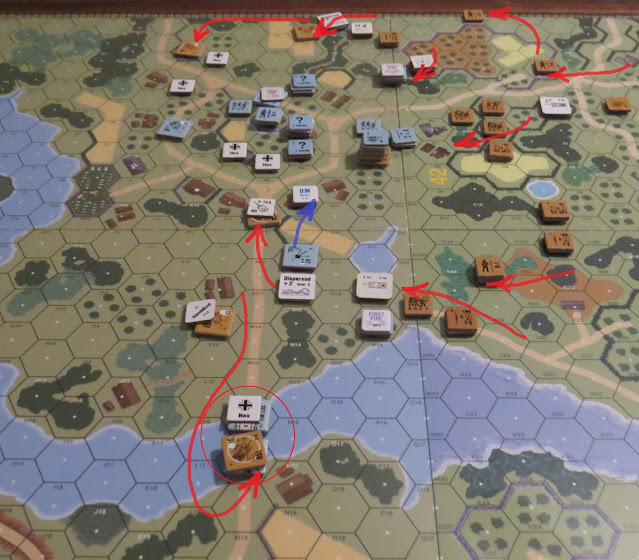
A final look at the battle as we headed into the bottom of Turn 5.


Dan's boys had performed very well. They hit me when they could and fell back when they should have, which prevented me from hitting them back. Dan really played a textbook fallback defense. I haven't seen it work this well since playing against Chris Brackney, who I consider to be the master of the falling back defense. Used effectively, this defense can be used to burn up the clock and force your opponent to take great risks to open things up.


And now for Dan's Post-Game Comments:
“The plan worked.  The Russians came on a broad front and moved steadily forward.  The Germans were able to slowly fall back although none of the three HS ambush HIP units were able to get a PF.  The Russians lost three MA malfunctions and one ESB immobilization.  With the AT gun killing one tank and the PSK another the Russian armor was in a bad way.  The Russian infantry were too far away from the victory locations for an effective assault and Grumble Jones threw in the towel.  This scenario is hard on the Russians with the B# circled assault guns making advancing fire a very risky affair.  It was however a nice change from the desert.  My thanks to Grumble Jones for a good game and fun scenario selection.”


So, today is the last day of May and tomorrow we enter June and a summer of uncertainty not only for the United States but for the world. On Friday, a good friend and former boss texted me as I was playing ASL with Dan. He texted to tell that he had just been let go at Spirit in Wichita. This veteran Aerospace Supply Chain professional was the latest casualty in the Boeing layoffs that will ripple across our entire economy in the months to come. I imagine Airbus will face challenges as well...but European workers have more protections against layoffs, so should ride the storm out.

I mention this, because it brought me back to reality as I indulged in my favorite hobby. ASL is something that I am incredibly passionate about and I am so fortunate to be able to play it...but I can't forget that reality's storms are currently blowing. Pandemic...crashing economy...health care concerns...and the chaos of social protests can't be ignored. How I wish they could be.

I'll leave it there as Grumble Jones is not meant to be a place of political or social stumping. I just hope that the positive values of America will ultimately prevail in this unsettling time.

Saturday, May 30, 2020

Our Friday Game - ASL Scenario 42 - Point of No Return

It seems fitting that I finish my COVID-19 forced vacation burn with a final trip to the baked sands of the Sahara desert. And trust me...it's not a scenario that I have looked forward to. In fact, I've been dreading it. Like many ASL'rs I like to play what interests me scenario wise. And truthfully, the huge Avalon Hill scenarios of Code of Bushido, Gung Ho, and West of Alamein simply do not interest me. The pain index is just too high. But, Dan has been on a mission to complete all of the original scenarios. And I am happy to help him achieve that milestone. It helps me as well. A year from now, I'll look back on the grueling effort to complete the West of Alamein scenarios and smile...cause I don't have to play them ever again!!  

"Dan...please....please don't make me play another DTO scenario...the sun glare...the dust...the scorching heat...the endless rules checks.." "Grumble...just one more...just one more...yes...it's the biggest and the longest...but you can do it!"

All kidding aside, I am actually glad to complete all the WoA scenarios. What's so bad is that it too me 30 years to do it. 

One look at the scenario card for Point of No Return was enough to cause most of us to move on the next scenario. It's daunting. Just pulling the counters takes a commitment!!! "Honey...are you coming up to dinner?" "No...dear...I'm still pulling counters..."

This scenario uses three desert boards and the E1 Overlay. How often have you used that bad boy!?!  So there's that!

It's a ten turn scenario with multiple reinforcements for both sides through the course of the game. Both sides also set up on board and close to each other. So that at least saves some time for closing the distance into combat. Several of the WoA scenarios have involved some tedious movement phases. Point of No Return should have less of that.

The victory conditions are straight forward. The Germans win at the end of any turn that they control four victory  hex locations. Three of these are on Board 25 and 1 is on Board 27.  It took me a bit of study to get a good grasp of the initial setups. The more difficult part is figuring out how to set up a defense. In keeping with our DTO experience, I'll be the British one last time and Dan will once again put on his Pour le Merite and channel his inner Desert Fox.


My good friend Hong Kong Wargamer has done an excellent AAR for this scenario. I spent a bit of time studying it to get my footing for this scenario. I highly recommend checking it out and reading his blog on a regular basis if you don't already. 

ROAR has this scenario with 33 German and 24 British wins. The ASL Archive has it with 1 German and 3 British. Judging from the ROAR stats, it would appear Pro-German, but not greatly so. This scenario has a lot of moving pieces and many tactical choices to make. DTO is unforgiving, so making too many mistakes will have consequences.


The scenario appears focused on the fight for control of Point 175.


The battle space...some painful terrain in the middle.


As the scenario defender for the final time in our Desert Odyssey, I would command the men of the 25th New Zealand Battalion. For once, I won't list out the forces for either the New Zealanders or the Germans...just waaay too much stuff. Suffice to say, both sides have lots of stuff!


For our final desert foray, Dan would once again command the men of the Afrika Korps. So far, Dan has done an excellent job of winning victories in the desert. The 21st Panzer Division would make up Dan's primary force. And according to history Rommel himself was present. So expect to see the Rommel Counter from Croix de Guerre on the map for this game!  As with the New Zealanders, Dan's force makeup is just too much stuff to walk through. It's heavy in infantry, but only six tanks, which is a bit surprising.

My desert journey began with Blazin Chariots on the horizon as I scaled Rachi Ridge to escape the Khamsin but failed to Escape from Derna until I found success with Turning the Tables only to fall in the darkness of Fort McGregor and find myself mired in A Bridgehead too Wet...until at last I find myself at the Point of No Return...


And now for Dan's Pre-Game Comments:
“The Germans start this scenario in an L-shaped ambush.  With one group in trenches and one in a wadi.  My Pz III will start in the wadi group and the other tanks will be climbing the escarpment road.  My plan is the shoot up the ambushed British and then attack toward the victory locations using armored assault.  The tanks will cut route paths.  Hopefully the Germans can capture the victory location before the reinforcements get into position to counterattack. “


The final WoA scenario approaches...the final battle for control of North Africa begins!


So at 11:30 AM on Friday...Dan and I begin a scenario that averages 20 hours to complete. We were committed to finishing it today, cause one day was all we wanted to spend on this one. The scenario is constructed to place the British player into a German ambush, who key assets are two 50L AT Guns. These would be the sources of great pain for my forces for the duration of the game. I was never able to focus any fire on them throughout the game.

It's easy to forget how effective the 50L AT Gun was in 1941. It's certainly not an auto kill, but against the British armor at that time, it was highly effective. And L Guns really shine in long range engagement such as this scenario presented.
OBA - both Dan and I would have OBA. Dan's was by phone and mine by radio. My arty would never show up. I didn't have access to it until Turn 3 and then radio contact, a broken radio operator, a red card draw and then the death of the operator pretty much cancelled my OBA...which I truly could have used.

Dan would get his OBA into play right away and it would cause me no little grief at the game start. But then Dan would draw two successive Red Cards and his OBA would be gone...much to my relief.


This is one of those rare scenarios where Rommel is actually present in the game. He is a 10-3, but I elected to use my new Croix de Guerre Rommel counter for this scenario. Fun stuff...I'd love to have a Manteuffel for my Grossdeutschland scenarios someday.


I've blogged about Rommel before and he always been a source of fascination for me. He is a multi-faceted individual...professional soldier, shameless egotist, photographer, flyer, family man, and a man of personal courage. He led from the front. But we cannot forget that he also bought into the Nazi plan and certainly enjoyed his close relationship with the Fuehrer. Personally, I believe his ruthless ambition had him take advantage of his relationship with Hitler to advance his military career. And like anyone who makes a deal with the devil...he would pay a terrible price for his misplaced allegiance. But for today, he'll just be the top German cardboard leader.

Dan's Turn 1 Prep Fire would be devastating for me. All of my tanks had to begin the game in motion to reflect the ambush scenario...but also to provide me with a modicum of protection. It failed. His eastern most 50L would unleash a rate of fire turret of armor piercing shells. I would have two tanks and a carrier destroyed and a third tank shocked, and later destroyed.

Dan has a knack for rate of fire tears and once his dice are hot, they stay hot. Turn 1 would be a hard for me.

Dan's low rolls would produce a lot of 4's, which was my sniper. And I would roll a lot of 1's. The first of many breaks and at least one squad would go down to the sniper...as well as one his half-track carriers, which my sniper would immobilize. Too bad my entire force didn't perform as well as the sniper!!!

"I can't carry the battle by myself lads...this isn't bloody Call of Duty!!!"


I would see a lot of snake eyes on my screen during this loooong game. I'd also roll a few of my own...cause...I'm a cheeky monkey! 


(Dan also has one of the very...very rare Grumble Jones tactical patches.) https://redheadedtshirts.com/ -- this is a great source for tactical patches and other ASL style stuff.


Turn 1 New Zealand. I had one 4-5-8 with an LMG next to board 25. They would manage to stun a PZ MKI with the LMG. I would then move them into the wadi where Dan had parked a half-track carrier. This intrepid squad would be my heroes. Next up...I turned my tanks and tried to run back to the hillock. I would succeed in getting two tanks back to the rear to carry on the fight. 


Not all of my Valentines would make it.

Smoke...the desert breeze would create lots off smoke. Vehicle dust...and the SSR Light Dust would all conspire to make this another miserable game. I'm sorry...but there were moments in this game, where I just stopped firing at moving targets, because the chance of hitting was just so minimal after factoring in all the nonsense. It's actually maddening, because you think...desert, open ground, should be awesome...but it's not...you can't see anything. Oh and then you get exactly what you need to hit...then roll for the light dust and miss.

I know I've carried on a bit about my dislike for DTO terrain, but it's just wearing on you. DTO and PTO are difficult scenarios to play quickly...both cause a lot of rules dives...which slows down the game, saps your personal game momentum and just drag the whole experience down. There's nothing I hate more than flipping through the rule book. I don't want to look any further than my Rat Charts. Those who know me well...know that I am no rules lawyer...but instead the furthest thing from it.

Thank goodness Dan is around to keep me honest!!!

So Turn 2 ended with a newly established MLF for my New Zealanders. I would fight out along this line for the remainder of the game. My intrepid squad in the Wadi would eliminate the Half-track carrier and then begin a journey to safety through the wadi....at least that was the plan.

Dan's Turn reinforcements arrive and begin their long drive up the Board 25 road of torture. Are you detecting a theme from me...


Dan would not let my brave band of Kiwis just escape. So sent the MKI to take 'em down. Well they got the MK I instead. These fellows were restoring my pride that was shattered on Turn 1.

Turn 2- Dan's reinforcements begin the journey up the Ledo Road, while he sent more grenadiers to take on my Wadi 4-5-8. Dan was not going to let them live.

Dan's Panzers began their advance towards my retreating Valentines.


I had successfully relocated my 2lb Portees and used the smoke from one of Dan's kills to provide some protection from his relentless 50L AT Gun. Dan would also temporarily MALF the 50L AT Gun, so that allowed me some time to rack up kills with my Portees. They would take down or shock nearly all of Dan's tanks in a single phase.


My intrepid wadi squad would continue to hold out and eliminate some more Germans in close combat. I kept expecting Dan to just move on and ignore them. But he was determined to destroy them.


"Come and get us Danny Boy!!!"

Dan continued to expand his penetration towards the 4 victory locations. My boys in the wadi were deep behind German lines now.

Dan's reinforcements would leave their trucks and move rapidly up the road to get into the fight. Dan would forget about the trucks for a couple turns and then I foolishly pointed out that they could still do some stuff. And boy was that stupid as Dan used them to blind me with vehicle dust...proof again that no good deed goes unpunished!!!

Dan's fire support teams also began moving out of the wadi and heading west. It was time for Rommel to lead his boys towards the objectives.


Dan's western 50L AT Gun went to work on my south flank and tore me up. Carriers knocked out left and right.


Dan's final group of reinforcements show up on the south board edge.

My intrepid boys in the wadi were attacked from all sides. Time was running out for my boys.


They fought gallantly but there were too many Germans coming at them.

Time to fix bayonets!

The close combat would end in Melee...but time was running out.

My intrepid squad was finally eliminated in Melee as Dan's force began to threaten the hillock. His Panzer MKIII had left the wadi to join the fight and would be knocked out by two snakes in a row. Can't remember the last time I rolled back to back snakes...but I liked it!!!


My final reinforcements would come in to try and support the defense on Hill 25. The terrain is pretty rugged and my guys would not get there in time.


Dan's trucks made their dust making debut and effectively blinded me all over the battlefield. I could not hit one of them...which was driving me crazy.

Dan's forces were on the hillock and a huge fight would take place.

On board 25, I was still hanging on to the 3 victory locations, but Dan was pummeling me.


A look at Dan's drive towards the east. He was making good progress and his trucks had shielded him pretty well with their vehicle dust.

While Rommel was driving the attack on the hillock, another huge group was preparing to seize the three locations on board 25. My forces were weakened, but still putting out some good fire.

And Rommel had gotten too close to the action...

My last remaining Valentine and the last armored vehicle still in action...led an overrun attack on Rommel and his kill stack. Success...the entire stack was broken.

Sure Dan was on his way to winning the scenario...but I just captured Rommel and he was on his way to England! WOOHOOO!!!

Churchill addresses the House of Commons...let's listen in..."Today...in the shifting sands of North Africa, our brave lads of the Commonwealth have this day removed the Fox from the desert. Rommel is in the bag. The sun has risen on success for our forces in Africa!" 

Back on board 25, I was losing the fight.

My boys prepared for the end in their sangars.

A final close combat would give Dan control of all 4 victory locations and by rule, the immediate victory! Congrats Dan on a well deserved win. Our final scenario from West of Alamein was an epic fight. We can now leave the desert with our heads held high!!!


Dan's boys would celebrate a great win and Dan would finish as the decisive victor of our West of Alamein campaign. I would be the British in every scenario and Dan the Germans. Dan would win every scenario except one. So he truly is the Desert Fox and I'm...well...I'm staying out of the desert. It doesn't suit me!!!


And now for Dan's Post-Game Comments:
“The plan worked.  Although the scenario is a grueling desert duel.  The Germans used smoke from burning wrecks and vehicle dust to move in and clear the victory locations in close combat.  The British killed all the German tanks and with the last British tank overran and captured my 10-3 leader.  However, the reinforcements took the gully approach to the victory area and the Germans were able capture the victory hexes before they could get into the battle.  My thanks to Grumble Jones for a great game and for the fun of playing the West of Alamein series all the way through.  I can say I have had enough desert scenario for the year.  Thanks for a great good game and great desert series!”


Goodbye Sahara Desert!!!


Europe...here I come!!!