Saturday, June 25, 2016

The Great Dice Roll Log

Advanced Squad Leader like most every other Wargame, RPG, or many family board games relies on dice to determine the results of actions taken during game play. In the Case of ASL, most rolls involve two six-sided die of different colors. Now the purpose of this particular blog post is not to dwell deeply into the die rolling mechanics of the world's greatest WWII tactical board game. 

In truth, this blog post is to relate a nearly 5 year record keeping experiment conducted by my long-time ASL opponent from St. Louis. This experiment began in 2010 after Scott and I returned to playing ASL after a 13 year hiatus. The cause of the hiatus was my leaving St. Louis for jobs in Illinois, Iowa, Tennessee and Oklahoma. Raising two children also distracted from ASL as well.

But in 2010, Scott and I began playing ASL by the Cardboard via SKYPE method. For the first time in 13 years, distance no longer kept us from playing our favorite game. Now for those who don't know him, Scott is a meticulous player and after one particularly frustrating game where the dice seemed to betray him at every turn, Scott decided to keep a log of every roll for every scenario we played. He was convinced that the dice play a significant role in the outcome of the games we were playing. Well, of course common sense tells us that naturally in any game involving dice, the dice will play a significant role (pun intended). 

With that understanding, I was a bit skeptical that Scott's data mining would extract anything more meaningful than the standard bell curve we have all become accustomed to seeing. 

As a Six Sigma Blackbelt, I believed that Scott's exercise would ultimately confirm what was already understood about rolling two dice. But he was undeterred, and began compiling the data with greater and greater detail throughout our gaming sessions. In fact, our game play began to suffer as he need to document each and every roll slowed our game play to a crawl. It wasn't until 2015, that I was able to convince Scott, that we had enough data for a meaningful data dive. Our game play has not returned to more normal and enjoyable speeds. 

By the time, we called it quits on the experiment, Scott had collected data for 30 scenarios played between 2010 and 2015. That is a rather large data pool to be sure.

Despite having all this collected data, my buddy hesitated to send it to me. After a year of subtle reminders, he finally sent me the Excel Spreadsheets. And I must admit the data is pretty amazing. I could see how Scott's spreadsheets evolved over time and he attempted to tie die rolls to game results. It was at that moment that I realized...wow...ok maybe the data can tell us something more about randomness in ASL...maybe...so into the data I dived.

Now, trust me when I say there is a lot of data...in truth too much that can be shared successfully. When Scott began his deep dive...he went really deep. So I took the results of the data across several relevant roll categories and took a snapshot, which is posted below.


What you see are the average die roll results for 30 scenarios divided by Player 1 and Player 2. The categories from left to right are: Player Side, Average Morale Check dice roll, Average To Hit dice roll, Average # of Factors for IFT shots, Average IFT dice roll result, Average Rally dice roll, Average Special dice roll (wind change, bog, kindling, etc.), Average single die roll (MG repair, smoke, PF check, sniper, etc.) A quick look confirms the bell curve relationship for rolling 2D6.
So yes, my friend's deep dive on the surface doesn't reveal anything different from what we expected to see. And yes, I was a bit disappointed at first. I wanted Scott's data to confirm that the dice could introduce too much randomness into the game. But the numbers as an average were not telling that story. 

So I decided to go deeper...to go where my Scott had gone...to see what else the data could reveal...if anything.

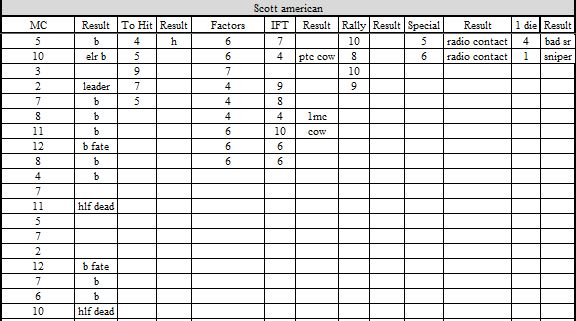
So I looked deeper at each of Scott's spreadsheets and discovered some observations which he noted on one of the Scenarios...ASL S24 Sherman Marches West. Here are two snips of the data he observed.
In this particular scenario, Scott had the Russian side. In the course of the scenario, he rolled the dice 137 times. Suddenly the data did indeed begin to tell a story beyond the simple bell curve math. 26 of his 137 rolls were 10 or greater. 18% of his rolls were "bad" and rolling 7 "12's" at any time in ASL is never good.  Now the predicted % for rolling 10's is roughly 8%...so 9% is higher than the predicted norm. His 11's were within the normal range, but his 12's were double the predicted norm. 
No my rolls for the same scenario were pretty much within or below the predicted norm with my 12's being the exception at 4%, which is higher than the predicted 3% norm. 


But the rolls themselves don't really tell us a story. It's the results of the rolls at at given time in the game that really matters. Rolling a 12 for Pin Task Check is far different than rolling a 12 for a Morale Check. So I decided to look again at Scott's data and see if results could also be gleaned in any meaningful way.

And yes, Scott did indeed compile results and give us a glimpse how the dice rolls factored into the game.


I looked to his spreadsheet for ASL 22 Kurhaus Clash for the a good example. I was keenly interested in seeing the data on this scenario, because I had suffered such a resounding defeat as the Americans. I distinctly remembered missing my morale checks throughout the game and suffering huge losses in the process. 

Scott's rolls for the game show that he put together a lot of high factor IFT shots against my Americans.  He also retained rate of fire on his MG's 5 times consecutively and the results were a 4 and 1 MC for my desperate Americans. What is also interesting is that Scott's IFT rolls were not stellar. In fact, they were right at average with 7.7. His rolls were successful in large part due to the high IFT factor shots he was taking, which provides evidence of the basic premise in ASL that your higher factor shots will produce a favorable result based on an average dice roll.

Ok...maybe this is not quite that interesting or mind-blowing...but still I find the data to be worth looking at. After all, we have all had those moments in ASL where we seem to continually roll 10's when we have 16 factor IFT shots and then roll 3's when we have 2 factor IFT shots. 

 
Ok, above are my rolls for the same scenario. Keeping in mind that my Americans were with a "6"morale, the MC rolls are telling. 13 or my 19 morale check rolls ended badly for me with either a broken squad or worse. 81% of my MC rolls were bad. And my Rally rolls were no better with nothing lower than an "8" rolled.  So not only did I break often, I failed to Rally the boys who did break. And my IFT factors tell a story of single squads and MMG's firing back at the Germans, with no fire groups in evidence at all. And my IFT rolls resulted in two Cowers for my boys 25% of my IFT rolls resulted in a Cower...against Germans in stone buildings. So the single 1MC I got against the Germans in the entire scenario comes as no surprise. The numbers above help confirm that my Americans were dealt a crushing defeat.  


So, in summary, my friend's project does indeed yield some useful information. On the one hand it confirms that ASL and the dice work very well together. While we often feel that that we are "diced" in a given situation or scenario...the data suggests that most rolls fall within the predicted norms. There will of course be those games where one player's dice are hotter than another or colder than the other. Certainly, the data for Kurhaus Clash shows that my Americans did indeed suffer from bad MC rolls...but on the other side of the equation....my opponent did an outstanding job of forcing me to make those MC's. So once again, the beauty of ASL and it's relationship to "random" dice rolls continues to show itself.

I will hold on to my friend's labor of love and keep the spreadsheets with my other scenario history files. They tell a story every bit as interesting as any AAR.

As next weekend leads to the 4th of July Holiday, the Grumble Jones blog will take a break and return after the 4th. Here's wishing you all a wonderful 4th of July!

Having lived in St. Louis for nearly 20 years, I can tell you no city does 4th of July better. If you have never watched fireworks from beneath the Arch...I highly recommend it!!!

Monday, June 20, 2016

June visit to the Grumble Jones Library

June has come to Tulsa, Oklahoma and with it 108 F heat...which makes walking across the street feel like a stroll through a furnace. But June always focuses my mind on those dramatic days in Normandy from June 6th through August 13th, 1944. As an American, I might be expected to be drawn to studying the Battles of Carentan, St. Lo, Cherbourg, Mortain and Operation Cobra. And indeed, I have studied those engagements...but by and large my personal library reflects my interest in the efforts of the British, the Scottish, and the Canadians engaged in the many operations to seize Caen. After all, it seems that the greatest tank battles of the Normandy Campaign were waged in the space between Villers Bocage and Caen.
And smack in the middle of this collision of Allied and German armor was a non-descript hill dubbed Cote 112. The Germans would throw the might of the 9th and 10th SS Panzer Divisions into the fight against a host of British, Scottish and Canadian Regiments and Divisions. A hill in perhaps name only would be the scene of agonizing carnage on both sides. And whoever would eventually control the hill would be one step closer to winning the most important campaign on the Western Front.

My first real academic study of the campaigns around the battles for Caen came when I purchased a copy of Max Hasting's outstanding book, Overlord. I was still in college at the time and took to reading it each night in my wife's (then girl-friend) apartment each evening as she fell asleep. I would read a chapter, turn out the lights and walk back to campus to my dorm room. During those late night walks, my mind would be focused on details of the Normandy campaign as penned by Hastings.  


Overlord whetted my interest. While a very good book, it was not overly detailed and didn't give me enough specific info about Buron, Carpiquet, Maltot, Villers Bocage or Hill 112. I wanted to know more and I wanted great source material for SL scenarios. In 1986, I was still playing SL in my own personal defiance of spending the money for ASL. I wouldn't embrace ASL until 1989, when my resistance was finally revealed to be futile.

So, what follows are the books in the Grumble Jones library, which I have been fortunate enough to obtain and which I believe provide the ASL player with the best combination of history and scenario source material. The books covered in this visit are not the whole of my Normandy collection, but instead those most focused on the events around Caen. We'll save the other tomes for another visit to the library.

For whatever reason, Hill 112 really grabbed my interest and I began learning as much about the battle for this bump in the Normandy landscape as I could. Back in 2003, my wife presented me with two excellent books covering the German forces engaged at Hill 112 by French publisher, Heimdal. 

The first of these covers the 9th SS Hohenstaufen Panzer Division. This book is massive...I mean massive and is filled with great photographs and a great many directly from the fighting for Hill 112. On the downside for me, it's in French. So my English and German are not much help. Nonetheless, I consider this one of the truly great books in my collection. 

Hemidal does a tremendous job in telling a well put together history of the German units which fought in France in the summer of 1944. At times, it has seemed odd to me that a French publisher would put together such great books about specific German units...but then again, who else has a greater right than the French to tell the story.

The second of the books my wife got me in 2003 was Hemidal's 10th SS Panzer Division Frundsberg. In many ways this volume seems a pale cousin to the huge Hohenstaufen volume. It's about a third the size of the former and while every bit as good with the photographs, etc. it does seem a bit smallish. It is still a great book, but of the two, Hohenstaufen is the King Tiger. These two volumes, taken together don't necessarily offer much in the way of scenario development, but the pictures and maps go a long way to helping the ASL player understand the battles around Hill 112. So I do recommend them, if you can find them at a reasonable price. At one time or another I have seen Hohenstaufen range between $150 to $500.00 It's good...but not that good.

So, while I loved the picture quality of the two Heimdal books, I still felt like a I wasn't learning about Hill 112 the way I wanted to. So off to Amazon I went and the following books were ones that I purchased for my Kindle and kept me occupied during my many business travels.

 The Battle Ground Europe series of books are truly outstanding. Great pictures, maps and the detailed narrative to inform the reader of the battles being covered. These are also intended to serve as guides for any visit to the specific battles. I love them and try to snag them on Amazon whenever they are on sale.

This series of books is very extensive and covers nearly every major engagement of the Normandy Campaign.  In addition to Hill 112, I also picked up Operation Epsom and Mont Pincon. And as time and money permit, I hope to pick up other volumes.
Mont Pincon is another of those engagements in the fight for Caen and beyond, that I was rather unfamiliar with, so I have very much enjoyed learning something new.

And as stated before, the picture quality of these books is first rate with equal time given to the Allies and the Germans. 


I have noted that there are a great many more pictures available from the Allied perspective, but to some extent that might be expected given the Allied success in the campaign.

Much of the German photo history can again be found in the Heimdal publications.


Another of the books in my library was one that I found in the local Books A Million, which does have some great history books from time to time. 

Tigers in Normandy is one of those books, which is an absolute must have. The detailed narrative of the fate of Germany's Tiger Tanks in Normandy is without rival. Simply stated, this is one of those books that gets you down to the Turret Number and tells you what happened to that Tank and oh...has the pictures to back it up. I love this book and have poured through on numerous occasions for scenario inspiration.


Now, some ASL'rs might find a book like Tigers in Normandy to almost be too much detail. I know...is that really possible...well yes, I suppose it can be and certainly, books like Tigers in Normandy are not for everyone. A similar treatment of Allied Tanks would be welcome...but unfortunately, the fascination with the Tiger Tank has ensured that their history was a bit better preserved than the hundreds of Shermans and Churchills which battled them in the hills and hedgerows of Normandy.

But there is an author, whose book I'm saving for last, who at least does great justice to the Allied side of the conflict. 


The next two books are very recent acquisitions, which I'm yet to complete reading through, but nonetheless are volumes, which have the kind of detail I've been searching for to inspire ASL scenarios.


Ken Touts, The Bloody Battle for Tilly is the first of these two books. I chanced upon this at used bookstore here in Tulsa and for $6 dollars, could hardly pass it up. 

My brief perusal of its pages confirms that it will provide the narrative details that I am partial to.

It's not chock full of pictures or maps. It's that kind of book...you know the ones...with a series of pictures in the middle and a drought both before and after. The Battle Ground Series really does shine when compared to the standard WW2 volume. Editors should take note, that pictures mixed with the relevant text makes for a better reading experience. Just my two cents worth.


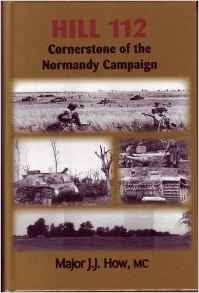
The next volume, is Maj. How's Hill 112. Again, I am just getting into this particular book, but can already tell it will be very useful in educating me on the battle while at the same time providing the inspiration for ASL Scenario Creation.

This hardbound book is thin, but chock full of pictures, maps, firsthand accounts from both Allied and German participants, and plenty of maps. It's an all around great volume.

We are heading into the home stretch for June's visit to the Grumble Jones Library. 10 books is a bit more than I had anticipated talking about...but hey, these are some great books, and any one of them would be a great resource for the average historian or ASL player.


And finally, no accounting of the Normandy Campaign would be complete without Ian Daglish's excellent, Goodwood. This book was produced not only by an outstanding historian, but an ASL player as well. Ian's book is absolutely filled with maps, pictures and the most detailed, action narratives of any of the books we have talked about. It stands head and shoulders above the others. 

There are moment's in Ian's book that really make your head spin as you are forced to understand how truly awful it was to be in a Sherman Tank advancing against German anti-tank guns, tanks and Panzerfausts. Ian does not hold back the punches and brings the reader face to face with the human cost of war. Some of the losses suffered by Allied Tankers is simply staggering. You will ask yourself..."how did they find the courage to keep attacking??" 

Ian's book will give you insight into the terrible carnage of armored conflict in Normandy. 

So, it's nearly closing time in the Grumble Jones Library. Thanks for visiting this month and we look forward to visiting again with you in July.

Saturday, June 18, 2016

Our Friday Night Game -- the conclusion of FF-8 "Send in the Sand Rabbits"

Our Friday night game saw the conclusion of FF-8 "Send in the Sand Rabbits". We had missed one session, so it took us both a moment to reorient ourselves to the battle in progress. I had been thinking about the game throughout the week and felt that it would go pretty well for my Russians. To say it went my way would be an understatement. Things went my way almost from the start and my opponent's dice took away any chances he had. 

It's never easy for ASL'rs to reflect on the randomness of results, which is such a huge aspect of game play. It's tougher still, when we observe that randomness deny what we know would otherwise be predicted results in a given situation...at least as much as we might believe we can accurately predict such things. So I did feel badly near the end of the game as my opponent's cold dice allowed my forces to simply walk past his defenders.

Winning any game in ASL is always worth celebrating and despite the setbacks suffered by STL opponent, I was still happy with the win and my choices for much of the game. As for the scenario itself...I have to admit that Scott Holst's initial impressions of the VC were accurate. It played a bit messily. My opponent never made any attempt to move east of Row T and gain the VP associated with being beyond that row. Instead, he built his game around keeping me from exiting the board. Was that the best choice?  I don't know. This game really played very much like the historical event, so I generally give kudos to a scenario designer when they achieve that. To me that is a big part of the game, as I really enjoy experiencing the actual event to the extent possible with a board game. Would I play this one again....probably not. It just never developed into an exciting game for us, which of course is as related to the Players involved as the scenario itself.


My opponent's Germans would find themselves locked in position for most of the game. They traded shots with shadows as they attempted unsuccessfully to uncover my concealed 4-5-8's in my initial ambush force.

My ambush force was hugely successful...not in eliminating German units, but in holding them in place along a long front, which enabled my exit forces to get off the map.


At the start of Turn 4, I wasn't sure what to expect. Through 3 turns, my STL opponent had been content to stay pretty much west of the Row Y Road. That appeared to be the road he was planning to defend in an attempt to stop my forces from exiting the board.

His forces had good North-South visibility and the road definitely bisected my approach to exit the board. So I could see the value in that, but on the downside, I was going to be moving through his field of vision with only 1 MP...so any shots would be really tough to make.


My opponent moved the Jadgpanzer IV into a hull down position with a shot down the entire length of the Y Road. His Tiger II then started up and rumbled towards my oncoming infantry laden trucks. I had feared that move and would now see if I would pay for my audacity.


In Advancing Fire, the MG's managed to immobilize my lead truck. Both squads made their morale checks...but a Snake Eyes created a Berserk squad and activated the German Sniper who promptly eliminated my broken AT Gun crew.

Good shooting Uwe.


The Berserk 4-4-7 charged right at the King Tiger in order to draw its MG fire and spare my other truck from disaster. The ploy worked, but my Berserkers were broken, which left 6 residual fire in the Hex...and ensured that I would not be moving any trucks through that hex.


They made a lot of noise...but ultimately broke under the point blank MG fire of the White Tiger!!!


Next up, I decided to go for broke. I sent two IS-2's right at the mighty King Tiger.

Dmitri Kasonov questioned the wisdom of my command...but understood that his comrades in the trucks were in great danger. Only he stood between them and the White Tiger of Death!!!


What would follow would be the decisive moment of the scenario as my IS-2's faced off at point-blank range with the fearsome King Tiger.
My other forces continued moving as well. I was determined to run everything to the edge of the board as quickly as possible. The Tiger II could only watch as Trucks of Soviet Infantry bypassed and headed West.


Two trucks with a total of 4 squads ran past the Tiger II and would successfully exit the West board edge.

Soviet Yaks captured the battle from the air as they headed west to strafe German airfields.


My opponent's bad luck with the dice continued and gained in frequency. His Tiger II eliminated his Main Armament while trying repair and was recalled.


Bad Dice...


Bad dice didn't just affect my opponent. Dmitri's IS-2 broke its gun while trying to hit the King Tiger. Fortunately for me though, the Tiger kept failing to penetrate the armor of the IS-2 right in front of it.


Meanwhile up in the North, the recalled Tiger II headed for the rear. The standoff in the building remained with the Germans on the 1st floor and the Russians hanging on to the second floor.


My opponent's Landsers never came up the stairs after me.


The tank duel ended with a fiery blast as my IS-2 hit the King Tiger's turret and rolled snake-eyes for the effect.


That was the moment we both realized that the game was over. There was nothing now to stop my forces from exiting the board.


My tankers had come through and taken out the dreaded White Tiger!!!
My opponent didn't give up of course and as my column of tanks and trucks went by, he attempted to fire a Panzerschreck and Panzerfausts from inside the building. Three times he fired as my vehicles rolled by...and each time, he rolled a "9" which broke the squad and failed to hit.

It's hard not to feel like my opponent suffered a bit from bad rolls at the end. The odds of rolling three 9's in a row...with auto killing Panzerfausts was hard to believe.


So, as my opponent's DM'd themselves, my Trucks and Armor exited the board and secured a Russian Victory.


A look at the Russians who successfully exited the board.


Relative positions of the forces at game end. My opponent gave the concession at the conclusion of Turn 6.  Not the greatest scenario we ever played, but it had its fun moments and it's never boring when King Tigers face off against IS-2's!!!