
As we approach the 4th of July Holiday, I was fortunate to have today and Friday off as holidays. (My boss still needed answers today, but a phone call out of the way and I was back to my blogging ways!). And since I thought I would not be working today, I set up a Wednesday game with my ol buddy Dan Best. It was my turn to pick and I selected a scenario from the March Madness The Players Pack. I still had not played three of the scenarios and I was eager to complete the entire pack.

So my choice for our Wednesday game would be MM45 Platamon Castle(designed by Dave Mareske and Dan Best). No current ROAR Data and the ASL Archive has it with 1 German and 1 New Zealand win.
One of the great things about ASL is the amount of history you learn just from the scenario cards. As Dan and I prepared to play last night, he brought me up to speed on the significance of the fight around Platamon Castle.
Situated near Larissa, Greece, Castle Hill was the controlling piece of terrain which would impede the German advance to the south. The ruins of Platamon Castle (dating back to the Byzantine Era) were occupied by New Zealanders determined to halt the German advance.
The Germans were moving rapidly towards a railway tunnel that went through he slopes near Mount Olympus. The tunnel and railroad tracks offered an excellent path for the Panzers to move rapidly to the south. The New Zealanders provided their typically tough defense and only gave ground when the Panzer numbers were simply too great to halt. But, before they left, they would succeed in blocking the railroad tunnel and disrupting the German timetable.


This Osprey Combat series volume is a an excellent source for more information on the fight for Platamon Castle. An entire chapter is devoted to Platamon with an awesome color plate that really shows fight from New Zealand and German vantage points.


After rolling for sides, Dan would end up commanding the men of the 21st Battalion, 5th Infantry Brigade, 2nd New Zealand Division. This force would consist of 4 x 4-5-8's, and 7 x 4-5-7's led by a 9-1, 8-1 and 8-0 with 4 x LMG's, 2 x ATR's, 2 x 51 MTR's , 8 x foxholes and 76mm Battalion Mortar OBA. Aside from the OBA, a bit of a brittle force. The infantry would certainly numerically equal to the German force, but the lack of heavier machine guns would limit both range and punch.

As the attacking Germans I would command the men of the 2nd Panzer Division. This force would consist of 8 x 4-6-8's, and 4 x 4-6-7's led by a 9-2, x 8-1's, and 8-0 with 2 x MMG's, 4 x LMG's and 2 x 50 MTR's. And for support I would have 5 x Panzer MK II (f's) with an 8-1 Armor Leader. Yeah...I was digging my force for this game. New Zealanders are tough....but my 2nd Panzer Division boys were ready to hang!

The battle space for tonight's game. The SSR's for this scenario made all woods brush, roads would be paths, and all orchards would be olive groves. Additionally, hexes adjacent to crags would be bog terrain. The victory conditions were variable. The German player can win immediately by exiting 25 or more VP off the south board edge of by controlling Hex DD3 (in the castle). A quick survey of the terrain would reveal that the east board edge was the easiest path for my tanks to go without fear of bogging. Of course it would take me directly by the castle which had a steeple location and would undoubtedly be home for New Zealand Radio/Arty observer. And as it was very narrow passage, OBA could be devastating. The more open approach on the west side lead to a gap between the hills, but crag locations would create many opportunities to bog. And the way I roll...bogs will happen.
So my plan would involve two mutually supporting objectives. Objective A would be for all of my tanks and the 8-1 Armor Leader to run for the south board edge. This represented 27 VP and should they all make it off the board edge...well then game over. Objective B would be assigned to all of my infantry. They would make a hard push to take control of the DD3 Hex and win the game by that means. So I would Schwerpunkt with a huge armor assault and my armor would protect my grenadiers until they reached the hill. Once at the hill, the tanks would kick it in gear and run for the board edge. The grenadiers would then assault the castle. At least that was the plan!!!

And now for Dan's Pre-Game Comments:
“The
New Zealanders must prevent the Germans from crossing the playing area and/or
capturing building 9DD3. The German
tanks are the biggest threat if all of them exit the Germans win. While there are not many AT weapons the crag
will channel the tanks into two avenues on board 9. Along the Y hex row and the GG board
edge. The ATRs will set up to defend the
tank avenues. The MTRs will set up in
9W2 and 9S5 each with a HS. Another
deployed HS will set up with the 8-0 in the tower to call OBA. The 9-1 will set up with the ATR in the DD3
building. The LMGs will set up in 9AA3,
9W6, 9U3 and 9S7. The 8-1 will be in
S7. the rest of the squads will space
out between with the last HS in 9DD3 ground level. Hopefully the OBA will break up the infantry
attack and a tank or two can be stopped by ATR or MG fire. The MTRs and OBA can also stop a tank.”

Dan's defense set up to counter an attack along the entire front. As I stated earlier, I had already decided on my A and B Objectives. As I looked over Dan's defense, it seemed to validate that my attack against his right flank (east board edge) would be a sound approach.

My 8-1 Armor Leader talks with a crewman...let's listen in..."Hans...wake up...it's time to do the wind change DR!" "But Leutnant....we can't let Grumble Jones roll the dice. He's been killing us lately wtih his bad die rolls" 'Ja, that's true Hans...but we'll be doing a lot of moving in this scenario...so we should be good!"

My turn 1 movement is a bit slow as the brush slows down my infantry as they armor assault with the Panzer II's. Ranges were still long for the New Zealanders, so Dan did not take many shots.

In his D-Fire, Dan made radio contact and made his card draw for battery access. It would be red, so nothing this phase. My Schwerpunkt formation would be highly vulnerable to a successful OBA. Dan also fired one of his mortars. Dan and I would both have some pretty decent rate tears with our mortars, but ultimately neither of us would do more than break a squad on the other side.

The dreaded RED CARD....no ARTY for you...

In my first D-Fire, I set my mortars to work on Dan's 4-5-8 with an ATR. I would succeed in breaking this squad and keeping it broken for much of the game.

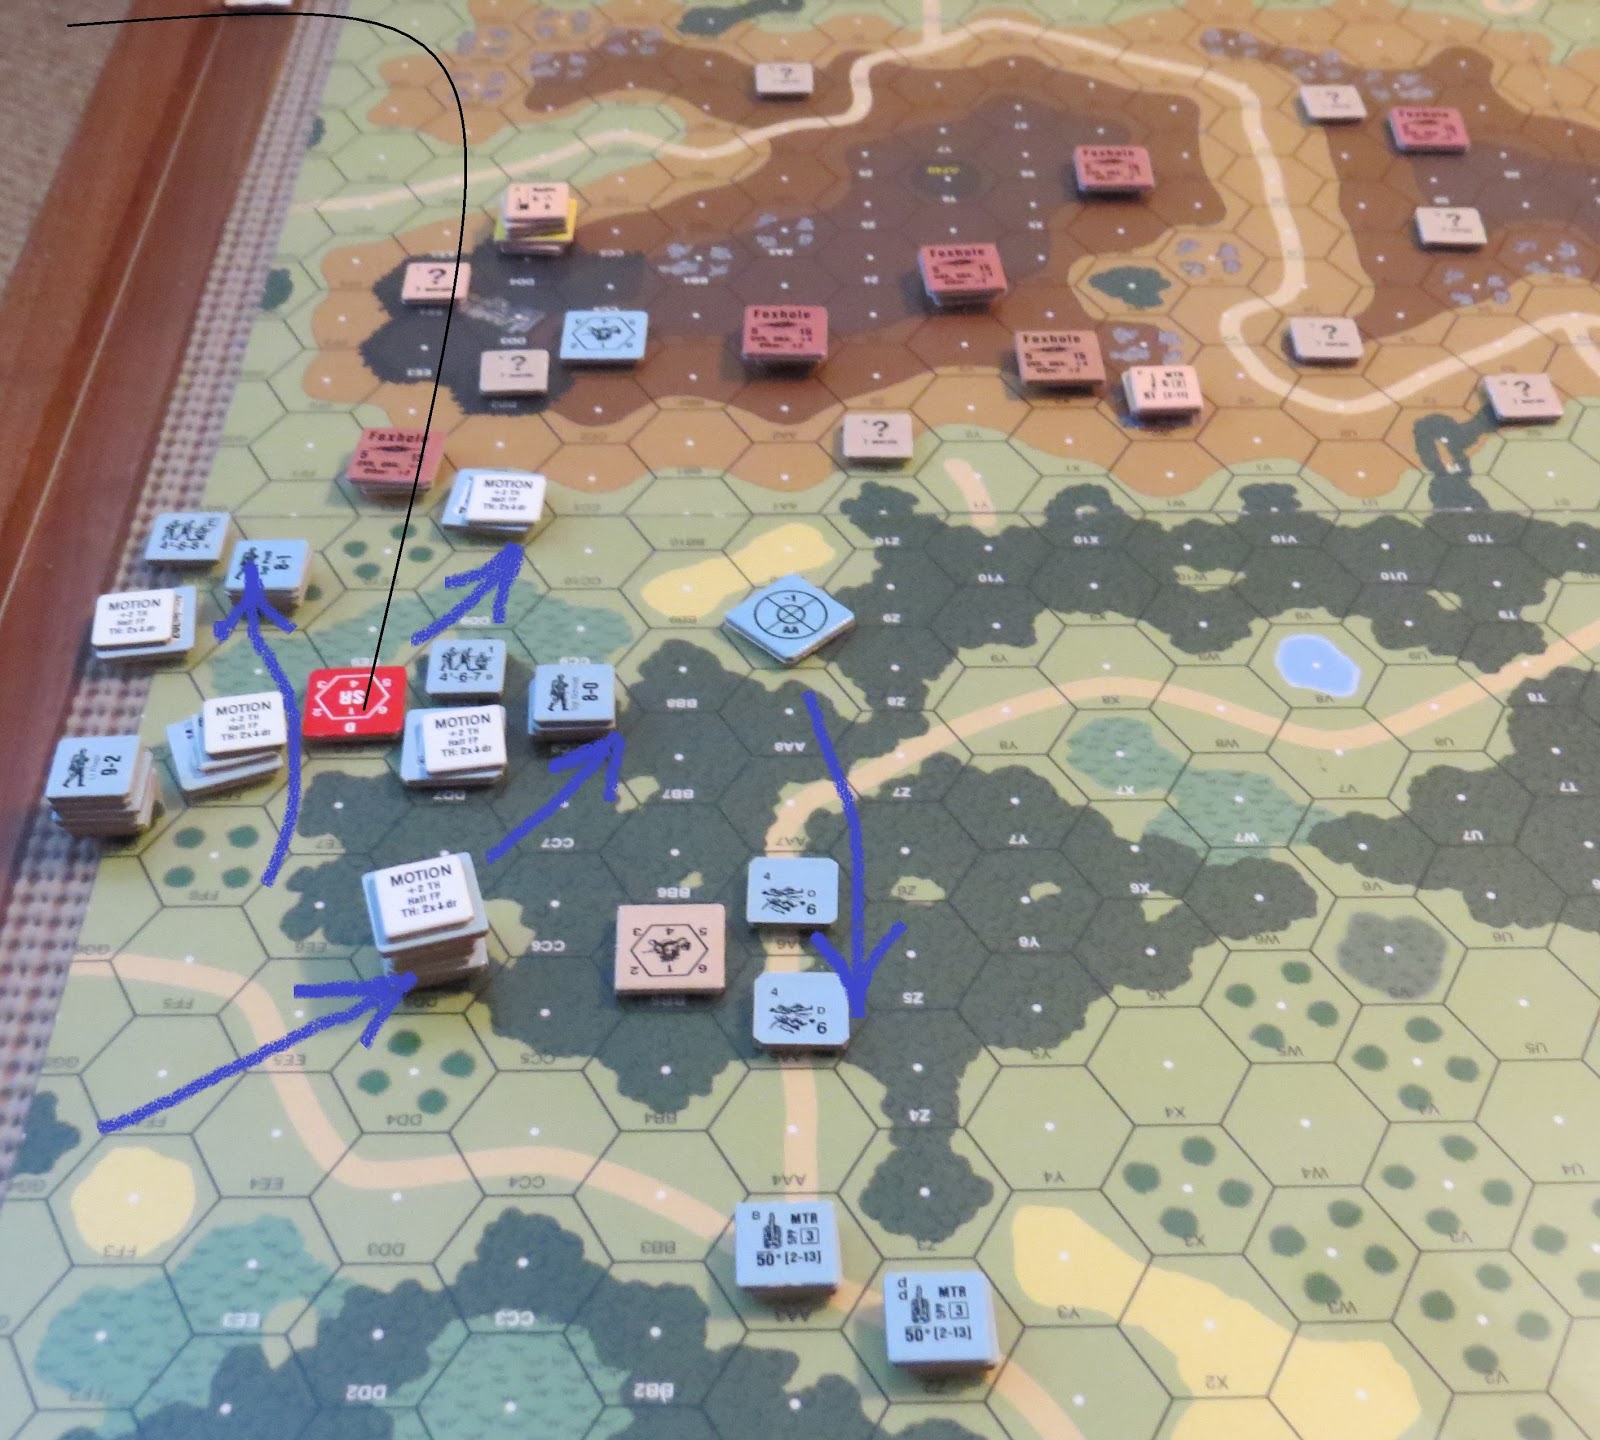
Turn 2 - I continue my armored assault along the east board edge. I sent two half-squads up the middle to draw fire and they did.

The OBA would finally come into play as the observer in the castle tower finally drew a black card!

The German advance limit after two turns.

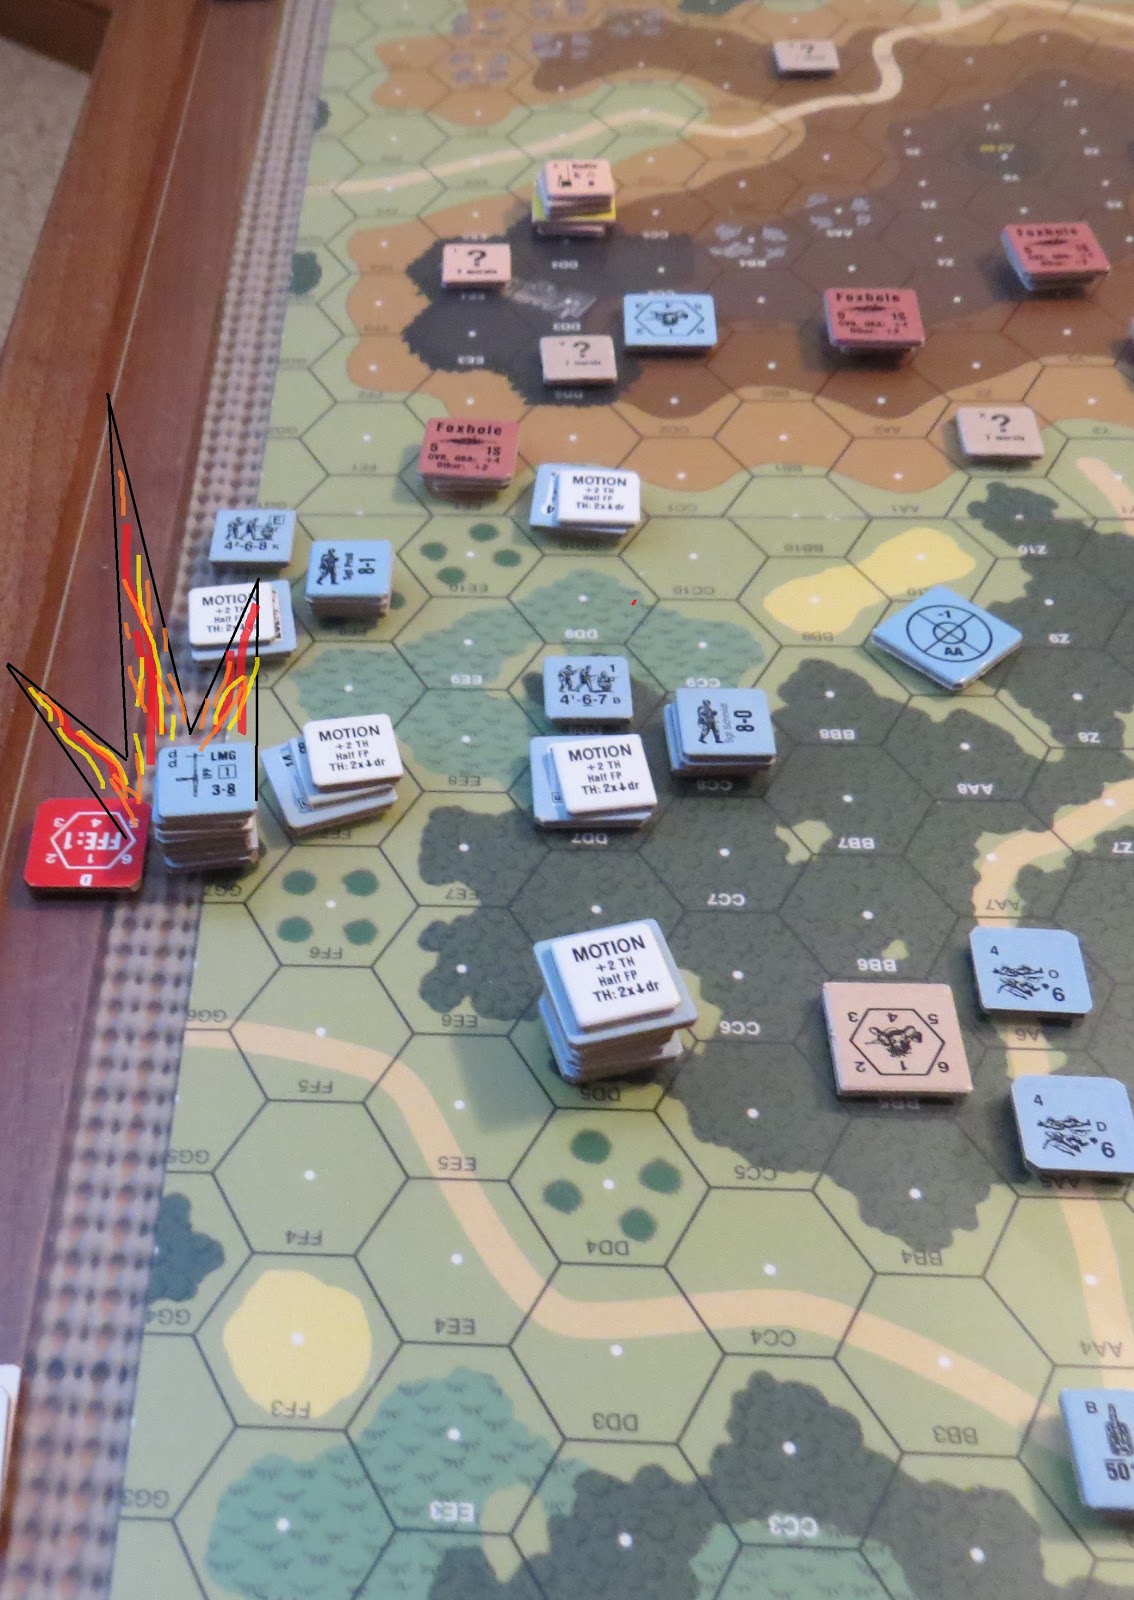
Dan's FFE hits my 9-2 stack and breaks him and a squad. Fortunately, that was the only damage Dan's OBA would do to me.


I would manage to break and wound the Radio Operator. The New Zealand ARTY would be removed for the remainder of the game.

My liquid luck potion was working well tonight.
Our dice roll check for this game would be as follows: Dan would not roll any snake eyes and I would roll 4. Dan would roll seven 11's and I would roll 6. Dan would roll three 12's and I would roll 2. So the dice roll luck would be strong for me tonight.

Turn 3 - with the ARTY down, and an ATR broken, it felt like the right time for my units to separate and go after their separate objectives. Four tanks would rush past the castle and head for the exit. A fifth tank would protect my infantry as they moved towards the castle. Dan's 9-1 and an ATR would fire at the tanks from the castle. Dan would shock one of the tanks.


Turn 4 - my shocked tank recovered and all 4 tanks and my 8-1 Armor Leader would successfully exit the south board edge for a total of 22 VP's.


My grenadiers would continue their advance towards the castle. Dan and I would trade mortar shots as his mortars went after my last remaining tank.


Turn 5 - my final Panzer II makes a run for the exit and makes it. Game over and a German victory with 27 VP exited off the south board edge.

My grenadiers would celebrate their victory with a sight seeing tour of the Acropolis. Tonight's game played quickly and it felt like it ended abruptly. Of course immediate win victory conditions are like that. My plan had worked better than I could have hoped for with the successful exit of all five tanks. Dan's ATR and LMG would both get hits, but Dan was unable to get the kills against my armor. A few more lucky rolls for Dan and the game would have gone very differently. My thanks to Dan for another of our great games!

And now for Dan's Post-Game Comments:
“The
plan did not work. The German
Schwerpunkt did a board edge creep and all five tanks made it past to exit for
victory. Even with the 8-1 reinforcing
that flank the German tanks only got one tank shocked and it recovered. Well played by Grumble Jones who picked a
good point of attack and kept the tanks moving to victory. This scenario a fun with a lot of
movement. And I have now lost as both
sides so it must be balanced. My thanks
to Grumble Jones for a great game!”

Dan and I will be back tomorrow night for a playing of RB 4- To the Rescue!
We will see you from the ruins of
Hall 4 Assembly Hall!!
No PDF file for Sunrise Surprise
ReplyDeleteI'll try and get that posted to the ASL Scenario Archive shortly.
Delete