

For our next Saturday Game - Dan Best and I would go BIG...DELUXE ASL in the house. As I have stated previously, I was never a big fan of DASL. I'm an old school guy and like the normal size hexes. But, I'll admit that it can be intriguing to play some DASL now and then. My last DASL game was against Dave Ginnard at the 2018 St. Louis Tournament. It was a good game as I recall. So what the heck...let's play another one right!?!
 I never purchased Streets of Fire or Hedge Row Hell back in the day. My friends in St. Louis had both, so we used their kit if we ever played a DASL scenario.
I had remained DASL free until the release of MMP's Winter Offensive Pack 9, which had three new DASL boards. The trifold SK style boards were intriguing and so when Deluxe ASL went on preorder, I decided to finally get onboard the DASL train.
So after our game last week, Dan and I were talking about what to play next. And in the course of thinking about it, we realized...DASL...we needed to play a DASL scenario.
Dan leafed through the updated DASL scenarios and selected DASL Scenario 29 - Lehr Sanction (designed by: Jan Himschoot). This scenario was originally released in the ASL Annual '91 by Avalon Hill. So it's an oldie reborn!

The '91 Annual is one of my favorites. It came at a time, when there weren't a thousand scenarios, so we would play a lot of these in the '90's. I still enjoy looking through this one from to time.
Many of the scenarios from this Annual have since been reprinted in other modules, etc., so you don't necessarily have to try and find this one on eBay in order to enjoy its scenarios.
 A look at the map boards for this scenario. ROAR has this scenario with 28 German wins and 17 British wins. The ASL Archive has it with 2 German an 0 British wins. So it would appear to be pro-German. And guess who drew the British...yep I did...I would get to be the British....woohooo!!!
The scenario is set during June 1944 in Normandy. The fight takes place at Lingevres, France and covers the confused action as elements of the British 50th Division and the German Panzer Lehr Division collided into one another. Despite several Panthers, the British Fireflys got the better of the Germans in the street fighting that marked much of the action.

 Dan would roll the Germans and would command the grenadier of the Panzer Lehr Division. This storied formation would be instrumental in the German defense of Caen and would suffer heavy damage to the Allied bombardments preceding Operation Cobra. But in the early days of June, the Division still packed a punch. Dan's force would consist of 12 x 4-6-8's, led by a 9-2, 9-1 and 2 x 8-0's with an HMG, 2 x MMG's, 3 x LMG's and 2 x Panzerschrecks. In support, Dan would have 4 x Panthers and a single Jagdpanzer IV. One very solid force!

As the defending British, I would command the men of the 2nd Durham Light Infantry and 4th/7th Dragoon Guards Regiment. This storied regiment would see action from the Sudan to the Boer War, Northwest Frontier, World Wars I and II, Cyprus, Korean and Malaya. An amazing record of service.

My force would consist of 5 x 4-5-8's, and 6 x 4-5-7's led by a 9-1 and x 8-1's with an HMG, an MMG, 3 x LMG's and 2 x Piats with 2 x Shermans and 2 x Sherman Fireflys.
The victory conditions require the Germans to control 2 more buildings at game end than the British. ROAR makes feel like it will be hard to stop the Germans...especially as I know Dan will no doubt hit me hard with a Schwerpunkt. Still not entirely sure how best to stop it. I always remember the military maxim..."He who defends everything defends nothing." So I will definitely try to set up a defense that gives me some flexibility to knock back the Schwerpunkt. We'll see if I was anywhere near successful. And maybe my dice will actually work with me instead of against me. A guy can hope!
 And now for Dan's Pre-Game Comments:
 So, some readers may not have every played DASL. So here's a comparison of the hex sizes. It's a substantial difference and DASL games tend to be much more close quarters as a result.
 DASL boards truly are and they do relieve some of the fat fingered stack knock overs that are a part of regular ASL boards. But having said that....I did hear Dan say something about knocking over a stack during our play of this scenario....so bigger doesn't always mean better!

A look at my defense. To win the scenario Dan would have to control 9 buildings. By SSR all building are two story, stone houses. So inherent staircases are NA. My most significant setup error would be the placement of my Sherman on the far left (east) board edge. I had totally forgotten that Dan's Turn 2 reinforcements came in on the east board edge. Talk about a real error. Dan of course would form a Schwerpunkt and come along the west side of the maps.
 What can I say here...by now...it's clear that I can't walk and chew gum at the same time. I set up my defense and then completely forget that my opponent is going to come in behind me.
So, I had no defense set up to contend with Dan coming in behind my defense. This would cost me heavily as I would my broken squads as they could not route back.
I can throw some humor at this, but at the end of the day, I have to do better.
 Turn 1- Dan's 9-2 kill stack would set up to PREP FIRE on my concealed MMG group H3. He forces a morale check. I snake it and then go berserk...and the squad manning the MMG would join their nutty leader to run to their deaths. (note: I hate this game.)

 I had a spread out defense and generally only a single squad in a hex, with a lot of my boys on level 1. Dan moved successfully into place without too much push back from my boys.

 On my part of Turn 1, I scrambled to move out of the line of fire on the right flank and tried to adjust my left back towards the center....forgetting of course that Dan would soon be coming from the left.

 Turn 2 - Oh look...a Panther and Jadgpanzer IV over on the left side. This is going to be fun...
 Dan came straight at me up the road. My Firefly would fire and miss...as would my Piat in the first floor to the left. His grenadiers would advance into the open and I would do nothing. My shots were not causing any breaks and many of my results were Pin Checks. You are not going to win any ASL game with Pin Checks.
My Firefly would manage to immobilize the Panther in my part of Turn 2.
 Close combat would ensue as I could not stop Dan's boys from getting adjacent to me. And my Firefly was destroyed by the immobilized Panther.

 Dan's reinforcements came in and began putting fire down on my boys from behind. My Piat was not able to respond due to the orchard blocking him in the level 1 location.
 My Piat would succeed in destroying the immobilized Panther, but the crew would escape and cause me sooooo much pain for the remainder of the game. I couldn't kill them with a point blank -2 when they bailed out. As has become a bit too common lately, I simply was unable to inflict damage consistently.

 Going into Turn 3 - I was down to four areas of resistance. Dan's tanks on the left couldn't take building locations away from me, so I was still in the fight. Stopping Dan's grenadiers was priority one.

 My Sherman in the center crossroads would hammer some of Dan's infantry in the village, but a Panzerschreck would take it down.


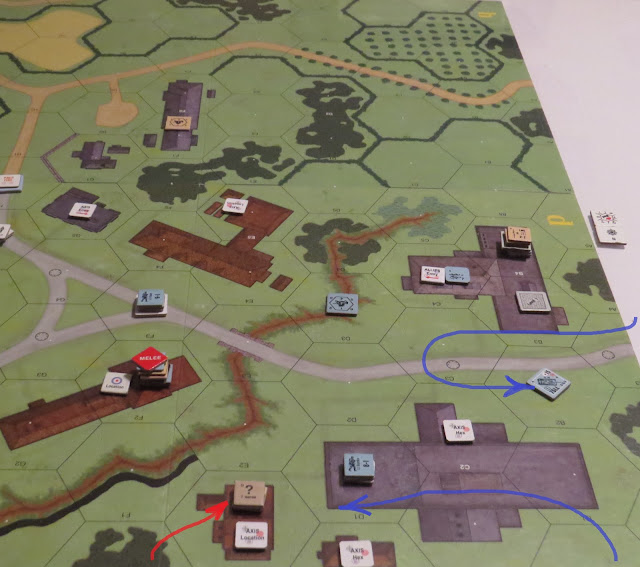
 Turn 3 - Dan's movements continue. His Panther on the left flank uses VBM to go around K3. I argued that VBM was restricted by the stone wall, but DASL gives a good look at the ability of the Panther to by pass between the building and the stone wall. I didn't like it...and still don't, but it was a good move that kept my Piat from firing at the Panther.
 I do struggle from time to time with VBM, but you have to be prepared for your opponent to put it to good use. DASL definitely allows you to see the battlefield in a different light and take advantage of moves you might miss in regular hex size ASL.
 In my part of Turn 4, a 4-5-7 would finally pass a PAATC and jump on the VBM'ing Panther in Close Combat. I would succeed in destroying it. Despite my failings against Dan's infantry, I was surprisingly successful against his Panthers.

 Close combat and MELEE would be the rule of the day as Dan and I grappled for control of the buildings. As my boys were locked down, Dan sent his boys to gather building locations and prepare to receive my reinforcements which would come in precisely where he was. You see Dan did remember where my reinforcements would arrive. So kudos to my opponent for playing a sharply played game.

 On my part of Turn 4, my 8-0 with a Radio came onto the board. Unfortunately, the Germans were already in control of the village, so his OBA services were probably too late to do much good.

 As Turn 4 drew to an end, I was down to a single good order 4-5-7 squad that was not either broken or in Melee with Dan's grenadiers.
 turn 5 - Dan's final Panther Tank (why he needed another one is unknown...) came on to the map and prepared to ambush my soon to arrive Sherman Firefly.


 My part of Turn 5 and my last Sherman Firefly arrives on the scene and will try and bypass the entire B3 building and come up behind Dan's ambushing Panther.

 Everything went ok....until I needed to roll for ESB as I was going a little beyond my MP allowance. I should have known better...as my dice truly hate me...that's right...you guessed it...BOXCARS...and with that little bit of BS...I gave my concession. Seriously, I'm starting to feel cursed in this game. Hot with emotion, I did a little anti-ASL word salad at the end of the game. Fortunately, Dan knows me well enough by now to know I was just venting. I wouldn't really give up playing ASL...well at least not yet!!!
 I get tired of complaining about dice rolls and I'm quite certain that my readers get weary of it too. You don't lose because of bad dice...but let's just say the difference between losing and suffering humiliation are definitely attributable to the dice. Humiliation has been served up cold for me the past couple games. I'm determined to play through this and come out on the other side of this dice addled Sargasso Sea.
 My Firefly sits immobilized and my intrepid 8-0 was killed in Close combat with a bunch of angry Germans...I guess the Radio BBC wasn't to their liking!
 A final look at the battle. Dan's Germans had won a decisive victory. I was broken both physically and emotionally. It had been a really fun scenario. I had performed miserably, but it was a great game and certainly a scenario that I would recommend. It's challenging for the British, but definitely winnable. Just not by me!! To my Saturday opponent, Mr. Dan Best...a tip of the hat for a great win. Dan is really hitting his stride against me this year. This would be another dominating win. This scenario is a great combination of various terrain types and lots of combined arms fighting. The DASL boards kept everything close and within range. The fighting was intense to say the least.

And now for Dan's Post-Game Comments:
"The plan worked. The Germans broke through in the center and got into the village. The tank battle was over by turn 2 with two tanks being destroyed by the German tanks and one to a PSK. All for the loss of one panther. An even exchange in CC and some cut route paths allowed the Germans to clear the center buildings and use the gully to get into the rear of the British. By turn 4 only one British squad remained good order. Although another panther was lost to street fighting. The scenario is a fun close quarters fight with good cover in the buildings and bocage leading to much CC action. Both sides had some fire phases with little results. My thanks to Grumble Jones for a great game."

Now...I may be feeling the pain of an ASL slump at the moment...but I won't stop playing this game anytime soon!
Time to start preparing for March Madness...look out Roy Connelly!!!
My dice might turn around yet!!!

 I never purchased Streets of Fire or Hedge Row Hell back in the day. My friends in St. Louis had both, so we used their kit if we ever played a DASL scenario.
I had remained DASL free until the release of MMP's Winter Offensive Pack 9, which had three new DASL boards. The trifold SK style boards were intriguing and so when Deluxe ASL went on preorder, I decided to finally get onboard the DASL train.
So after our game last week, Dan and I were talking about what to play next. And in the course of thinking about it, we realized...DASL...we needed to play a DASL scenario.
Dan leafed through the updated DASL scenarios and selected DASL Scenario 29 - Lehr Sanction (designed by: Jan Himschoot). This scenario was originally released in the ASL Annual '91 by Avalon Hill. So it's an oldie reborn!

The '91 Annual is one of my favorites. It came at a time, when there weren't a thousand scenarios, so we would play a lot of these in the '90's. I still enjoy looking through this one from to time.
Many of the scenarios from this Annual have since been reprinted in other modules, etc., so you don't necessarily have to try and find this one on eBay in order to enjoy its scenarios.

The scenario is set during June 1944 in Normandy. The fight takes place at Lingevres, France and covers the confused action as elements of the British 50th Division and the German Panzer Lehr Division collided into one another. Despite several Panthers, the British Fireflys got the better of the Germans in the street fighting that marked much of the action.

 Dan would roll the Germans and would command the grenadier of the Panzer Lehr Division. This storied formation would be instrumental in the German defense of Caen and would suffer heavy damage to the Allied bombardments preceding Operation Cobra. But in the early days of June, the Division still packed a punch. Dan's force would consist of 12 x 4-6-8's, led by a 9-2, 9-1 and 2 x 8-0's with an HMG, 2 x MMG's, 3 x LMG's and 2 x Panzerschrecks. In support, Dan would have 4 x Panthers and a single Jagdpanzer IV. One very solid force!
As the defending British, I would command the men of the 2nd Durham Light Infantry and 4th/7th Dragoon Guards Regiment. This storied regiment would see action from the Sudan to the Boer War, Northwest Frontier, World Wars I and II, Cyprus, Korean and Malaya. An amazing record of service.
My force would consist of 5 x 4-5-8's, and 6 x 4-5-7's led by a 9-1 and x 8-1's with an HMG, an MMG, 3 x LMG's and 2 x Piats with 2 x Shermans and 2 x Sherman Fireflys.
The victory conditions require the Germans to control 2 more buildings at game end than the British. ROAR makes feel like it will be hard to stop the Germans...especially as I know Dan will no doubt hit me hard with a Schwerpunkt. Still not entirely sure how best to stop it. I always remember the military maxim..."He who defends everything defends nothing." So I will definitely try to set up a defense that gives me some flexibility to knock back the Schwerpunkt. We'll see if I was anywhere near successful. And maybe my dice will actually work with me instead of against me. A guy can hope!
And now for Dan's Pre-Game Comments:
“The Germans must capture two more of the 17 building on
board d than the British have at game end.
This terrain is high on cover and low on options for the tanks. Both panthers will attack down the single
road between boards h and d. The
infantry will form two kill stacks one with the 9-2 with the HMG, MMG and a
PSK. The second with the 9-1 and a MMG,
LMG and PSK. These will alternate prep
firing and moving with the 9-1 stack moving first in armored assault with a
panther. The 8-0 will lead the other groups
each with a deployed squad and squad. On
the right flank, the 8-0 will have an extra squad with the LMG. The other LMG and squad will armored assault
with the second tank. The assault will
aim to attack down the middle of the board with one of the 8-0 groups going
along the right flank. The objective is
to break the British force in two and eliminate the western side first. Hopefully the Germans can win the tank duel and
clear most of the village before the OBA arrives.”


A look at my defense. To win the scenario Dan would have to control 9 buildings. By SSR all building are two story, stone houses. So inherent staircases are NA. My most significant setup error would be the placement of my Sherman on the far left (east) board edge. I had totally forgotten that Dan's Turn 2 reinforcements came in on the east board edge. Talk about a real error. Dan of course would form a Schwerpunkt and come along the west side of the maps.

So, I had no defense set up to contend with Dan coming in behind my defense. This would cost me heavily as I would my broken squads as they could not route back.
I can throw some humor at this, but at the end of the day, I have to do better.


Yep...


My Firefly would manage to immobilize the Panther in my part of Turn 2.


As in last week's game, Dan's boys were playing mistake free ASL and getting results.


A look at Dan's push into the village as Turn 3 began.


"Der Englaender kommt sofort...wir warten auf dich..."

Melee...close combat and surrendering brokies...a fun way to end Turn 4.


"Have no fears, French folk...we'll take care of that Jerry Panther! "


Dan's boys would celebrate a great win!
"The plan worked. The Germans broke through in the center and got into the village. The tank battle was over by turn 2 with two tanks being destroyed by the German tanks and one to a PSK. All for the loss of one panther. An even exchange in CC and some cut route paths allowed the Germans to clear the center buildings and use the gully to get into the rear of the British. By turn 4 only one British squad remained good order. Although another panther was lost to street fighting. The scenario is a fun close quarters fight with good cover in the buildings and bocage leading to much CC action. Both sides had some fire phases with little results. My thanks to Grumble Jones for a great game."

Now...I may be feeling the pain of an ASL slump at the moment...but I won't stop playing this game anytime soon!
Time to start preparing for March Madness...look out Roy Connelly!!!
My dice might turn around yet!!!

Dan and I will return next Saturday for a playing of ASL Scenario
FT223 The Kings of Bollersdorf...
King Tigers and IS-II's...good times win or lose!!!
No comments:
Post a Comment