

For our Saturday Game, Dan Best and I left the ruins of Stalingrad for the sunny fields of Normandy. After so much recent East Front Action, it would be a nice change of pace to play something in Normandy. Our choice for this day's action would be ASL Scenario 15 - Trapped (designed by Don Greenwood). Trapped first appeared in Paratrooper and is one of those scenarios that my St. Louis group would pass over due to it's 2-Part nature. Strange how the simplest thing could cause us to pass over a scenario. So I had never played it and neither had Dan. We were going to correct that situation and finally play Trapped!!

Paratrooper has always been one of my favorite modules. Coming on the heels of Beyond Valor as it did, it was nice to have the Americans so early in the ASL rollout. It was infantry oriented which was another plus and my St. Louis gaming group struggled at times to make the transition from Squad Leader/Cross of Iron armor rules to full ASL armor rules. Looking back now...I see how we really deprived ourselves in those early years by not just playing everything we could regardless of rules, etc. But I will admit that group of players still hasn't played much DTO or PTO in the past thirty years either. Some of that comes down to being more "Beer & Pretzels" wargamers and not always loving the complexity of ASL rules. Of course each to their own as far as gaming likes and dislikes go.
This scenario takes place near Saint-Come-du-Mont, France on June 8th, 1944. Von der Heydte's mixed force of Grenadiers and Fallshirmjaeger had held out in Saint-Come-du-Mont for as long as possible, but as reinforcements began to come fromt he invasion beaches, it was clear that the time to escape had arrived. Von der Heydte gathered his force and attempted to break out towards Carentan.


The ASL Archive shows this scenario with 6 German wins and 1 American win. ROAR shows it with 52 German wins and 32 American wins. It definitely appears to favor the Germans. Historically, Von der Heydte was not successful in breaking through the lines of the 501st PRI. They Germans would escape, but not before losing most of their heavy equipment and vehicles.
As I mentioned earlier this scenario is not your run of the mill scenario. It plays out in two parts. Each part is 7 turns long. The Germans win imediately by exiting 10 or more squad equivalents off the south board edge during Part or Part II. The Germans lose immediately during Part I if at the end of any German Player Turn there is less than 1 German squad equivalent so many hexes from the north board edge each turn. In short, the Germans have to keep moving at least one hex row each turn to ensure that they are not subject to this SSR VC. So the German player has to keep moving into the teeth of the American defense. YIKES...that's rough.
Now Part I ends either after Turn 7 or at any point during which the Germans have 9 or less unbroken squad equivalents. Part II reduces German ELR and SAN number, but replaces losses, so that the Germans have 19 squads for each Part. The Americans receive no reinforcements. So everything lost in Part I is gone when the Americans set up again for Part II. There is of course a bit more detail, but you'll just have to read that when you play this scenario yourself.

After rolling for sides, Dan would be the attacking Germans. Dan would command a mixed force composed primarily of Fallschirmjaegers from the 6th Fallschirmjaeger Regiment and grenadiers of the III Battalion, Grenadier Regiment 1058. Dan's force for Part I would consist of 19 x 4-6-7's led by a 9-1, 8-1, 2 x 8-0's, and a 7-0 with 3 x MMG's, 5 x LMG's and 2 x 5cm Mortars. A very robust force to say the least.

As the defending Americans, I would command the Paratroopers of the 3rd Battalion, 501st Parachute Infantry, 101st Airborne. I do love me some Screamin' Eagles!!! My force would consist of 12 x 7-4-7's, and a 3-3-7 led by a 9-2, 8-1, 8-0 and 7-0 with 2 x MMG's, 5 x Bazookas, and 2 x 6cm Mortars with 7 x Foxholes to hide in when the shooting starts!!
AAR NOTE: There won't be any Pre-Game or Post-Game Commentary from Dan for Part I. He'll provide that for both Parts with next week's AAR for Part II and the conclusion of this scenario.

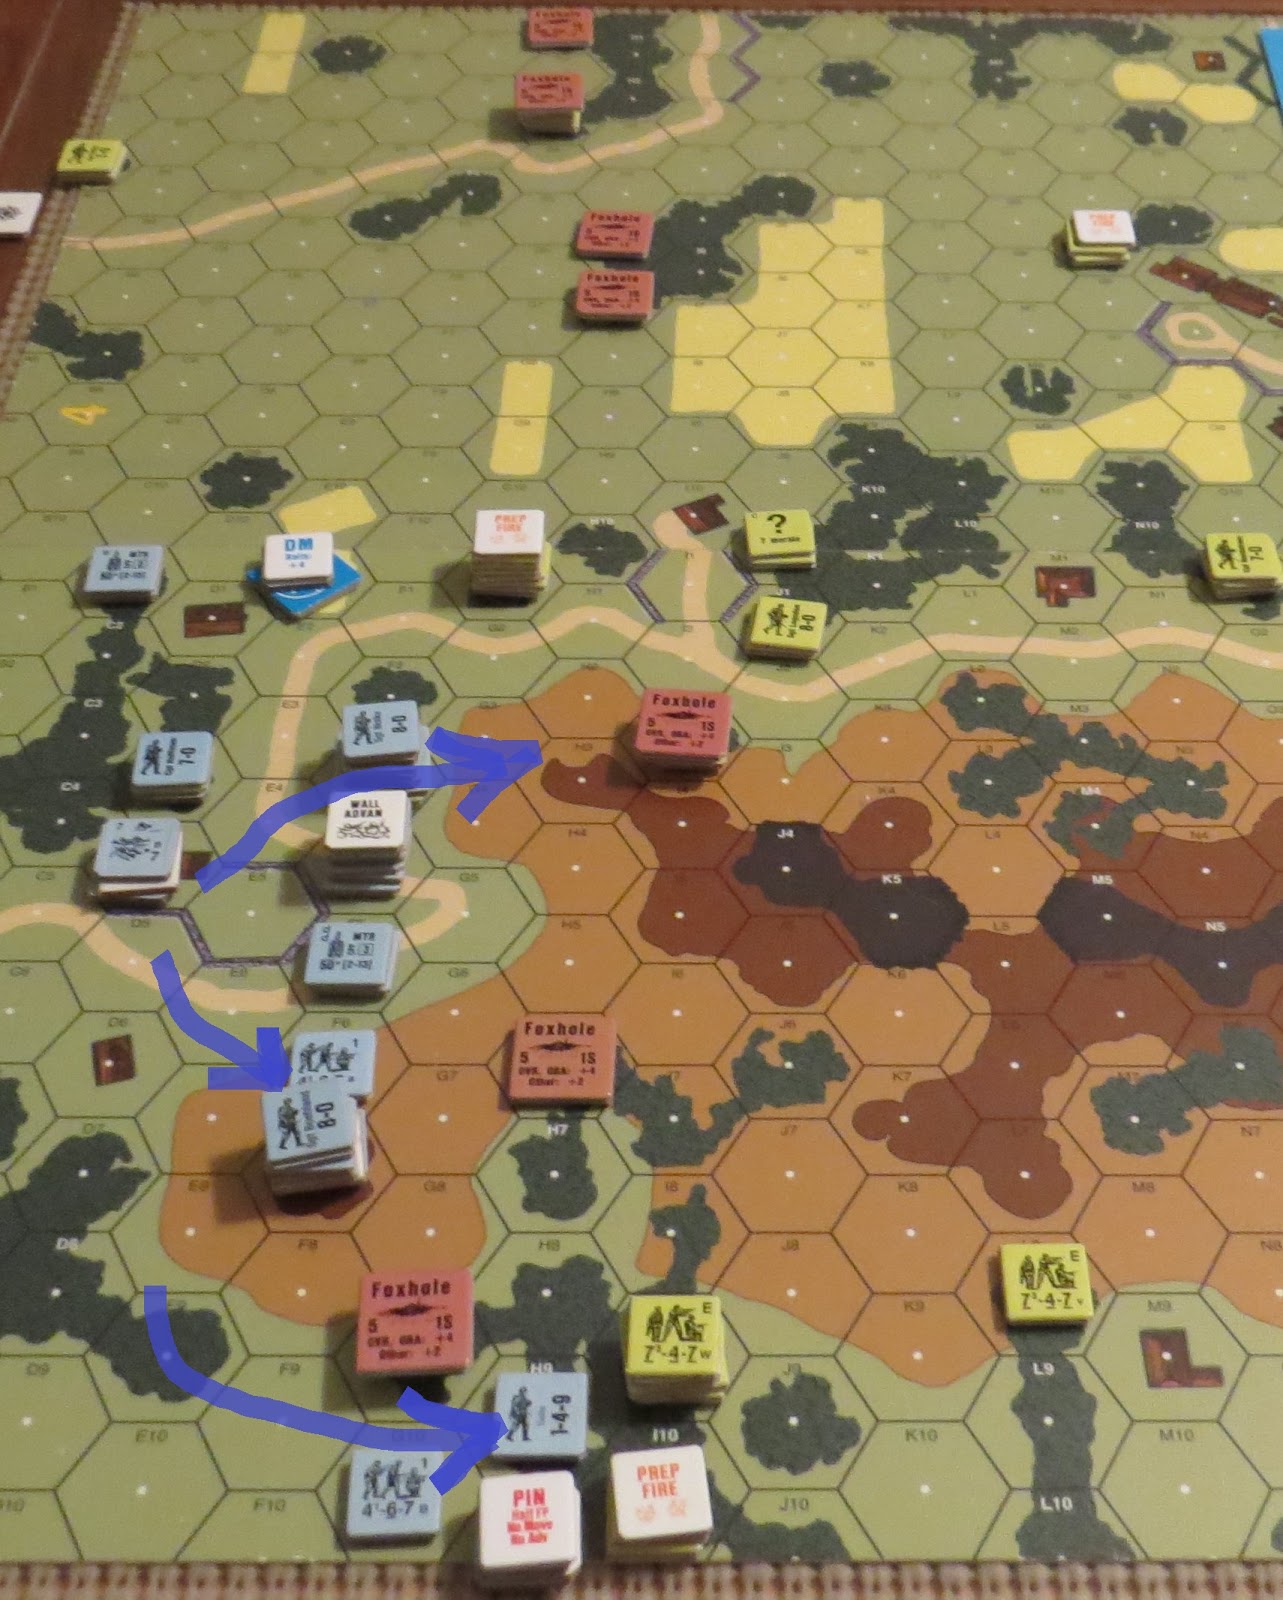
Not knowing where Dan's Schwerpunkt was going to come from, I made a guess and for once I would be right. my strength was concentrated on the west side of the map and sure enough Dan's Schwerpunkt showed up there. Of course...you don't have to be genius to guess that your opponent will come where the terrain is a bit favorable.


So in my part of Turn 1, I decided to be bold and my boys on the east edge made a move to push Dan's forces back towards the north board edge. My thinking here was that forcing Dan back could help me get the immediate win if Dan's forces were not sufficiently forward each turn. My plan would not work.


Dan's next assault would include back to back Snake Eyes which would result in Hero Creation. He would also start to break my boys and destabilize my line.


Yep...Dan was taking 16 and 20+ factor shots at my boys.

Just like that Dan was in my grill and I was starting to sweat...all it would take for my line to crumble would be one or two breaks. Fortunately, I would make most of my morale checks.

Getting his machine guns into action was one of the more important actions in Turn 2. Dan needed the firepower to punch through my positions.

Both of us would fire mortars...but Dan would have a nearly 7 shot rate of fire tear that would finally get a critical hit and break my H6 position. My line was being unhinged. My 3-3-7 half-squad in the F3 house would be forced to surrender. And my boys that had come down from the east edge would both be broken. Things were starting to look a little bit Teutonic!!


But Dan's next assault would have to move through a serious fire lane that would break or eliminate half-squads and squads alike. My 9-2 was controlling the battlefield at this point in the game.


But despite the success, I had to fall back on the west edge. There was simply too much German firepower aimed at me.

"Cease fire...fall back!"
Turn 4 - Dan continued to press the attack.


In my part of Turn 4, I managed to get some key breaks and would eliminate Dan's Hero in close combat. At this point, Dan fell below 9 unbroken squad equivalents and Part I ended.

My boys had managed to hold.

At the end of Part I, a resorting of the available forces, before starting Part II.

Ok...that's a wrap for Part I. Hope you'll join us for the conclusion of ASL Scenario 15 - Trapped...Part II next Saturday!
No comments:
Post a Comment